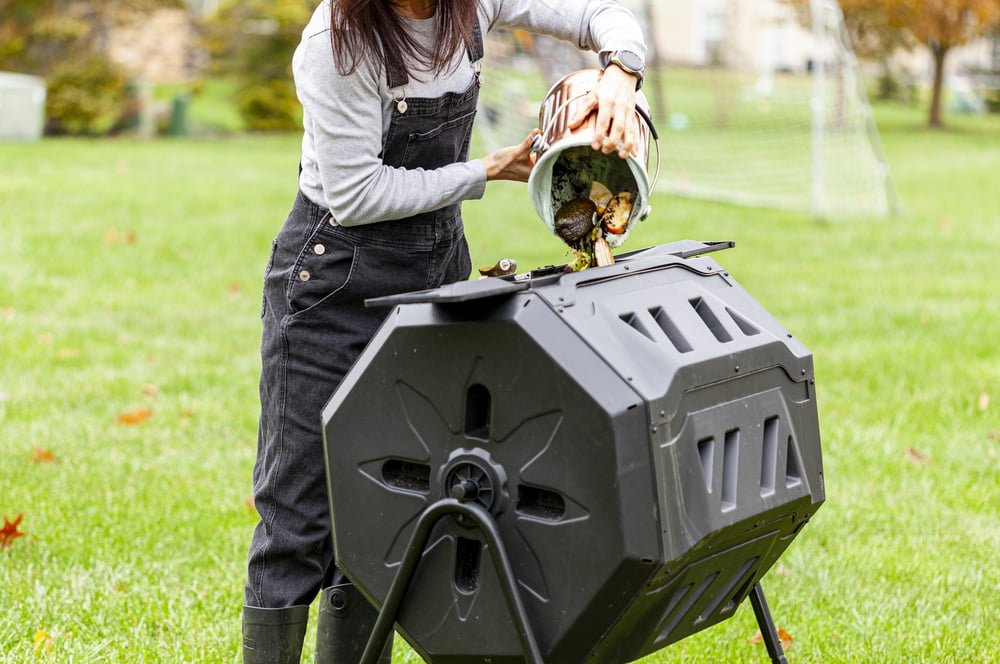
Composting is not only a great way to recycle your kitchen scraps and yard waste, but it’s also an awesome method for creating nutrient-rich soil for your garden.
There are two main composting techniques that you can choose from – hot composting and cold composting. Don’t worry; neither of these methods will set your backyard on fire! They simply refer to the temperature at which the organic materials break down.
In this article, we’ll explore both hot and cold composting methods so that you can decide which technique works best for you and keeps your garden in tip-top shape.
We understand how important safety is when trying new things around our homes, so rest assured we’ve got you covered with all the information you need to start composting confidently today.
So grab your gardening gloves, let’s dive into the world of composting together!
The Fundamentals Of Composting
Composting is nature’s way of recycling organic matter into nutrient-rich soil that supports plant growth. By understanding the fundamentals of composting, you can create an environment where your plants will flourish while also reducing waste.
Hot and cold composting are two common techniques used to break down organic materials like leaves, grass clippings, kitchen scraps, and more into usable nutrients for your garden. Hot composting involves rapidly breaking down material in large piles or bins using high heat generated by microorganisms within the pile itself. This method requires regular turning to maintain oxygen levels but results in rich, dark compost in just a few weeks or months.
On the other hand, cold composting relies on slower decomposition over time without added heat or frequent maintenance; this approach may take up to a year before producing finished compost. Understanding which technique best suits your needs comes down to factors such as available space, desired speed of decomposition, and personal preference regarding effort level involved in maintaining the process.
Both hot and cold methods offer benefits for creating healthy gardens as well as contributing positively to environmental efforts by repurposing organic waste instead of sending it to landfills. Whichever technique you choose, remember that patience and attention yield incredible rewards – not only for your garden but also for our planet!
Principles Of Hot Composting
Hot composting is a fast and efficient way to turn your kitchen scraps and yard waste into nutrient-rich soil for your garden. It’s called ‘hot’ because the microorganisms that break down the materials generate heat as they work, creating temperatures between 130°F (55°C) to 160°F (70°C). This warmth not only speeds up the decomposition process but also kills weed seeds and disease-causing organisms, making it a safe option for many gardeners.
To start hot composting, you’ll need a good mix of materials. These include green items like fruit and vegetable peels, grass clippings, coffee grounds, and eggshells; as well as brown items such as leaves, straw, wood chips or small branches. The key is to have the right balance of carbon from brown materials and nitrogen from green ones. A ratio of about 30:1 works best – meaning 30 parts carbon to every one part nitrogen.
Layer these ingredients in your compost bin or pile so air can circulate freely through them.
One important aspect of hot composting is turning the pile regularly. This helps ensure all parts get exposed to oxygen, which aids in speeding up decomposition while keeping smells at bay. You should aim to turn your pile once a week or when its temperature starts dropping below 130°F (55°C).
After a few weeks of regular turning and maintaining proper moisture levels – damp but not soaking wet – you will notice that your pile has turned into rich dark humus full of nutrients ready for use in your garden!
Remember that safety comes first when handling decomposing material; always wear gloves and wash hands thoroughly after working with compost.
Benefits Of Hot Composting
Now that we’ve explored the principles of hot composting, let’s dive into some of its noteworthy benefits. Did you know that a well-maintained hot compost pile can reach temperatures between 130 and 160 degrees Fahrenheit? This heat offers several advantages over cold composting methods, making it an attractive choice for gardeners seeking a safe and efficient way to recycle organic waste.
Here are three key benefits of hot composting:
- Faster decomposition: The high temperatures generated in a hot compost pile speed up the breakdown process significantly. Organic materials can be transformed into nutrient-rich humus within just a few weeks or months compared to the six months to two years it may take for cold composting.
- Kills pathogens and weeds: Because of the intense heat produced during hot composting, harmful bacteria, viruses, fungi, and weed seeds present in your organic waste will likely be destroyed. This ensures that your finished compost is both safe for use around plants and won’t introduce unwanted weeds into your garden beds.
- Less odor: A properly managed hot compost pile emits very little smell due to its aerobic nature. Oxygen-loving microbes break down organic matter efficiently without producing unpleasant odors common in anaerobic (oxygen-poor) environments like those found in many cold piles.
Safety-conscious gardeners who want quick results with minimal risks should seriously consider adopting hot composting techniques. By creating conditions conducive to rapid decomposition while neutralizing potential hazards such as pathogens and weeds, this method provides peace of mind alongside premium-quality garden amendments. Plus, you’ll enjoy less offensive smells wafting through your yard!
So why not give hot composting a try – your plants will certainly thank you for it!
How To Set Up A Hot Compost Pile
Now that we know the benefits of hot composting, let’s dive into how to set up a hot compost pile.
First, choose an ideal location for your compost pile; it should be in a well-draining area with easy access to water and some shade. Remember, safety comes first, so keep it away from flammable materials and structures.
Next, gather all your ingredients: brown (carbon-rich) materials like dry leaves or straw and green (nitrogen-rich) materials such as kitchen scraps or grass clippings. Aim for a 2:1 ratio of browns-to-greens to create the perfect balance for healthy decomposition. Layer these materials in alternating layers about six inches thick while adding water between each layer to ensure moisture is evenly distributed throughout the pile.
You can also include items like eggshells, coffee grounds, and small branches but avoid meat, dairy products, and diseased plants – these might attract unwanted pests or slow down the process.
Once you’ve built your pile to around three feet high with alternating layers of greens and browns, use a pitchfork or shovel to turn it every few days or at least once a week. This allows oxygen to flow through the pile which is essential for creating heat within it.
Don’t worry if you see steam coming out when turning your compost – this means it’s working! As long as you maintain proper conditions by keeping the right balance of materials and regularly turning your pile, you’ll have rich compost ready for use in just two months!
Maintaining A Hot Compost Pile
Monitoring Temperature: You’ll need to check the temperature of your compost pile regularly to make sure it’s hot enough. If it’s too cold, you’ll need to add more material and mix it in to get it hot again.
Adding Nutrients: You should add nitrogen-rich materials like grass clippings and food scraps to your pile to help it heat up. Don’t forget to add carbon-rich materials like dried leaves and wood chips too!
Monitoring Temperature
There’s nothing quite as satisfying as watching your compost pile heat up and transform into nutrient-rich soil, right?
Maintaining a hot compost pile can be an exciting and rewarding process. One of the most critical factors in ensuring success is monitoring temperature.
As you may know, a hot compost pile requires consistent temperatures between 130°F to 160°F (54°C to 71°C). To keep track of these numbers, it’s essential to have a reliable thermometer on hand.
Compost thermometers are specially designed for this purpose, with long probes that reach deep into the center of the pile. It would help if you took readings daily or every other day, stirring the pile each time to redistribute heat evenly. This way, you’ll ensure all parts get enough warmth while also checking whether your efforts pay off.
Keeping an eye on your compost’s temperature not only ensures effective decomposition but also helps safeguard against potential hazards such as spontaneous combustion or foul odors.
By maintaining optimal temperatures, harmful pathogens will be killed off naturally without any need for chemicals which could bring harm to both ourselves and our environment.
So go ahead – grab that thermometer and start enjoying the benefits of a well-managed hot compost pile!
Adding Nutrients
Now that you’ve got your trusty thermometer and are keeping an eye on the temperature, it’s time to focus on adding nutrients to your hot compost pile.
A well-balanced mix of materials is crucial for providing the necessary elements for decomposition and creating nutrient-rich compost. You’ll need a combination of carbon-rich ‘browns’ like dried leaves or straw, and nitrogen-rich ‘greens’ such as grass clippings, fruit scraps, or vegetable peels.
Don’t worry; making sure your compost has all the right stuff isn’t as complicated as it sounds! Just remember to add equal amounts of browns and greens while also turning the pile regularly to aerate it properly.
This simple practice will maintain optimal conditions for microorganisms to break down organic matter effectively. Plus, by diversifying what goes into your compost heap, you’re ensuring a rich blend of nutrients in the final product – perfect for nourishing your plants!
Consistently monitoring temperature and supplying essential nutrients can feel like quite the responsibility but trust us – this extra effort pays off big time when you see how healthy and vibrant your garden becomes thanks to that homemade gold you created.
So keep up the good work and watch in awe as Mother Nature transforms waste into valuable resources!
Troubleshooting Common Hot Composting Issues
One issue many people face with their hot compost piles is the lack of heat. A proper hot compost pile should reach temperatures between 130°F and 160°F (55°C – 70°C). If it doesn’t, this could mean several things are wrong: there might not be enough nitrogen-rich materials like grass clippings or food scraps; perhaps the pile isn’t getting enough air circulation due to compaction; or maybe it’s simply too small.
To remedy these problems, try adding more green materials rich in nitrogen, turning your pile regularly to improve airflow, and ensuring your heap is at least three feet tall and wide.
Another common problem encountered by those attempting hot composting is foul odors emanating from the pile. This unpleasant smell usually indicates that anaerobic bacteria have taken over because there isn’t sufficient oxygen available for aerobic organisms to do their work efficiently. Instead of breaking down organic matter quickly into nutrient-dense humus, the anaerobic microbes produce methane gas which has a distinctively pungent aroma similar to rotten eggs.
To combat this issue, turn your compost more frequently – about once every week – so that fresh air can enter the mix and support beneficial aerobic decomposition processes while suppressing odor-causing anaerobes. With some simple adjustments and care, you’ll soon find yourself reaping the benefits of a healthy hot compost system while keeping any unwanted smells at bay!
Principles Of Cold Composting
Now that we’ve explored the world of hot composting, let’s dive into cold composting! Cold composting is a more laid-back approach to creating nutrient-rich soil for your garden. It’s perfect if you’re looking for a simple and safe method to recycle your kitchen scraps and yard waste without much hassle. Don’t worry; even though it takes longer than hot composting, your plants will still love the end result!
To start with cold composting, all you need is an outdoor space where you can pile up organic materials like leaves, grass clippings, fruit peels, and vegetable scraps. There’s no need to turn or monitor the temperature of your pile – just let nature do its thing!
Over time (usually about 6-12 months), these materials break down slowly through the action of worms, insects, bacteria, and fungi. This process creates that rich humus that helps improve soil structure while also providing essential nutrients for plant growth.
So go ahead and give cold composting a try in your own backyard! Not only does this technique provide a safe haven for beneficial critters who help decompose organic matter but also reduces landfill waste by recycling those kitchen leftovers. Remember to be patient as good things take time – before long, you’ll have some fantastic homemade fertilizer ready for use in your beloved garden oasis!
Benefits Of Cold Composting
Cold composting is the superhero of gardening techniques, swooping in to save the day with its easy and low-maintenance approach. Unlike hot composting, which requires constant monitoring and turning of the pile to maintain high temperatures, cold composting is a more relaxed method that allows nature to do most of the work.
It’s perfect for busy individuals who still want to contribute to a greener environment without having to put in too much effort. There are several benefits when it comes to cold composting:
- Convenience: Cold composting doesn’t require as much time or attention compared to hot composting. Just add your kitchen scraps and yard waste, mix occasionally, and let nature do its thing.
- Less odor: Since decomposition occurs at a slower pace in cold compost piles, there’s less chance for unpleasant smells that might bother you or your neighbors.
- Preserved nutrients: The slow breakdown process means that essential nutrients remain intact within the organic materials rather than being lost through evaporation or runoff.
- Attracts beneficial organisms: A diverse array of microorganisms, insects, and worms thrive in colder environments; these helpful critters play a crucial role in breaking down waste while enriching your soil.
Cold composting may take longer than its hotter counterpart – sometimes up to two years – but patience pays off with rich, nutrient-dense humus that will give your plants an extra boost. Plus, this laid-back technique can be done year-round so you won’t have any gaps in nourishing your garden even during winter months!
By embracing cold composting methods, not only does it make life easier for those strapped on time but also provides numerous ecological advantages by recycling organic waste instead of sending them off into landfills – making our planet healthier one heap at a time.
How To Set Up A Cold Compost Pile
Now that you’re familiar with the benefits of cold composting, let’s dive into setting up your very own cold compost pile. Don’t worry; it’s not as daunting as it might seem! With just a few simple steps and some patience, you’ll soon have rich, nutrient-filled compost to use in your garden.
First things first: choose a suitable location for your compost pile. You’ll want to find a spot with good access to water and enough space for turning the pile occasionally – this helps aerate the material. Look for an area that has partial shade so that the pile doesn’t dry out too quickly or overheat in direct sunlight.
Once you’ve found the perfect place, start gathering materials to build your pile. A mix of green (nitrogen-rich) and brown (carbon-rich) materials is essential. Green materials include fruit and vegetable scraps, grass clippings, coffee grounds, and tea bags. Brown materials consist of leaves, straw, small branches, paper products like newspaper or cardboard.
With everything collected, it’s time to assemble your compost heap! Start by laying down a layer of coarse brown material like twigs or small branches – this will help create air pockets at the bottom of the pile for better airflow. Follow this with alternating layers of green and brown materials until you reach about 3 feet high or more if space allows.
Remember to keep these layers relatively even but don’t stress if they aren’t perfect; nature isn’t always precise either! Be sure to dampen each layer as you go along since moisture is crucial for decomposition. Keep adding new items whenever available while giving the pile occasional turns using a pitchfork or shovel to ensure proper ventilation.
And there you have it – setting up a cold compost pile is easy peasy when following these simple guidelines! Just remember that patience is key because cold composting takes longer than hot methods – anywhere from six months to two years. But the wait is worth it because your garden will thank you for all those amazing nutrients. So go ahead, start composting today and play a part in making our planet healthier!
Maintaining A Cold Compost Pile
When it comes to composting, there are two main methods: hot and cold.
To maintain a cold compost pile, you’ll need to choose the right materials, such as yard clippings, food scraps, and shredded newspaper.
You’ll also need to aerate the pile regularly, by turning it with a pitchfork or shovel.
Doing this will help the pile to decompose, and eventually give you natural fertilizer for your garden.
Choosing Materials
First things first, let’s talk about those lovely green materials. Green materials are rich in nitrogen and provide essential nutrients for microorganisms working hard in your compost pile. Some of our favorite green items include grass clippings, fruit and vegetable scraps, coffee grounds, and even eggshells! Just remember not to go overboard; too much nitrogen can create an unpleasant smell and slow down decomposition. Aim to have one-third of your total materials as greens.
Now onto brown materials – these bad boys help keep everything balanced by providing carbon. Carbon helps break down organic matter into nutrient-rich humus (the ultimate goal!). When it comes to browns, think dry leaves, straw or hay, small branches, wood chips or sawdust from untreated lumber. Mixing equal parts brown and green materials will ensure a well-balanced and safe-to-handle cold compost pile.
So next time you’re outside collecting goodies for your compost heap, make sure to keep this guide in mind!
Aerating Pile
So now that you’ve got the perfect mix of green and brown materials for your cold compost pile, it’s time to talk about keeping things fresh – literally!
One key aspect of maintaining a healthy compost pile is aerating it. This means getting air into the center of the heap, which helps those hardworking microorganisms do their best work breaking down all those lovely scraps into nutrient-rich humus.
Don’t worry; aerating your compost pile isn’t as difficult as it might sound. All you need to do is give it a good stir or turn every once in a while using a pitchfork or shovel. Doing this regularly ensures that oxygen reaches deep inside the pile, preventing any nasty smells from forming and helping everything decompose at a steady pace.
It also keeps your backyard oasis safe because an adequately oxygenated compost pile won’t produce harmful bacteria or pathogens.
Remember, taking care of your cold compost pile by aerating it will not only keep things running smoothly but also ensure that everyone (including Mother Nature) stays happy and healthy.
So grab that pitchfork and get stirring—you’ll be rewarded with fantastic garden soil before you know it!
Troubleshooting Common Cold Composting Issues
One common issue you might uncover is an imbalance between green (high-nitrogen) materials like grass clippings and kitchen scraps, versus brown (carbon-rich) materials such as dried leaves or straw. A good rule of thumb for maintaining a healthy balance is to aim for three parts brown material to every part green material. If there’s too much nitrogen present, the pile may become slimy and emit unpleasant odors; if there’s not enough nitrogen, decomposition will slow down significantly.
Adjusting these ratios can help get things back on track quickly so that your compost continues to provide essential nutrients for a thriving garden safely.
Another potential culprit behind stagnant cold compost piles is insufficient turning or mixing. Unlike hot composting methods where temperatures climb higher, cold compost requires more frequent attention to ensure proper circulation of air and moisture throughout the layers. Remember that microorganisms rely on oxygen to break down organic matter effectively – without adequate airflow, their activity slows down dramatically.
So grab your trusty pitchfork or shovel at least once every few weeks and give the contents of your pile a thorough mix! Doing this regularly will keep those friendly microbes hard at work while also preventing any unwanted critters from setting up shop in your heap.
With persistence and patience, you’ll soon have rich black gold ready to nourish plants in need while keeping everyone happy and safe!
Choosing The Right Composting Method For Your Needs
Now that you’re familiar with hot and cold composting techniques, it’s time to decide which method best suits your needs.
To make this decision, consider factors such as the amount of space available, how much time and effort you can devote to composting, and the type of materials you have for creating a compost pile.
Here are some key points to help guide your choice:
- Space: If you have limited outdoor space or live in an urban environment, cold composting may be more suitable as it typically requires less room than hot composting.
- Time and effort: Hot composting demands more attention due to frequent turning; if you don’t have much free time or prefer low-maintenance tasks, go for cold composting.
- Materials: Both methods work well with common household waste like fruit and vegetable scraps. However, if you want to get rid of bulkier items like tree branches or corn stalks quickly, hot composting is likely the better option since it breaks down these materials faster.
- Nutrient content: Hot compost tends to produce richer nutrients that benefit plants sooner while cold-composted material releases its benefits slowly over time. Consider what will serve your garden’s needs best when choosing between these two approaches.
- Safety concerns: Due to its high temperatures, hot compost piles usually kill off weed seeds and pathogens. This makes them safer options for gardens where weeds might be problematic or disease-prone environments.
Keep in mind that there isn’t one right answer when deciding between hot and cold composting – both methods offer unique advantages depending on your situation.
Whichever technique you choose should align with your goals, preferences, and abilities. By selecting the most appropriate method for yourself, not only will you reap the rewards of nutrient-rich soil but also contribute positively toward reducing landfill waste by recycling organic matter back into nature’s cycle.
So take pride in making this environmentally conscious choice – happy gardening!
Hot vs Cold Composting – Frequently Asked Questions
Can I Use Both Hot And Cold Composting Techniques In The Same Compost Pile Or Should I Have Separate Piles For Each Method?
Imagine the satisfaction of turning your kitchen scraps and yard waste into rich, nutrient-dense compost for your garden; it’s like creating black gold!
You can definitely combine both hot and cold composting techniques in a single pile, but it requires careful management to ensure you achieve the benefits of each method.
By layering green (nitrogen-rich) materials with brown (carbon-rich) ones, you maintain an active center that heats up from microbial activity while providing a safe haven for beneficial insects and worms on the outer edges where it remains cooler.
This approach allows you to harness the faster decomposition rates associated with hot composting while still fostering diverse microorganisms essential for healthy soil found in cold composting.
Just remember to monitor moisture levels and turn your pile regularly to keep everything well-balanced and thriving – then watch as your garden flourishes thanks to your carefully crafted compost mix!
Are There Any Specific Types Of Materials That Should Be Avoided In Either Hot Or Cold Composting Methods Due To Potential Risks Or Negative Effects On The Compost?
In both hot and cold composting methods, it’s important to avoid certain materials that can pose risks or have negative effects on your compost.
For example, you should steer clear of adding meat, dairy products, oils, and grease since they can attract pests, cause unpleasant odors, and slow down the composting process.
Additionally, make sure not to include diseased plants or weeds with mature seeds because these can spread disease or unwanted growth in your garden later on.
Finally, stay away from using pet waste (especially cat and dog feces) as they may contain harmful pathogens that could affect your health and contaminate your finished compost.
By carefully choosing what goes into your compost pile, you’ll be able to create a safe and beneficial end product for your gardening needs!
How Can I Speed Up The Composting Process In Cold Composting Without Necessarily Turning It Into A Hot Composting Method?
If you want to speed up the composting process in cold composting without turning it into a hot method, there are a few tricks you can try.
First, make sure to chop or shred your materials into smaller pieces, as this will help them break down faster.
Adding more nitrogen-rich materials like grass clippings and kitchen scraps can also boost decomposition rates.
Regularly turning and aerating your pile helps maintain proper airflow and speeds up the process too.
Lastly, keep your compost moist (but not soggy), as moisture is essential for the microorganisms that do all the work in breaking down materials – remember keeping things safe by avoiding harmful chemicals or diseased plants!
Are There Any Specific Weather Or Climate Conditions That May Affect The Efficiency Of Hot Or Cold Composting Methods, And How Can I Mitigate These Effects?
Yes, weather and climate conditions can definitely impact the efficiency of both hot and cold composting methods.
In extremely cold temperatures, the decomposition process in cold composting may slow down or even stop completely. To keep things moving along, try insulating your pile with a thick layer of straw or leaves to trap heat inside.
On the other hand, hot composting relies on maintaining high temperatures within the pile to break down materials quickly. During sweltering summer days, be sure to monitor moisture levels closely as too much evaporation could cause your pile to dry out and stall the process. Adding water when needed and turning the pile regularly will help maintain proper humidity levels and ensure a safe and efficient composting experience!
Can I Combine The Finished Compost From Both Hot And Cold Composting Methods, Or Should They Be Used Separately For Different Gardening Purposes?
Combining finished compost from both hot and cold methods is not only safe but can also provide a well-rounded nutrient source for your plants. There isn’t a strict rule about keeping them separate since each type offers different benefits that complement each other when mixed.
So feel free to blend away and give your garden the best of both worlds for healthy and thriving growth!
Conclusion
In conclusion, dear fellow composters, it’s clear that both hot and cold composting have their rightful place in our gardens.
Whether you choose to mix the techniques or keep them apart like star-crossed lovers is entirely up to you.
As for any challenges faced during your composting journey – remember, nothing worth having comes easy!
So embrace Mother Nature’s quirks and continue striving for that black gold we all so desire.
Happy composting!