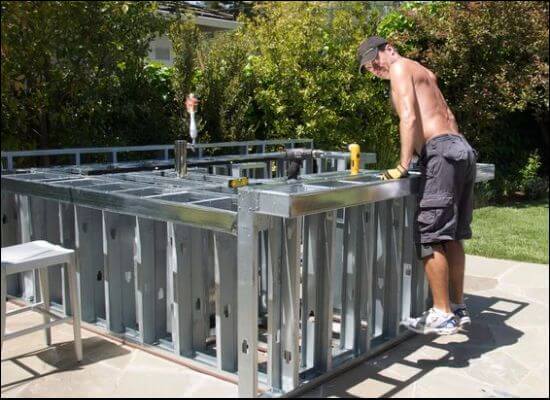
Building an outdoor kitchen with metal studs requires a coordinated plan for the frame, countertop, appliances, weather exposure and utilities. Metal framing can be part of a suitable system, but it does not by itself make a grill enclosure fire-safe or capable of supporting any countertop. Settle the appliance requirements and structural details before buying studs.
1. Decide the project scope
List what you actually need: preparation space, a built-in grill, storage, refrigeration, a sink or separate cooking appliances. Each addition changes the dimensions, services, ventilation and budget. A manufactured island system may suit the project better than a custom frame, especially if you do not have metal-framing experience.
Compare the full installed cost, including the base, cladding, countertop, delivery and professional utility work. A low price for studs is not the total kitchen cost.
2. Select the appliances before drawing openings
Choose specific models approved for the proposed installation. Download their current installation manuals and use the stated cutouts, support details, combustible clearances and ventilation requirements. Overall product dimensions are not necessarily the opening dimensions.
A freestanding grill is not automatically suitable for enclosure. A grill, smoker and pizza oven are not interchangeable occupants of the same opening. Confirm any required insulated jacket or other listed accessory with the manufacturer.
3. Prepare a reviewable plan
Draw the footprint, elevations and appliance locations. Include doors and drawer swings, grill-lid clearance, work surfaces, service access and circulation. The construction details must also identify framing members, connections, anchors, support around openings and countertop requirements.
- Record the exact appliance model and manual revision.
- Mark required ventilation openings and keep them separate from decorative gaps.
- Show utility routes and access for shutoffs and servicing.
- Specify compatible exterior cladding and finish systems.
- Have the plan reviewed by the appropriate installer or design professional before fabrication.
This checklist is a plan brief, not a dimensioned structural drawing. One stud spacing or screw size cannot cover every island, countertop and exposure.
4. Confirm the location and supporting base
Check local permits and requirements, drainage, utility locations and the surface supporting the completed kitchen. Include the weight of appliances, wet materials and countertops. Do not anchor into an unknown slab or roof system without checking what is beneath it and whether it is suitable.
Keep cooking equipment in an approved outdoor location. The U.S. Fire Administration advises keeping grills out from under eaves and branches and not using them on porches or balconies. Follow the selected appliance’s requirements as well as local rules.
5. Choose an appropriate framing system
Use members, coatings and fasteners specified for the loads and outdoor exposure. Interior non-load-bearing drywall studs should not be assumed suitable for a kitchen island. Member thickness, spacing and bracing depend on the design, especially beside wide openings and beneath heavy stone.
Plan corrosion resistance and compatibility between metals. Coastal exposure can require different choices from a sheltered inland installation. Keep material specifications with the drawings so substitutions can be reviewed.

6. Lay out and assemble the frame to the design
Mark the approved footprint and check dimensions before cutting. Use cutting tools and blades rated for the material, with the manufacturer’s safety precautions. Secure workpieces, protect against sharp edges and flying fragments, and do not use improvised breaking methods merely to save time.
Assemble tracks, studs, bracing and opening supports according to the specified details. Check square, level and alignment as you work. Use the designed fasteners and anchors rather than a universal instruction to overlap tracks or drive a particular screw everywhere. Resolve discrepancies before covering the frame.
7. Coordinate utilities before closing the enclosure
Have qualified trades handle gas, fixed electrical work and plumbing as required. They need the selected appliance information and access to the frame before it is closed. Metal edges, wet outdoor conditions, bonding, circuit protection and service access all need appropriate treatment.
A plastic bushing in a stud opening is not a complete electrical installation method. Do not run a gas line or cable from generic online instructions. Arrange necessary inspections and testing at the appropriate stages.
8. Preserve ventilation and heat clearances
Follow the appliance instructions for the enclosure, including ventilation location and size and any fuel-specific provisions. Do not block openings with storage, decorative panels or later additions.
For an example of model-specific requirements, Bull’s built-in grill manual specifies installation and enclosure conditions. Use the manual for your own exact appliance; its dimensions and details are not universal. Metal studs behind combustible plywood or wood blocking do not automatically make an assembly noncombustible.
9. Install compatible exterior boards and finishes
Use the specified exterior assembly, including board attachment, joints, moisture management and finish compatibility. Cement board is not the same as poured structural concrete, and it is not a reason to ignore water-management details.
Do not pour concrete into an ordinary stud frame to “make it stronger.” That introduces wet-material pressure and substantial weight that the frame may not be designed to carry. Keep any countertop casting or structural concrete work within its own approved design.

10. Fit the countertop and appliances
Confirm the fabricator’s support, overhang and cutout requirements before placing the countertop. Heavy pieces require appropriate handling. Install appliances only after openings, support and service provisions have been checked against their instructions.
Have the responsible installers complete required commissioning and safety checks. Keep manuals and access panels available. Do not put the kitchen into use while connections, inspections or critical finishing work remain incomplete.
Maintain access and inspect regularly
Clean according to the appliance and surface instructions, keep vents clear and check for corrosion, loose finishes and water damage. Use suitable covers without trapping moisture or blocking ventilation needed by installed equipment. Any change of appliance or added countertop load should trigger a review of the original design.