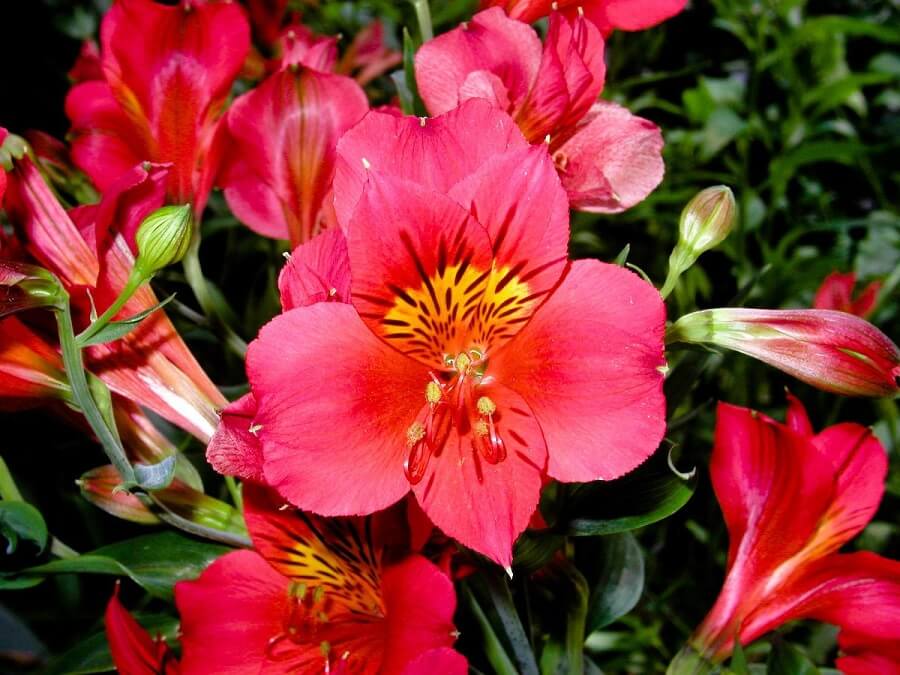
The Peruvian lily (also called Alstroemeria or Lily of the Incas) is a truly gorgeous flower variety that blooms in a large range of colors, from pink to purple, white, red, orange, salmon, and yellow. This flower looks a lot like an azalea, so it makes an extremely beautiful cut flower. It blooms later than most flowers, sometimes even in early summer. If this sounds appealing and you want to test out a new flower variety, you’re going to enjoy the topic of today’s article. We’ll be providing a step by step guide to planting and growing the Peruvian lily.
Peruvian Lily Growing Guide: 7 Main Steps
Step 1: Learn More About the Peruvian Lily
Before growing the Peruvian lily, you should know the most important things about it. For instance, did you know that it’s poisonous? Absolutely all its parts can cause skin irritation, so you should handle it with care. Despite this, a lot of people use it as a cut flower, which is something you can do as well, as long as you’re careful with it.
The Peruvian lily was discovered in the eighteenth century in South America and brought to Europe. There were about 50 varieties discovered, and in Europe, botanists experimented with them and came up with hybrids. Something interesting to keep in mind is that this plant originates from Chile, so the name can be rather confusing. Moreover, it’s not even part of the lily family, which only adds to the confusion.
A Peruvian lily plant can grow up to 48 inches tall. Its flower clusters are quite loose and the blooms are speckled. The foliage is shaped like a lance, it’s bright green, and it grows rather leafy on the plant’s stem. The great news about Peruvian lilies is that they don’t require a lot of maintenance, so you can plant them even if you’re not an experienced gardener. They also live long, so you won’t have to replant them often.
Step 2: Consider the Peruvian Lily’s Growing Requirements
Like any other plant, the Peruvian lily also has some requirements when it comes to the growing environment. First of all, this is a plant that enjoys the full sun for the most part of the day. However, if the area where you live is extremely hot in the summer, light shade would be the best option. Even if it can technically tolerate mild droughts, it would be best not to expose it to such conditions. As a result, you should water it thoroughly at least once a week.
In terms of soil, Peruvian lilies prefer light yet rich and slightly acidic soil. This means that before planting them, you should add peat moss and compost to the soil. For even better drainage, builders sand would help as well. Birds and butterflies love this plant for its ability to provide them with shelter. So if there’s a particular spot in your garden where you’d like to attract beneficial wildlife, that’s where you should plant the lilies.
When planting them, you should be careful not to damage their roots, since they’re quite brittle. The best way to grow a Peruvian lily is to start it from seed and then transplant the tuber to the garden. Let’s see how you can do that!
Step 3: Get Some Peruvian Lily Seeds
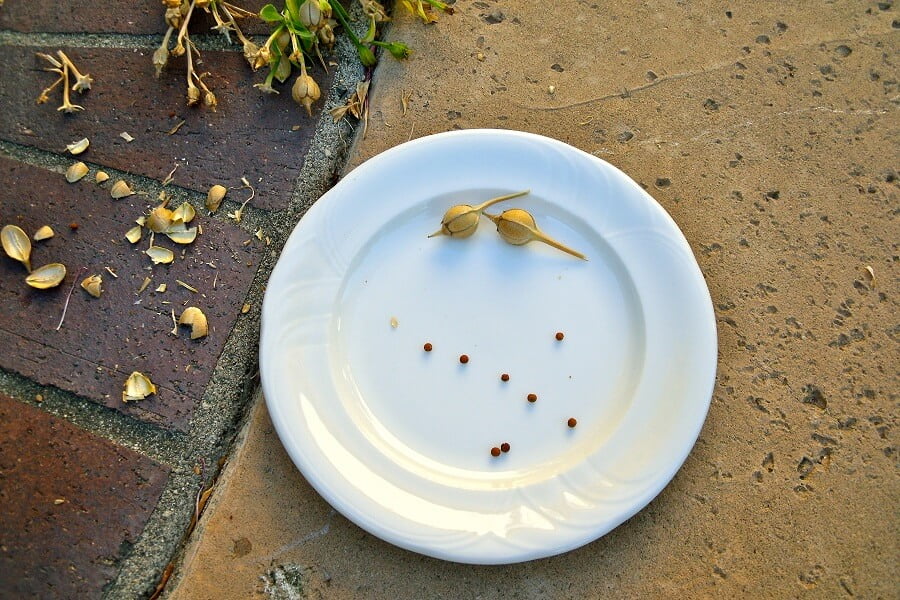
The first step in planting Peruvian lilies from seed is, of course, to find the seeds. You can either buy them (we recommend “Dr. Salter’s Mix” of 25 Peruvian Lily Seeds you can find here) or take them from an already existing plant. When the seed pods are brown and dry, you can harvest the seeds. If you’re going to choose the second option, you have to allow the seeds some time to dry. The best thing you could do is place the pods on a screen. There, the air circulation will help them dry. Once you remove the seeds if you’re not going to plant them immediately, store them in a container with a tight-fitting lid.
Step 4: Plant the Peruvian Lily from Seed
Before planting the Peruvian lily seeds, you have to soak them in water for 12 hours. Meanwhile, prepare the containers in which you’re going to plant them. You’ll need peat pots filled with a seed starting mixture that contains no soil. Place the pots in a tray, pour water over the mixture, and get rid of any excess water you notice in the tray. The trick is for the pot to be constantly moist.
Since Peruvian lilies don’t germinate as easily as other plants, you should place about five seeds in each of the pots. This will increase the chances of one germinating. Once the seeds are in the pot, cover them with a thin layer of soil and keep the pots at room temperature. They shouldn’t get direct sunlight, so placing them in the windowsill wouldn’t be a good idea.
Remember that the Peruvian lily develops quite slow. This means that even if the roots have started to expand, you might not notice any top growth. This doesn’t mean your plant won’t eventually develop. You just have to give it some time and resist the urge to discard it. Also, if you’re going to plant more than one Peruvian lily, and some of them have developed roots while others still haven’t, patience is key again. Germination is inconsistent, so they won’t all form roots at the same time.
Once you notice the top growth, you can move the pots to a sunnier location, such as a windowsill. At this time, your plants are also going to need fertilizer. A diluted liquid one added two weeks after the top growth appears would be perfect. Your plants need constant fertilization while they’re still in the pot. The best time to transplant them is a month after the top growth took shape. However, if the season is not fall or spring, you won’t be able to do that. Still, you shouldn’t worry, because you can grow them in the pot for as long as you wish.
Step 5: Transplant the Peruvian Lily Tuber
Transplanting the Peruvian lily tuber isn’t a difficult task. All you need to do is pay attention to its roots and consider the place where you’re going to transplant it. It needs to get full sun or partial shade and be planted in well-drained soil. The most effective way of checking if the soil is well-drained is to observe it after heavy rain. If after about 5 hours, there’s still water on top of the soil, you should look for another place where the water has drained completely. If you’re unable to find one, you can simply build a raised garden bed and transplant your Peruvian lily there. Under no circumstances should you plant it in soggy soil or allow it to sit in water because it will rot.
When it comes to the hole you have to dig for the plant, make it large enough so that the root ball can be on the same level with the top of the soil. The roots should also have enough room to spread unencumbered, so leave about a foot in between every two Peruvian lilies. Once you’ve done that, cover the hole with soil, press down on it, and then water it. This will help it settle.
The last thing we urge you to remember when it comes to planting/transplanting Peruvian lilies is that they’re poisonous and can cause irritations. Which is why you should handle them with gloves and avoid touching your eyes.
Step 6: Care for Your Peruvian Lily
One of the most appreciated things about the Peruvian lily is the fact that you don’t have to spend a lot of time taking care of it. Basically, all it needs is constant water. You’ll notice that if you water them often enough, they’ll reward you with larger and more beautiful flowers. Even if you might think watering in the winter sounds insane, you should actually do that a couple of times as well. This will help the lilies bloom stronger when spring arrives.
Step 7: Pick the Flowers
While this is not a mandatory step, we decided to include it because there’s something you need to know about it. That’s the fact that you should never cut the Peruvian lily flowers, but pick them instead. Cutting them would slow the plant’s growth and result in fewer blooms. If you want to use Peruvian lilies as cut flowers, you’ll have to grasp the stem and pull upwards while twisting it. This technique will help with flower production.
Summing Everything Up
Despite not being an actual lily, the Peruvian lily is one of the most beautiful flower varieties you could grow in your garden. Its gorgeous colors, the fact that it’s low-maintenance, and the fact that it lasts for a long time makes it a favorite of many people. As long as you follow the instructions above, you’ll manage to grow your own Peruvian lily in no time.


