If you don’t have a garden, but you still want to grow your own herbs, today’s guide is exactly what you need in order to accomplish that. Since growing herbs do not take up that much space, you can always use some window boxes and decorate your windowsills with them at the same time. You don’t even have to buy the boxes, since making your own is not at all a difficult task. In fact, with a little bit of time and dedication, you can learn how to make some great window boxes for planting herbs. All you need are the tools since we’re here to provide you with the instructions.
Window Boxes for Herbs: Creative DIY
Gather the Materials You Need
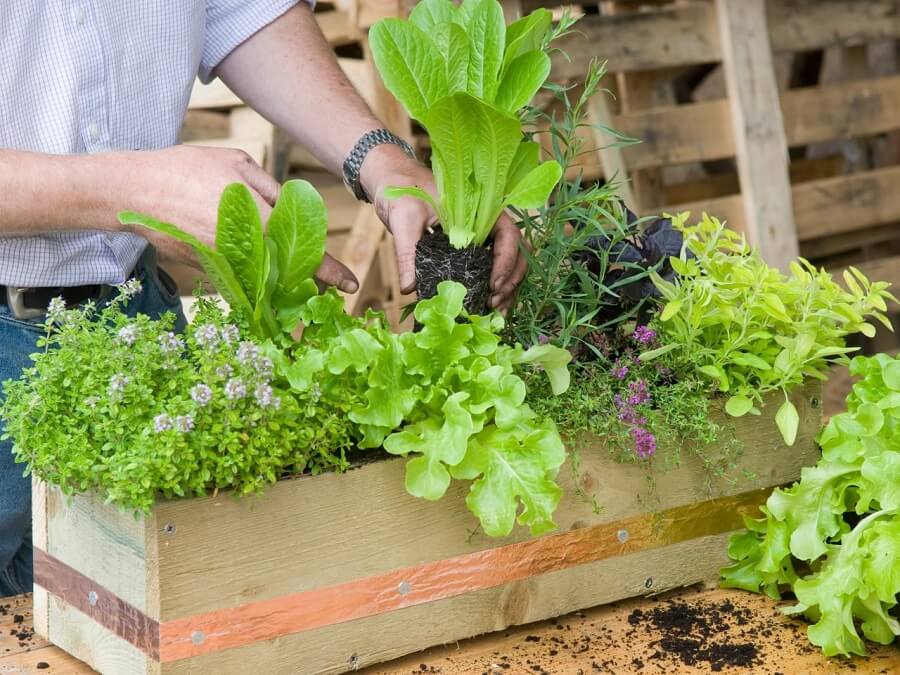
The first step of any DIY is gathering the necessary materials. In the case of window boxes, they might seem like a lot, but you probably already have some of them around the house, and the rest don’t cost a lot of money. The first thing you’re going to need are some pieces of wood to build your window boxes. You can use any type of wood you want, but we recommend using maple because it’s both resistant and pretty. The measurements are again up to you, but for a standard windowsill, we would suggest the following: 1 piece of 18-1/2″ x 5-1/2″ to use at the bottom, 2 pieces of 20″ x 5-1/2″ to use as sides, and 2 end pieces of 5-1/2″ x 5-1/2″.
Next, don’t forget the wood glue that you’re going to use to stick the piece of wood together. You’re also going to need some finishing nails, a hammer, two clamps, some metal clips, waterproofing tape, and a neon spray paint (optional).
Attach the Sides to the Bottom
The first step of this window boxes for herbs DIY is to attach the pieces of wood you selected for the sides of the box to the one designed for the bottom of it. For that, you’re going to need the glue you bought. Place the bottom wood piece on a flat surface. Make sure that there isn’t anything around you could damage when working on your window boxes. Then, put a small line of glue all around its edges. Take the first side piece and attach it to the bottom one.
Attach the End Sides as Well
Now, it’s time to take one of the end sides and put some glue on its edges. You’re going to attach this one next to the first side piece of wood that you’ve just stuck to the bottom. This will create a corner, that you’re going to complete by attaching the second side piece the same way you attached the first, and then the second end piece as well.
Make Sure Everything Is in Place
You don’t have to press too much in order to fixate the pieces together. That’s because the glue is quite strong and effective. However, you will notice that when you first stick the pieces in place, it’s almost impossible to get a perfect fit. Which is why we advise you to take advantage of the fact that the glue takes a while to dry and carefully shift the pieces so as to ensure a perfect match. After you’ve made sure everything looks the way you want it to look, use the two clamps to secure the ends of the box and allow the glue to dry for about 12 hours. Once it’s dry, you should also reinforce the box with a couple of finishing nails.
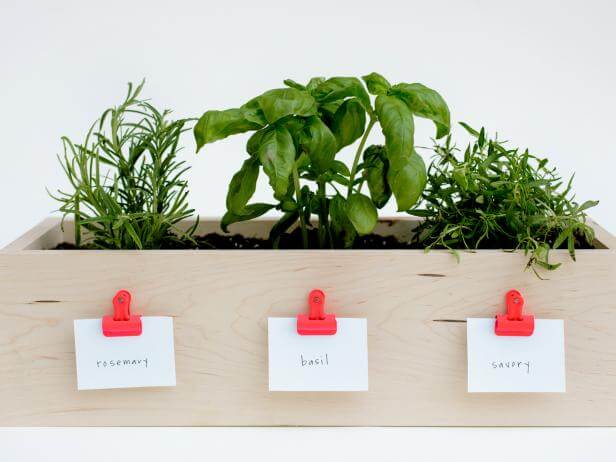
Attach the Clips
While this is not a necessary step, we thought attaching clips to the side of the box is the best way to know for sure what you’ve planted in it. Plus, these small accessories will provide your window boxes with a really lovely look. Before hammering the nails into the box, take a pencil and mark the exact spots where you want to attach the clips. The center of the box would be a great option, but the choice is completely up to you. Then, hammer the nails making sure you don’t press too violently on the box. Stop hammering when the nails are sticking out just enough for you to place the clips on them.
Paint the Clips
The reason why we also included neon spray paint in the list of materials you should gather for this window boxes DIY is that we thought the clips would look nicer if they were painted in a crazy color. You can go for any color you like, or you can skip this step altogether and leave the clips as they are. If you do decide to paint the clips, first allow the paint to dry. Then, place them onto the nails and attach some cardstock on which you’ve written the names of the herbs you want to plant.
Waterproof the Box
One of the last steps of this DIY (which is also optional) involves using the waterproofing tape to line your window boxes. The reason why this is a good idea is that if you want to plant herbs that require constant watering, the box might get damaged as a result of too much moisture. Lining it with tape or plastic will help prevent that.
Decorate the Box
We also wanted to include a step in which you can exercise your creativity a bit more. However, this is not something you have to do if you don’t want to. For instance, while it’s completely fine to leave the window boxes as they are and provide your windowsills with a more natural look, you could also spruce them up a little bit, either by painting them or decorating them with all sorts of stickers, tapes, stencils, and so on. Moreover, if you didn’t opt for the clips as a means of displaying the names of the herbs, you can make some other types of name tags and give your window boxes a unique spin.
3 Alternatives to Window Boxes for Herbs
If window boxes are not your thing, or if you simply want to have both window boxes and other types of containers filled with herbs, we’re here to suggest a couple of window boxes alternatives that you’re bound to love.
1. Hanging Jars
Jars are the ultimate containers right now. You can use them for anything, from drinking glasses, to storage containers, even to herb pots. While you could simply place the jars on your windowsills, an even better alternative is to hang them somewhere in your house where they’ll get plenty of light. As you can see from the image below, you’re going to have to build a vertical display made out of wood planks and metal rods. If this looks too complicated, don’t worry. You can find all the instructions on Susie Frazier’s website.
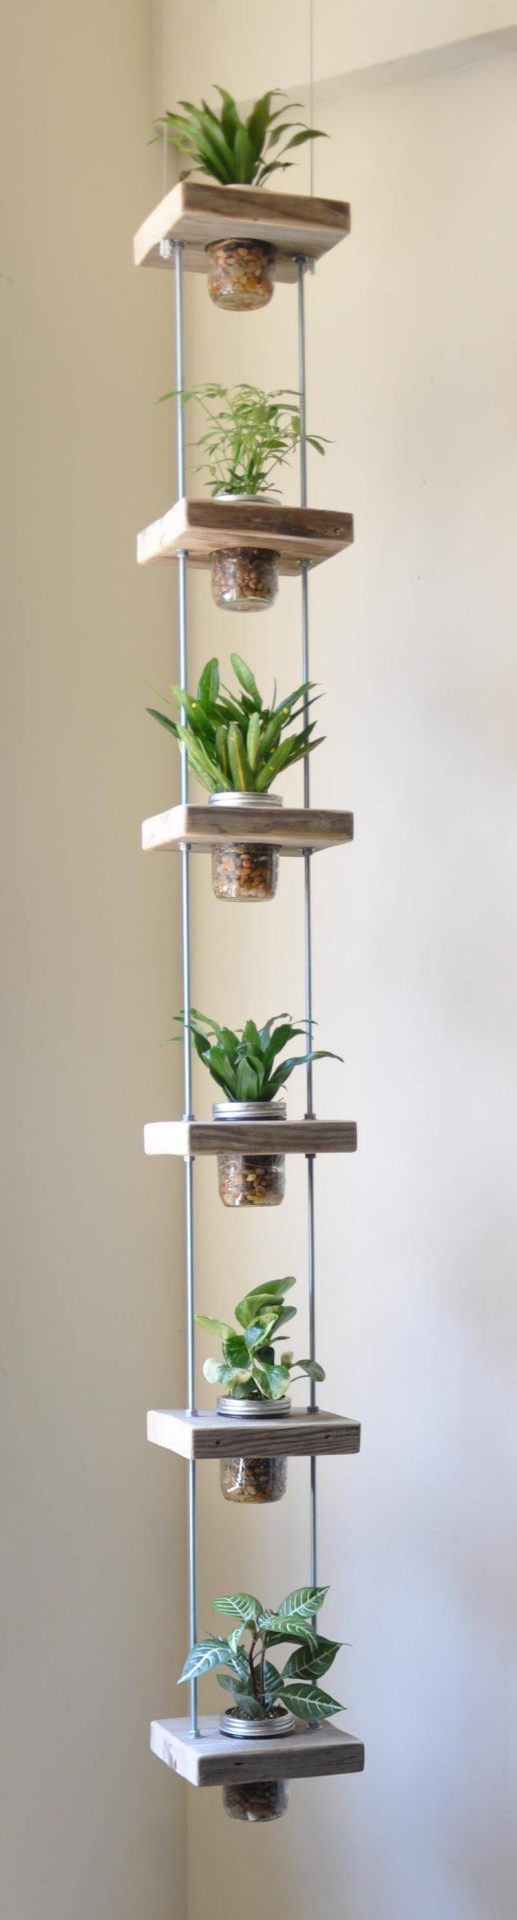
The great thing about this display is the fact that you can plant a different type of herb in each jar. Then, you can label the jars in a cute and colorful way. You can also go for a more minimalistic look if you prefer, and rely only on the deep green of the herbs to provide the entire project with some color. Regardless of how you choose to adapt this DIY, there’s no denying that it’s an extremely cool way of replacing window boxes.
2. Teacup Herb Planters
If you liked the previous hanging jars herb garden idea, then you’re probably also going to like this one. This time, we’re going to be using teacups to plant our herbs. You can choose old teacups that you don’t have any use for anymore. Another alternative is buying new ones specifically for this DIY, especially if you’re looking for a certain model. If you can find assorted plates for them, that’s even better.
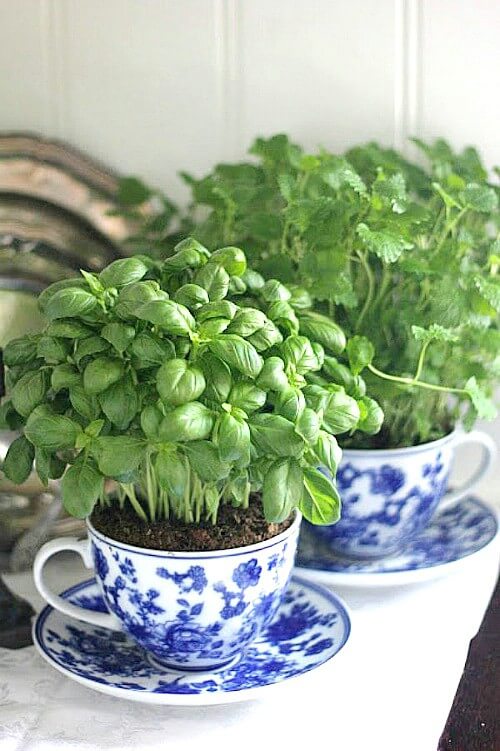
We particularly love these white and blue ones, and how they manage to store a relatively large quantity of herbs, despite not being that big. If you’re looking for more cute ideas involving teacups as planters, you can find 9 of them on the ACultivatedNest website.
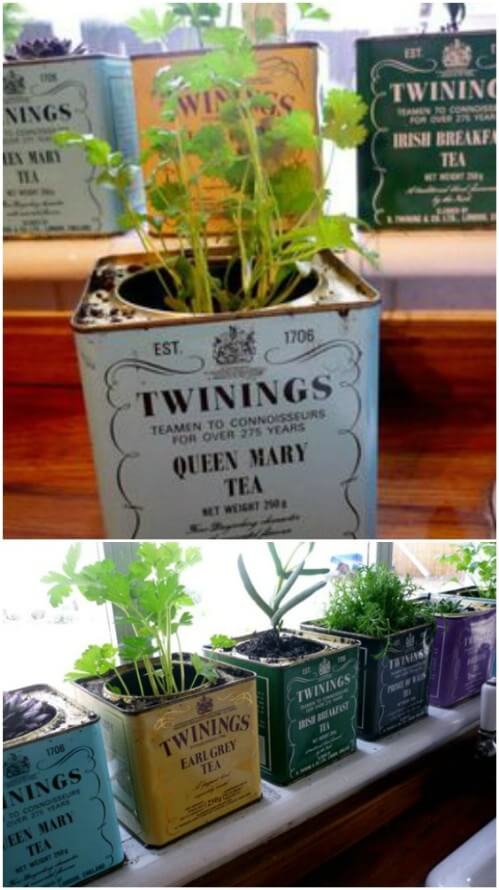
3. Tea Box Planters
In keeping with the theme of tea-related planters that serve as alternatives to window boxes, the last suggestion we have for you is using old tea boxes as herb containers. In the images below, the creator of the project, Jenny Butler from Apartment Therapy, used Twinings Tea Caddies. However, you can use any type of tea box that you can find or that you like. The end result is quite colorful and unique. As such, it will definitely serve as a conversation piece every time someone comes to visit you.
Summing Everything Up
If you’re tired of going to the store to buy herbs, we hope today’s article has managed to inspire you to build some window boxes and start growing your own. Not only will you get to exercise your creativity and decorate your house with some lovely window boxes, you’ll also get to know where the herbs you consume come from, which is always a great added benefit. If window boxes are not for you, we hope you at least enjoyed the 3 container alternatives for planting herbs!