One of the nicest things about a backyard is that you have your own outdoor get-away just feet from your house. And you don’t need gas money to get there. Perhaps one of the best things about a backyard is that you can even use it as your own personal campsite. I’m going to go over some backyard camping ideas that your whole family can try and enjoy.
Supplies You May Need for Backyard Camping
A backyard camping trip can be as extravagant or as simple as you want to make it. You can include supplies that you already have, borrow, or rent from a camping supply store. The beauty of a backyard camping trip is that you are never far from home. To be exact, you are home! That means that you won’t need as many supplies as you would if you were far from home. Things such as a first aid kit, extra jackets, etc. are not necessary. A quick trip to the house should solve any forgotten item problems quickly. I will discuss some supplies that you may want to bring along on your backyard camping experience:
- Tent
- Canopy
- Water jug
- Lots of snacks (Don’t forget the marshmallows)
- A grill
- Pillows
- Blankets
- Bug spray
- Flashlights
")
Image Source: Wikimedia Commons
Tips for Camping with Kids
Outdoor experiences with children are great ways for lifelong memories to be made. My best childhood memories involved camping with my parents and siblings. One of the most convenient places to get outdoors with your kids is right out your back door. The following are some tips for camping with kids that will help you make many long-lasting memories.
- Keep electronics in the house: Use this time to listen to the crickets chirp at night as you drift off to sleep and to hear birds sing when waking in the morning. A time away from screen time such games, social media, and texts will do everyone good. This doesn’t mean that you have to lose connection totally, but consider keeping kids’ electronics in the house and turning the ringer off of your phone. You can keep the phone on vibrate for emergencies.
- Bring plenty of snacks: A well-fed child will be happier and more well behaved than a hungry child. Make sure to bring along healthy snacks and not just junk food.
Fun Activities Before and After Dark
The following are some activities that you will fun to do on your backyard camping trip. I’ve separated the activities into two categories: Before Dark and After Dark.
Before Dark
- Badminton
- Board games
- Play bean bag toss with a ladder
After Dark
- Campfire: Unless there are fire restrictions in your area, consider having a backyard campfire. Make sure to keep the fire contained within a campfire ring or camping fire pit. Campfires and camping just go together. There’s nothing quite like the sound of crackling wood and the radiant warmth that a fire brings to a backyard campground.
- Stargaze: Stargazing can be a fun activity to do together as a family. Try finding all of the constellations that you can. You can go online to find constellations, print it, and go outside to find them. Not only is this a fun activity, but it is also educational for the whole family.
Safety
- Never leave the campfire unattended
- Wear sunscreen
- Wear bug spray
- Make sure to extinguish the fire before you go to sleep
Things You Can Eat
There are so many tasty foods to eat while camping in your backyard. The following are some delicious recipes that you can cook for you and your family. Keep in mind that most of the recipes below can be either cooked in your oven or on a grill and some you can cook over a campfire. For more delicious recipes that can be cooked over a fire pit, click here.
Caramelized Onions
Source: Allrecipes.com
Ingredients:
- 1 large Vidalia or sweet onion, peeled and cut into large wedges
- 2 tablespoons softened butter
- 1 teaspoon beef bouillon granules
- garlic salt and pepper to taste (optional)
Directions:
- Preheat an outdoor grill for medium heat.
- Place the onion wedges on a sheet of heavy duty aluminum foil. Dot with butter, then sprinkle with bouillon, garlic salt, and pepper to taste. Fold the aluminum foil into a packet, leaving only a small hole at the top to allow steam to escape.
- Place packet on preheated grill, and cook until the onions have softened, and cooked to a deep, rich brown, 45 minutes to 1 hour depending on the temperature of the grill. Stir the onions after the first 30 minutes, or as needed to keep from burning.
Campfire Toasted Cinnamon Rolls
Source: Dabbles and Babbles
Ingredients:
- Can of Pillsbury Cinnamon Rolls
- Roasting prongs (preferably with the prongs close together)
- Campfire with hot ember
Directions:
- Pop open can and carefully divide the cinnamon rolls.
- Gently insert the prongs through the side of the cinnamon roll in the center of the bun making sure it’s near the back of the prongs.
- Slowly place your roll over hot embers, rotating frequently and on all sides.
- Depending on the heat in your campfire, it should take anywhere from 8-12 minutes to toast your rolls so that they are cooked all the way through.
- Remove from campfire and allow to cool slightly before carefully removing the roll from the roasting prongs. Eat and enjoy!
S’mores Campfire Cones
Source: Frugal Coupon Living
Ingredients:
- 12 Sugar or Waffle Cones
- 1 bag Mini Marshmallows
- 12 oz Chocolate Chips
- optional: Butterscotch Chips
Directions:
- Fill each cone with marshmallows and chocolate chips.
- Wrap in aluminum foil.
- Head on the grill for 7 – 10 minutes. Keep away from direct flames. (This is also great in the oven!)
- Unwrap and enjoy. Be careful as contents may be hot.
Grilled Sweet Potato Fries
Source: Eureka
Ingredients:
- 2 Medium Sweet Potatoes
- 2 Tablespoons Olive Oil or Vegetable Oil
- 1 Clove of Garlic, Chopped
- 1 Teaspoon Chili Powder
- 1 Packet of Ranch Dry Mix
Directions:
Wash the Sweet Potatoes and dry them. Then cut them in lengthwise strips, about 1/3 an inch wide on each side, so that they look like fries. The important thing is that they are uniform so that they can cook up at the same time. If you wanted to produce a crispier Fry, and you have the time, soak the fries in water for 30 minutes and then let drain for an hour before continuing.
Take all the ingredients and mix them in a bowl. Lay these fries out on a piece of tin foil that’s over a sheet pan. Place the pan on a grate over an open fire or on the middle rack of a grill. We’re looking to cook the potatoes and make the outsides nice and crispy. Depending on your heat you want about ten minutes a side, flipping once.
Here are a few other dessert ideas that your whole family will enjoy:

Image Source: Wayfair

Image Source: Flickr
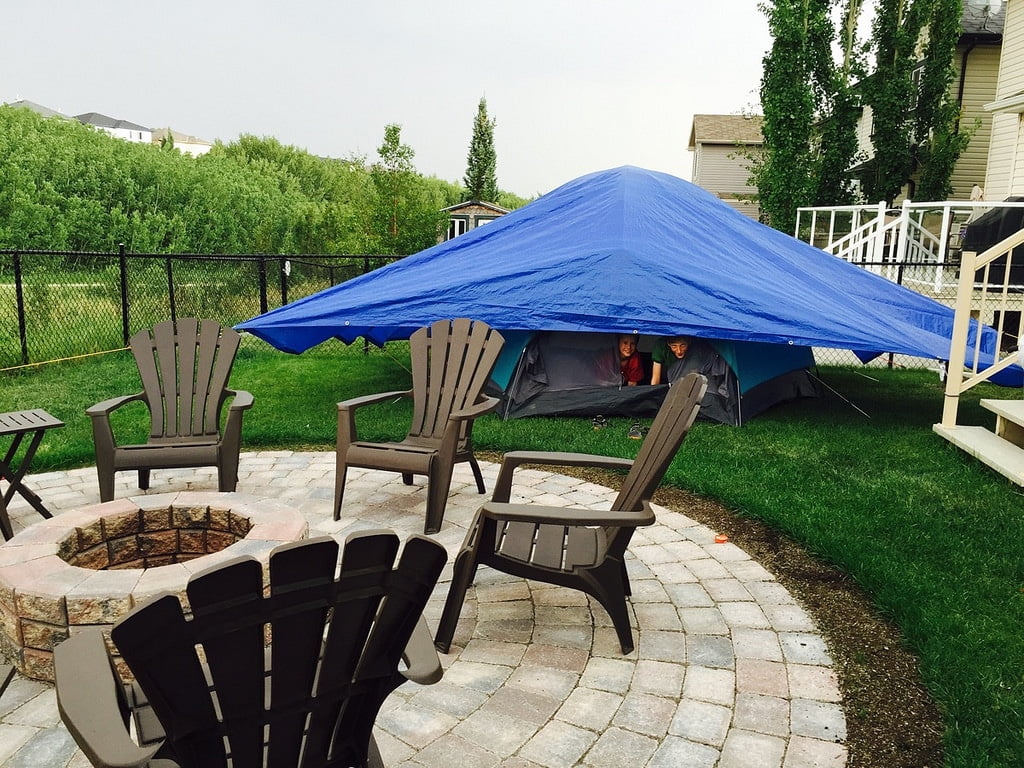
DIY Tent
If you don’t have a tent, then you may want to consider making your own. Even if you do have a tent, it can still be a fun activity for your family, and can be a treasured item for years to come. DIY tents are very easy to make. Let’s take a look on how to make one.
First, you will need some items. Here is what you’ll need:
- Canvas
- Grommet kit
- Branches
- Stakes or sticks to use as stakes
- Saw
- Drill
- Dowel
- Rope
- Twine
Once you have gathered all the items, you can start making your tent. Start by measuring and marking where the grommets will go. Two will need to be on the top, which is the middle of the fabric, and one will go in each corner. Put the grommets into the fabric. The grommet kit should include instructions.
Next, gather some branches to cut with the saw. The branches need to be the same height as the peak of the tent. Measure the tent height and cut the branches to the length. Once you have cut the branches to the desired size, drill a hole in the top of the branch. The hole should be at least 3 inches deep. Insert a dowel into the hole. If the dowel needs cut, cut it to the right size so that it fits tightly in the hole.
Now it is time to set up the tent. You will need two people to help set it up. Stand one branch up and put the center grommet over the dowel. Wrap some rope around the dowel and pull on it, so that there is pressure on the branch. Tie the ropes to stakes, or sticks, that act as stakes. Do the same thing on the other side. For the other grommets, tie twine through the grommet holes and tie them to the stakes. If you will be leaving the tent outside, you will need to apply a waterproof treatment on the canvas.
Once you have reached this step, you are done! Your homemade tent can be a treasured item and a fun memory for your children to remember when they made a tent for camping in their backyard. This tent can also be used over and over again, not just in your backyard but in other places as well. Or you could save your homemade tent for backyard camping only. Whatever you choose to do, the tent will always serve as a place of enjoyment. Now, go enjoy your tent when you have fun camping in your backyard.
Conclusion
I hope that this article has equipped you to go on a backyard camping trip. I have listed the supplies you may need, tips for camping with kids, fun activities to do, safety precautions, yummy foods to cook, and how to make a tent. Now, all you need to do is plan the date and go on your backyard campout and outdoor adventure!
Image Source: Flickr