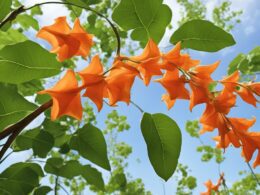
So, your Crocosmia has finished blooming and you’re wondering what to do next. Don’t worry, you’re not alone in this. Many gardeners are unsure about how to care for their Crocosmia after the flowering period. But fear not, because with a little bit of guidance, your Crocosmia can thrive and bloom again next season.
First things first, it’s important to deadhead the spent blooms. This will not only make your Crocosmia look tidier, but it will also encourage a longer blooming period.
After deadheading, it’s time to cut back the foliage. This will help the plant conserve its energy and prepare for the next growing season. But don’t worry, cutting back the foliage won’t harm the plant. In fact, it’s necessary for the health of the plant.
With these simple tasks completed, you’re well on your way to ensuring the success of your Crocosmia for the next growing season.
Deadhead Spent Blooms
Once the blooms on your crocosmia have faded, it’s time to deadhead them to ensure a vibrant and healthy garden. Deadheading involves removing the spent blooms from the plant. This process encourages the plant to produce more flowers and prevents it from going to seed too soon. It’s a simple task that can be done with a pair of scissors or pruning shears.
Don’t throw away the dead blooms! They can be composted to provide valuable nutrients to your garden. Simply collect the dead blooms and add them to your compost pile. Crocosmia blooms are rich in nitrogen, which is a vital nutrient for plants. Composting them will help enrich your soil and promote healthy plant growth.
Deadheading your crocosmia can also attract pollinators to your garden. As you remove the spent blooms, you’ll be opening up new spaces for fresh flowers to bloom. Bees and other pollinators will be drawn to your garden to feed on the nectar from these fresh blooms. This will help to support the health and diversity of your local pollinator population, which is essential for a thriving ecosystem.
Cut Back Foliage
Pruning back the foliage of crocosmia once the flowers have withered is crucial to the plant’s overall health and appearance. It allows the plant to conserve energy and focus on producing new growth and blooms. When cutting back foliage, it’s important to use pruning techniques that won’t damage the plant. Here are some tips to keep in mind:
- Use sharp, clean pruning shears to prevent tearing or crushing the plant’s stems.
- Cut the foliage back to about 2-3 inches above the soil level.
- Remove any dead or damaged leaves, but leave the healthy green ones.
Once you’ve cut back the foliage, you may wonder what to do with the clippings. Composting is a great option that benefits both your garden and the environment. Crocosmia foliage is rich in nitrogen and other nutrients essential for healthy soil. By composting clippings, you’re adding valuable organic matter to your soil and reducing waste at the same time.
In addition to composting, you can use clippings as mulch around other plants. This helps retain moisture in soil and prevent weed growth. Just chop foliage into small pieces before using it as mulch. With these pruning techniques and composting benefits in mind, you can keep your crocosmia healthy and thriving year after year.
Is It Necessary to Break Up Crocosmia After Flowering?
After flowering, it is necessary to break up crocosmia plants. By dividing the rhizomes, you can control their size and promote healthy growth. Breaking up crocosmia not only ensures abundant blooms but also prevents overcrowding and maintains the overall health of the plants. Remember to replant the divided rhizomes promptly in well-draining soil for optimal results.
Divide Overcrowded Clumps
If you want to ensure your crocosmia stays healthy and vibrant, it’s time to divide overcrowded clumps! As these plants grow, they can quickly become too large for their space and may even start to choke each other out. Luckily, dividing the clumps is an easy and effective way to keep your crocosmia thriving.
Propagation techniques are essential when it comes to dividing your crocosmia clumps. You’ll want to wait until the plants have finished flowering and the foliage has died back before attempting to divide them. Once you’ve identified which clumps need dividing, use a sharp spade or garden fork to dig up the entire clump. Then, gently separate the individual bulbs, making sure to keep as much of the roots intact as possible.
Transplanting tips are crucial for ensuring that your divided crocosmia clumps take root successfully. You’ll want to choose a well-draining spot with full sun or partial shade. Be sure to dig a hole that is deep enough to accommodate the roots without bending or crowding them. Once you’ve planted the bulbs, water them well and continue to keep the soil moist until new growth appears. With these simple steps, you can keep your crocosmia healthy and vibrant year after year.
Provide Adequate Water and Fertilizer
To help your crocosmia thrive and improve its flowering, it’s important to provide adequate water and fertilizer. This will ensure that the plants have the nutrients they need to grow strong and healthy.
When watering, make sure the soil is moist but not waterlogged. Use a balanced fertilizer to promote healthy growth.
Helps Plants Thrive
You can help your crocosmia thrive by providing it with adequate sunlight, water, and nutrients throughout the growing season. Here are three things you can do to ensure your crocosmia is getting what it needs:
-
Watering frequency: Crocosmia prefers moist soil, but it doesn’t like to sit in water. Water your crocosmia deeply once a week, or whenever the top inch of soil feels dry to the touch. Be sure to water the soil, not the leaves, to avoid fungal diseases.
-
Soil requirements: Crocosmia grows best in well-draining soil with a pH between 6.0 and 7.0. If your soil is heavy clay or sand, amend it with organic matter like compost or peat moss to improve drainage and fertility.
-
Fertilizer: Crocosmia is not a heavy feeder, but it benefits from a balanced fertilizer once or twice a year. Use a fertilizer with equal parts nitrogen, phosphorus, and potassium, and follow the manufacturer’s instructions for application rates. Over-fertilizing can lead to weak growth and fewer flowers.
Improves Flowering
Improving the flowering of your crocosmia can be achieved by providing it with the right amount of nutrients, water, and sunlight. Pruning techniques can also be utilized to encourage healthy growth and more blooms. When the flowers have faded, it’s important to cut off the spent blooms to promote the development of new buds. This process is called deadheading, and it can be done by simply snipping off the stem just below the faded flowers. By doing this, your crocosmia will put more energy into producing new flowers rather than developing seeds.
In addition to pruning, soil nutrition can also play a significant role in the flowering of your crocosmia. These plants thrive in well-draining soil that is rich in organic matter. You can incorporate compost or aged manure into the soil before planting to provide your crocosmia with the necessary nutrients. Additionally, you can apply a balanced fertilizer once a month during the growing season to give your plants a boost. By utilizing these techniques, you can ensure that your crocosmia will produce an abundance of beautiful blooms year after year.
| Pruning Techniques | Soil Nutrition | ||
|---|---|---|---|
| Deadheading spent blooms | Incorporate compost or aged manure | ||
| Cut stem just below faded flowers | Use well-draining soil rich in organic matter | ||
| Promotes development of new buds | Apply a balanced fertilizer once a month | ||
| Increases energy for new flower growth | Ensures necessary nutrients are provided | and helps plants grow strong and healthy. |
Store Bulbs for Next Season
You’ll need to store your crocosmia bulbs properly if you want them to thrive next season. This involves carefully digging them up, cleaning them off, and storing them in a cool, dry place.
Before planting them again in the spring, you’ll need to take a few steps to prepare the soil and ensure they have the right conditions to grow.
Proper Storage Techniques
To ensure the longevity of your crocosmia bulbs, it’s important to properly store them after they’ve finished blooming. Here are some tips on how to store your bulbs for the next season:
-
Wait until the foliage has died back before digging up the bulbs. This allows the plant to fully absorb nutrients from the leaves before they’re removed.
-
Gently dig up the bulbs and shake off any excess soil. Be careful not to damage the bulbs or any new growth.
-
Store the bulbs in a cool, dry place such as a paper bag or mesh bag. Avoid storing them in plastic as it can cause moisture buildup and rot.
By following these storage techniques, you can ensure that your crocosmia bulbs will be healthy and ready to bloom again next season. Remember to always handle the bulbs with care and store them properly for the best results.
Preparing for Planting in the Spring
Get ready for spring planting by preparing your crocosmia bulbs for their new home in the garden. One important factor to consider is choosing the right variety that suits your garden’s growing conditions. Crocosmia likes well-drained soil and prefers full sun, but some varieties can also tolerate partial shade. You can choose from a variety of colors, including orange, yellow, red, and pink, to add a pop of color to your garden.
Before planting, make sure to prepare the soil by removing any weeds, rocks, and debris. Crocosmia grows best in fertile soil, so adding compost or organic matter can help improve the soil quality. You can also mix in some sand or grit to improve drainage.
Once the soil is ready, plant the bulbs about 3-4 inches deep and space them 6-8 inches apart. Water the bulbs well after planting and continue to water regularly until they are established.
With proper preparation, your crocosmia bulbs will thrive in their new home and provide you with beautiful blooms all season long.
Frequently Asked Questions
What are some common pests or diseases that affect Crocosmia plants?
To keep your crocosmia plants healthy, it’s important to be aware of common pests and diseases that can affect them. Preventing infestations is key.
Keep an eye out for spider mites, which can cause yellowing leaves and webbing on the plant. Aphids are another common pest that can be controlled with insecticidal soap.
Diseases like root rot and leaf spot can be treated with a fungicide, but prevention is the best course of action. Avoid overwatering and make sure the soil is well-draining.
Regularly inspecting your plants and taking action at the first sign of trouble can help keep them thriving.
How often should Crocosmia be fertilized and what type of fertilizer is best?
To keep your Crocosmia plants healthy and thriving, it’s important to fertilize them regularly. The best fertilization frequency for Crocosmia is once a month during the growing season, using a balanced fertilizer with equal amounts of nitrogen, phosphorus, and potassium.
Before planting your Crocosmia, make sure to prepare the soil properly by adding organic matter and ensuring good drainage. This will help the plants to establish strong roots and better absorb nutrients from the fertilizer.
By following these tips, you can ensure that your Crocosmia plants receive the best possible care and continue to bloom beautifully year after year.
Are there any companion plants that pair well with Crocosmia in the garden?
Looking for companion plant options to pair with Crocosmia in your garden? Look no further!
Crocosmia pairs well with a variety of plants such as daylilies, coneflowers, and yarrow. When designing your garden, consider planting Crocosmia in groups of three or more for a dramatic effect. To balance the boldness of Crocosmia, pair it with plants that have delicate textures or softer colors.
Remember to also consider the height and spread of the plants to ensure they complement each other well. By following these design tips, you’ll be able to create a stunning garden with Crocosmia as the star of the show.
Can Crocosmia be grown in containers and if so, what are some tips for successful container gardening?
If you’re considering growing crocosmia in containers, there are a few things to keep in mind.
First, choose a container size that is at least 12 inches in diameter and has drainage holes to prevent water buildup.
When planting, use a well-draining potting mix and place the bulbs about 2-3 inches deep.
Water regularly, but avoid overwatering as this can lead to root rot.
It’s also a good idea to fertilize once a month during the growing season.
As the plant grows, you may need to stake it to prevent it from toppling over in the wind.
With these tips, you can successfully grow crocosmia in containers and enjoy their beautiful blooms all season long.
How long does it typically take for Crocosmia bulbs to multiply and form large clumps?
If you’re wondering how long it takes for crocosmia bulbs to multiply and form large clumps, you’ll be happy to know that these plants are hardy and resilient. With proper garden maintenance, crocosmia bulbs can multiply quickly, forming large clumps in just a few years.
To encourage crocosmia bulb multiplication, it’s important to keep the soil moist and provide them with plenty of sun. You’ll also want to divide the bulbs every few years to prevent overcrowding.
By regularly caring for your crocosmia bulbs, you’ll be rewarded with a beautiful and thriving garden.
Conclusion
Congratulations, you’ve successfully completed another season of crocosmia gardening! Now that your crocosmia has finished blooming, it’s time to give it some post-bloom care to ensure that it remains healthy and vibrant for the next growing season.
Firstly, make sure to deadhead any spent blooms to encourage the plant to put its energy into producing new growth rather than seed production.
Secondly, cut back the foliage to prevent any diseases or pests from overwintering on the plant. If your clumps are overcrowded, it’s time to divide them to promote healthier growth and prevent competition for nutrients.
Finally, provide adequate water and fertilizer to help the bulbs store nutrients for next season. By following these steps, your crocosmia will be sure to thrive and provide you with stunning blooms for years to come.
Happy gardening!