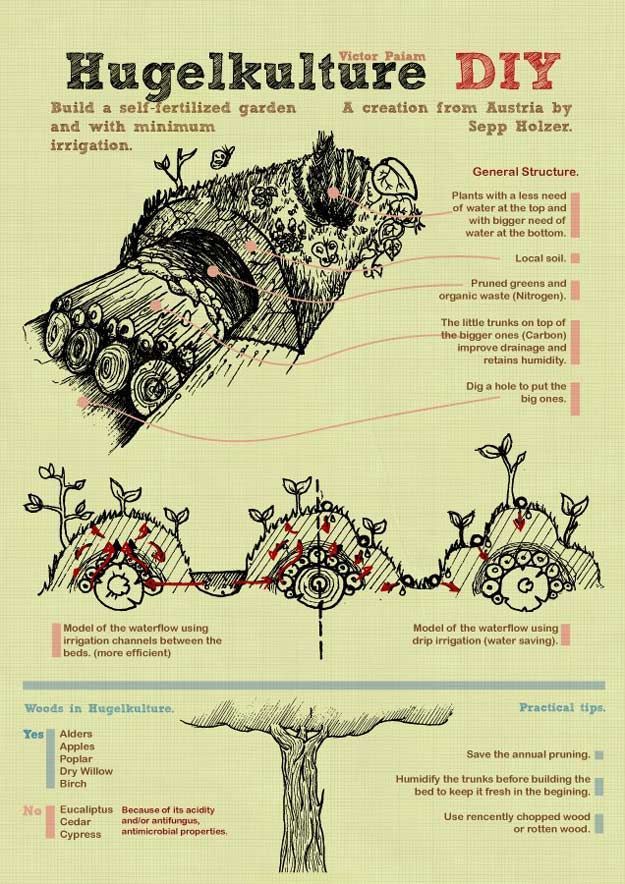
Hügelkultur is a word that comes from German and means mound culture or hill culture. This is a practice that has existed both in German and Eastern Europe societies for hundreds of years. The concept was further developed by Sepp Holzer, who is an expert in permaculture, in his book Sepp Holzer’s Permaculture: A Practical Guide to Small-Scale, Integrative Farming, and Gardening. Today we are going to find out more about the hügelkultur (or hugel culture, mound gardening, etc.) and see what are the steps to do it right.
What Is Mound Gardening?
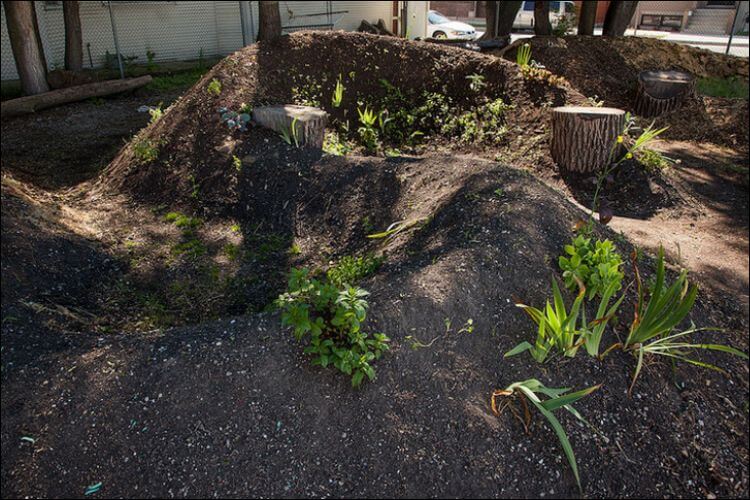
Mound gardening is a composting process that uses raised garden beds. The beds are made from biomass plant materials that can be composted, as well as from decaying wood debris, for example. Many planters took up mound gardening because it is a process that helps improve water retention, and soil fertility, together with soil warming. This means that hügelkultur benefits the plants that grow both on and near the mounds.
To put it simply, mound gardening tries to replicate the entirely natural process of decomposition. This occurs naturally on the forest floors. More exactly, the trees that fall in the forest turn into nurse logs that are decaying. Thus, they offer ecological facilitation to other seedlings. The more the wood decays, the more water can be stored thanks to its porosity. Finally, the water goes through a slow process of being released back into the environment, which is good for the nearby plants.
It’s a good idea to take up mound gardening if you live in an area with compacted or poor-quality underlying soil. It will be easier to take care of the mounds because of the height they have above the ground. Usually, the beds measure around 3 by 6 feet in area, and 3 feet high.
Can Hügelkultur Gardening Help with Moisture Control in Potting Soil?
Hügelkultur gardening can indeed improve moisture control in potting soil. By creating raised beds filled with organic materials, such as wood and compost, the soil retains water more effectively. This method promotes better drainage and reduces the need for frequent watering, making it an ideal solution for moisture control potting soil.
How to Do Mound Gardening Right?
1. Plan the Shape of the Mound
The first thing you need to do when taking up raised mound gardening is to plan the shape of the raised bed. The raised bed, or berm, will look most natural if it contains a curve or a sinuous shape. If there are any other curves in the landscape that allow it to blend in, that’s even better. A general guideline for the berm is to be 4 – 6 times as long as it’s wide.
2. Choose the Slope and Height
Next, you will need to choose the slope and height for your future mound. The maximum gradient should be kept below 5:1. This means that you need to make it 5 times as wide as it is tall if you want to cut down on problems with water runoff, mowing, or erosion. You can also do it with a 4:1 ratio, but this can turn out rather risky. Anything that is steeper than that will need some extra erosion control and specialized plants. If you’ll have a look at other berms found in home gardens, you’ll see they are no taller than 24 inches.
As an extra tip, it would be better if you could create an asymmetric look for it. This will boost the aesthetics of it, so you can have an off-center peak, as well as different slopes on the mound’s length.
3. Choose the Right Time
Theoretically, any time is good for setting up your mound. However, it is recommended to do it in the fall, before you start your spring planting. In this way, the beds will have an entire winter to relax ahead. They will get colonized with microbes and get accustomed to the environment before you plant anything on them. This can help you with the good development of the plants in the future.
4. Check the Drainage
One possible problem with mound gardening is that the raised bed can act as a miniature dam, which means it will alter the water flow that exists in your garden. For this reason, you may need to dig some swales between the raised beds, regrade the garden, or simply build a culvert that runs through the berm. If you’re planning on building a very tall berm, it’s better to discuss this aspect with a professional landscaper. You should also be careful if you live in an area with a rainy climate as well.
If you have a flat top, this will reduce the runoff and offer more water to the plants you grow on the side of the mound. Another thing you should keep in mind is to avoid compacting the dirt found at the base if you’re using heavy equipment when building the mound. However, if your soil is already compacted, try loosening it. Do this by digging 8 inches deep to help with the drainage.
5. Break Up the Soil
When mound gardening, it’s important to dig into the surface of the area, following the path of your berm. This will help you make up a stronger bond of the mound with the next layer of soil.
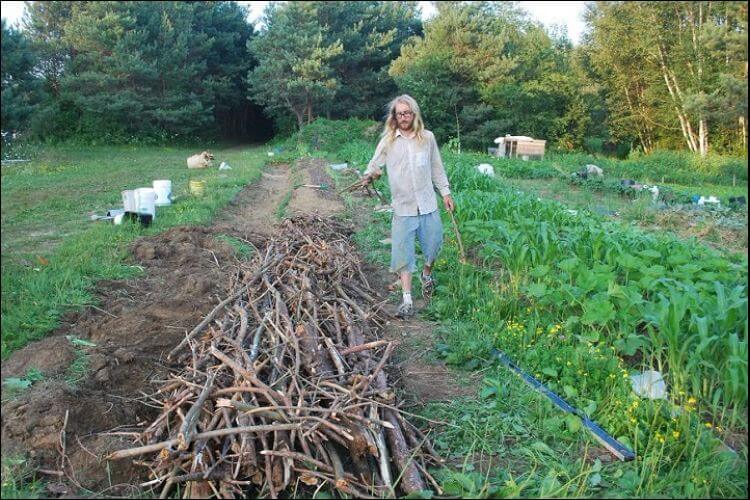
6. Build the Base
The best thing about mound gardening is that you don’t need to spend a fortune on materials. You can use any affordable ones you have lying around. Here, you will need the help of a bobcat or a shovel to pile on fill dirt. Periodically, remember to compact it. Consider the shape you decided on in the beginning and follow it. However, it’s a good idea to make it 1 foot smaller on all its sides. Rake up the soil smooth and make sure you respect the proportions.
If you’re building a tall or steep berm, it would be better to use well-compacted clay soil. In general, the loam collapses if the slope is steeper than 35%. Most likely, you already know that planting on a slope can be quite difficult. On the other hand, you can spend less money on gravel, but usually, the soil washes right through it. Moreover, in some areas using gravel may not comply with the local codes. However, if you still want to use it, make sure you cover it with a minimum of 1 inch of compacted clay.
7. Choose the Woods
For the base, you will need to accumulate different types of wood: branches, chips, old firewood, or even whole logs. For your hugel bed, it’s recommended to choose from:
- Willow;
- Apple;
- Birch;
- Alder;
- Poplar;
- Maple;
- Oak;
- Cottonwood, etc.
As you can see, all the recommended varieties are softwood. You should avoid black walnut, for example, because it has some natural chemicals that interfere with plant growth. At the same time, some gardeners say it’s not okay to use black locust, black cherry, or rot-resistant cedar. There are mixed opinions about using conifers, and some say that it would be better to let them age first before putting them in the growing area of your mound.

8. Add the Top Layer to the Mound
Next, spread a layer of topsoil on top of the entire berm. Mix it with the top 2 – 3 inches of clay that are on the mound already. Then, pile up more topsoil until you have a 1-foot layer.
9. Compact the Soil
Take an empty lawn roller and roll it over the top layer of dirt. Alternatively, you can compact it by tamping it down either with your feet or a board. In time, the mound will settle on itself as the water will seep through it. However, it is required to have light compaction if you want to minimize erosion.
10. Plant on the Mound Surface
Ideally, you should use the berm to establish a lawn. Add some shrubs and trees as well, but make sure this doesn’t interfere with your walking or mowing. To prevent erosion, it is recommended to add mulch when the plants are establishing roots.
11. Add Borders
If you want, you can customize your mound garden with borders. They can be made of stones, logs, or even boards that measure 2×8 inches. However, it’s not compulsory to define your bed with extra materials, but it’s a good idea if you want to customize and add to it.
12. Pay Attention to the Low Nitrogen
Another thing you should keep in mind is that in the first days, the bed will be low on nitrogen. In general, mounds give back nutrients in time, not immediately. For this reason, in the beginning, you can grow plants that don’t require plenty of nitrogen, such as potatoes. It’s not a good idea to plant corn, for instance, which is a heavy nitrogen feeder, on your new mound.
13. Aftercare of the Hugelkulture
In the subsequent years, you will also need to care a little for your mound. In time, the wood will break down, which means that it will start collapsing. For this reason, every time you’re planting it’s a good idea to add compost to your bed. Check the planting pockets and fill them up as needed.

Here you can watch an extensive video that described in detail how to build a raised bed for mound gardening:
Conclusion
Mound gardening is an easy way to grow the plants you want if you live in a rainy area or simply want to diversify your backyard. You will need to make more effort as opposed to regular gardening since you need to build your own hügelkultur raised beds. However, the result will be impressive and will have a natural look if you follow the steps correctly.
Main image source: depositphotos.com