Saving your own squash seeds from your favorite varieties has many benefits. It allows you to preserve your harvest and ensure a fruitful garden for seasons to come. By saving squash seeds, you can protect your favorite varieties from disappearing as seed companies may discontinue them. Additionally, you have the freedom to select seeds according to your personal tastes and desires. Saving squash seeds also enhances the adaptation of your seed to your specific micro-region and saves you money in the long run. Moreover, saved seeds serve as currency for trades and seed-swaps, promoting community exchange and diversity in gardening.
Whether you are a seasoned gardener or just starting your seed-saving journey, saving squash seeds is a cool and rewarding hobby for seed-savers. Not only does it give you a sense of accomplishment and self-sufficiency, but it also adds an element of sustainability to your garden. By following a few simple steps, you can become a pro at preserving and storing squash seeds.
Understanding Pollination for Saving Squash Seeds
Before attempting to save seeds from your winter squash, it is crucial to understand how they become pollinated. Winter squashes, including all cucurbits, are cross-pollinated. This means that they have distinct male and female flowers and rely on insects for pollination.
Cross-pollination can occur between different varieties of winter squash and even with summer squash, zucchini, and pumpkins since they are all part of the same species. However, cross-pollination only affects the seeds and not the fruit itself.
To ensure seeds stay true to their parent, it is recommended to only grow one type of squash in the garden. This way, you can prevent the mixing of pollen from different varieties. Advanced seed savers may also choose to hand-pollinate their flowers by covering them with small bags to further prevent cross-pollination.

Hand-pollination is a complex process that requires manual pollination to keep the seeds pure. By taking the time to hand-pollinate, you can have more control over the pollination process and ensure the integrity of the seeds you save.
For most seed savers, growing only one variety of squash and taking simple precautions is sufficient to preserve the genetic purity of the seeds.
The Process of Saving Squash Seeds
When it comes to saving squash seeds, it is crucial to understand the importance of avoiding hybrid varieties. Hybrid seeds, while they may produce desirable fruit, will not produce offspring that are true to the parent plant. Additionally, some hybrid seeds may be protected by patents, making it illegal to save and propagate them.
Therefore, it is crucial to save seeds only from open-pollinated varieties. These varieties are the result of natural pollination and will produce offspring that closely resemble the parent plant.
Here is a step-by-step guide on how to save squash seeds:
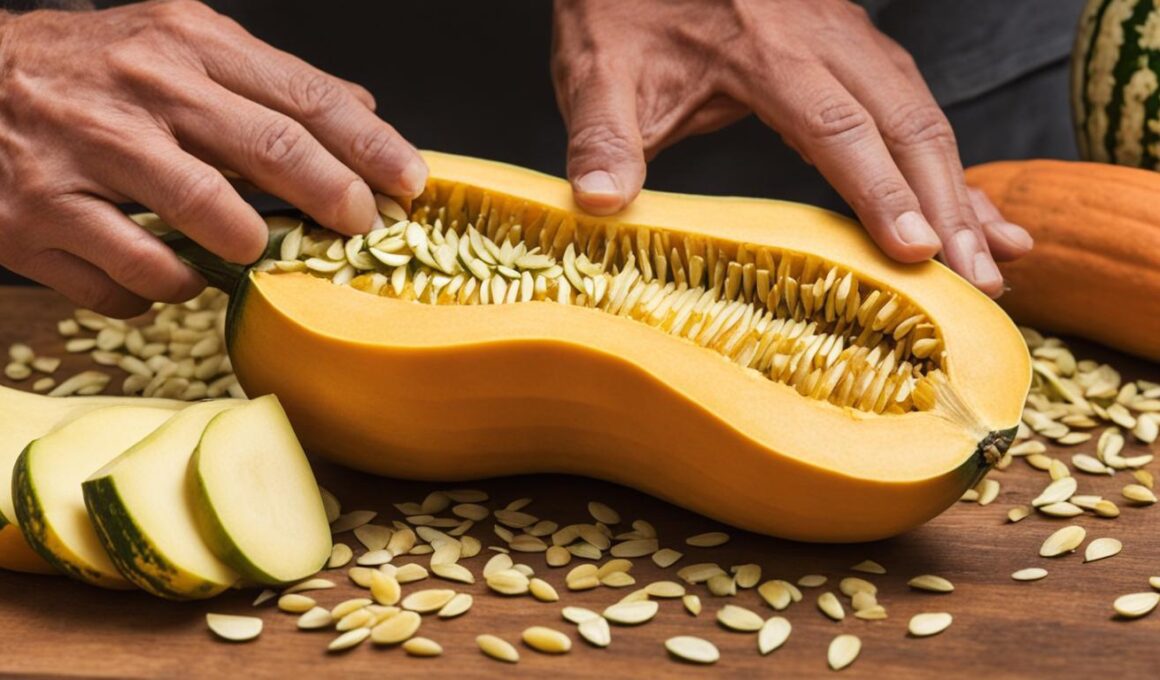
- Cutting the Squash: Begin by cutting the squash open as you normally would for eating. Use a sharp knife to carefully cut it in half.
- Removing the Seeds: Once the squash is cut, use a spoon or your hands to scoop out the seeds and the surrounding membranes from the center of the squash.
- Separating the Seeds: Separate the seeds from the membranes and place them in a small jar or container. It’s important to remove any excess pulp or flesh from the seeds.
- Fermenting the Seeds: Add water to the jar or container, covering the seeds completely. Allow the seeds to ferment for a few days up to a week. During this process, beneficial bacteria will break down any remaining pulp and help prevent seed-borne diseases.
- Draining and Rinsing: After the fermentation period, carefully pour out the water, taking care to retain the seeds. Rinse the seeds thoroughly to remove any remaining debris or fermentation residue.
- Drying the Seeds: Spread the rinsed seeds out in a single layer on a towel or newspaper. Allow them to air dry completely. This process usually takes about a week. Make sure the seeds are completely dry before moving on to the next step.
- Storing the Seeds: Once the seeds are dry, store them in a glass jar or a paper envelope. Make sure the container is labeled with the date and the name of the squash variety. Store the container in a cool, dry place, such as a basement or a refrigerator, to maintain optimal seed viability.
By following these steps, you can successfully save squash seeds and continue to grow your favorite varieties year after year. Remember to avoid hybrid varieties and opt for open-pollinated varieties to ensure the best results. Happy seed saving!
Conclusion
Saving squash seeds is a rewarding and beneficial practice for gardeners. It allows you to preserve your harvest and ensure a fruitful garden for seasons to come. By saving squash seeds, you can protect your favorite varieties from disappearing as seed companies may discontinue them.
Additionally, you have the freedom to select seeds according to your personal tastes and desires. Saving squash seeds also enhances the adaptation of your seed to your specific micro-region and saves you money in the long run. Moreover, saved seeds serve as currency for trades and seed-swaps, promoting community exchange and diversity in gardening.
By following the proper steps to save and store squash seeds, you can have a sustainable source of seeds for your future gardening endeavors, fostering self-sufficiency and independence in your garden. Start your seed-saving journey today and enjoy the benefits of growing your own seeds.
Can the Same Process Be Used to Save and Germinate Squash Seeds?
Yes, the same process outlined in the germinate watermelon seeds article can be used to save and germinate squash seeds. By carefully extracting and drying the seeds, then storing them in a cool, dry place, they can be successfully germinated in the following growing season.