Quick Summary
- Gather necessary tools and materials: hose adapter, wrench
- Turn off water supply before starting connection
- Choose the right hose adapter that fits the faucet and hose properly
- Double-check for leaks before turning on the water supply gradually
Gather the Necessary Tools and Materials
You’re going to need a few things to make this garden hose connection happen, but don’t worry, it’s easier than you think! Safety is the utmost concern when connecting a garden hose to an indoor faucet, so let’s make sure you have the necessary tools and materials. First, you’ll need to choose the right hose adapter. This adapter is crucial as it connects the indoor faucet to the garden hose. Make sure to select an adapter that fits both the faucet and the hose properly. Improperly sized adapters may cause leaks or damage to the faucet. Once you have the right adapter, it’s important to properly secure the hose attachment. You can use a hose clamp or a hose coupling to tightly secure the hose to the adapter. This will prevent any water leakage and ensure a safe connection. Remember to tighten the clamp or coupling securely, but be careful not to overtighten as it may damage the hose or the adapter. By gathering these necessary tools and materials and following the proper steps, you can safely connect your garden hose to an indoor faucet.Turn Off the Water Supply
Before proceeding, make sure to shut off the water supply to prevent any unexpected surprises. Safety should always be a top priority when connecting a garden hose indoors. Here are some precautions you should take and alternative methods you can consider.- Precautions when connecting a garden hose indoors:
- Turn off the water supply: Locate the shut-off valve for the water source and close it firmly to avoid any water leakage or pressure build-up.
- Release pressure: Open the faucet to release any remaining pressure in the pipes before connecting the garden hose.
- Inspect the faucet: Make sure the faucet is in good condition and can withstand the pressure of a garden hose. Look for any leaks or cracks that may cause water damage.
- Alternative methods to connect a garden hose indoors:
- Use a hose adapter: If your indoor faucet doesn’t have a threaded spout, you can use a hose adapter that attaches to the faucet and allows you to connect the hose securely.
- Install a spigot or tap: If you frequently need to connect a garden hose indoors, consider installing a dedicated spigot or tap specifically for that purpose. This will provide a more convenient and secure connection.
Remove the Aerator from the Faucet
To get started, it’s essential to take off the aerator from your indoor tap. The aerator is a small device attached to the end of the faucet that helps regulate the flow of water and prevent splashing. Removing it will allow you to connect the garden hose to the faucet.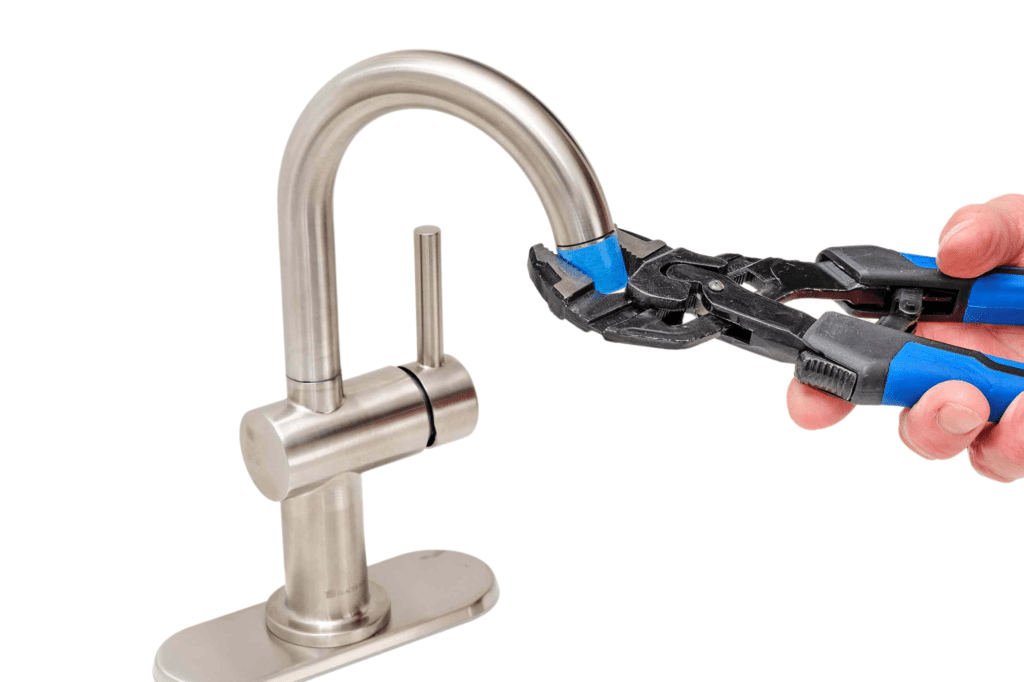 To remove the aerator, follow these simple steps:
- Locate the aerator at the end of the faucet and grip it firmly with your hand.
- Twist the aerator counterclockwise to loosen it. If it’s too tight, you can use a pair of pliers to help you turn it.
- Once loosened, continue twisting the aerator until it comes off completely.
- Set the aerator aside in a safe place, where it won’t get lost or damaged.
| Action | Amount of Water Saved (per minute) |
|---|---|
| Turning off the faucet while brushing teeth | 2-5 gallons |
| Fixing a leaky faucet | 20 gallons |
| Taking shorter showers | 2.5 gallons |
| Using a broom instead of a hose for outdoor cleaning | 80-100 gallons |
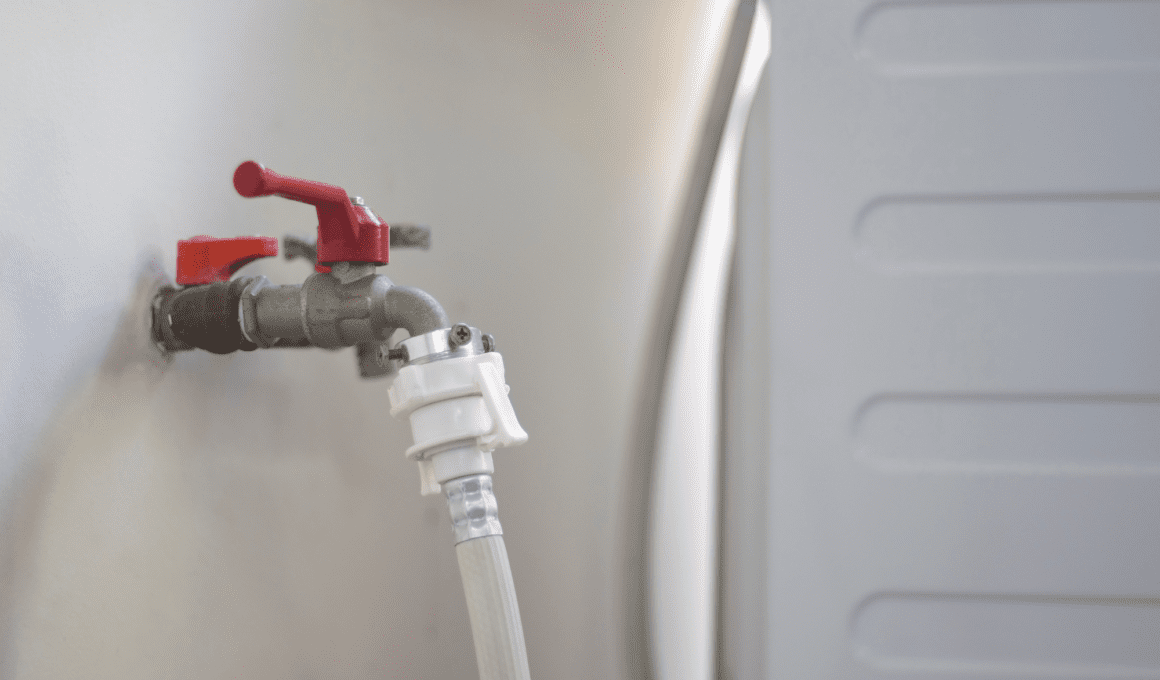
Attach the Hose Adapter to the Faucet
Once you’ve successfully removed the aerator, it’s time to secure the hose adapter onto your faucet. This step is crucial for connecting your garden hose to an indoor faucet safely.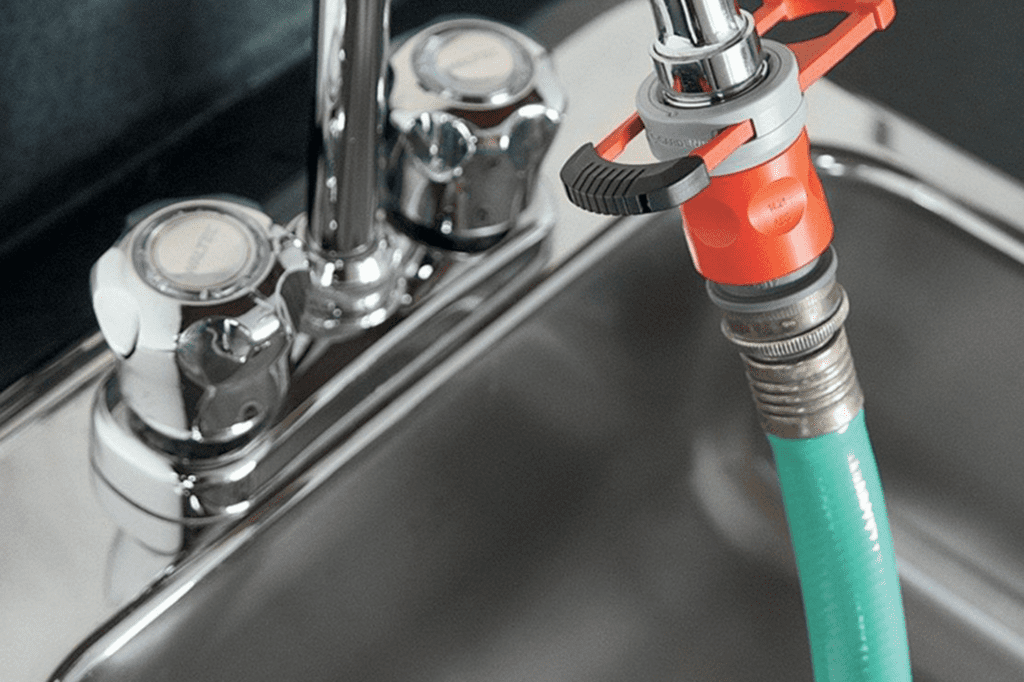 There are different hose adapters available in the market, so make sure to choose the one that fits your faucet properly. To attach the hose adapter, simply screw it onto the faucet where you removed the aerator. Ensure that it’s tight enough to prevent any leakage but not too tight that it damages the faucet.
Safety is paramount when connecting a garden hose to an indoor faucet. Always follow the manufacturer’s instructions and guidelines to ensure a secure connection. If you’re unsure about which hose adapter to use, consult a professional or seek advice from a knowledgeable person.
Alternatively, there are other methods for connecting a hose to an indoor faucet. Some faucets may have a built-in threaded connection that allows direct attachment of the hose. In such cases, you won’t need a hose adapter. However, it’s essential to check the compatibility of your faucet with this method before proceeding.
Remember, proper installation of the hose adapter or using alternative methods will help prevent any accidents or damage to your faucet. Take your time, double-check your connections, and always prioritize safety when connecting a garden hose to an indoor faucet.
There are different hose adapters available in the market, so make sure to choose the one that fits your faucet properly. To attach the hose adapter, simply screw it onto the faucet where you removed the aerator. Ensure that it’s tight enough to prevent any leakage but not too tight that it damages the faucet.
Safety is paramount when connecting a garden hose to an indoor faucet. Always follow the manufacturer’s instructions and guidelines to ensure a secure connection. If you’re unsure about which hose adapter to use, consult a professional or seek advice from a knowledgeable person.
Alternatively, there are other methods for connecting a hose to an indoor faucet. Some faucets may have a built-in threaded connection that allows direct attachment of the hose. In such cases, you won’t need a hose adapter. However, it’s essential to check the compatibility of your faucet with this method before proceeding.
Remember, proper installation of the hose adapter or using alternative methods will help prevent any accidents or damage to your faucet. Take your time, double-check your connections, and always prioritize safety when connecting a garden hose to an indoor faucet.
Connect the Garden Hose to the Adapter
Begin by ensuring that the hose adapter is securely fastened to the faucet, so you can effortlessly attach the hose. Safety is paramount when connecting a garden hose to an indoor faucet, so follow these steps carefully:- Check for Leaks: Before connecting the hose, inspect the adapter and faucet for any signs of leakage. If you notice any leaks, tighten the connections or replace faulty parts to prevent water wastage and potential damage.
- Proper Alignment: Align the threads of the hose connector with those on the adapter. Make sure they fit snugly together. A loose connection can result in water leakage or a weak flow, so ensure a tight fit.
- Tighten Gently: Once aligned, gently tighten the hose connector onto the adapter. Avoid overtightening, as it can damage the threads or cause leaks. Use your hand to tighten it securely, and if needed, give it a small additional turn with pliers.
Can I Use Wicker Furniture Outdoors Without Treating It?
Using wicker furniture for outdoor spaces is common, but it’s essential to consider treating wicker furniture for outdoor use to withstand the elements. Untreated wicker may become susceptible to damage from rain, humidity, and sun exposure, leading to fading, warping, and mold growth. Treating wicker furniture prevents these issues, ensuring its longevity and maintaining its appearance.
Turn On the Water Supply and Check for Leaks
Now that you’ve securely attached the hose adapter, it’s time to turn on the water supply and make sure there are no leaks. Safety is crucial when dealing with water, so let’s go through the necessary steps to check for water pressure and adjust the water flow. First, slowly turn on the indoor faucet to allow water to flow into the hose. Pay close attention to any signs of leaks or drips around the connections. If you notice any leaks, immediately turn off the water supply and tighten the connections. Next, check the water pressure. Too much pressure can damage the hose or cause it to burst. To adjust the water flow, turn the faucet handle slightly to decrease the pressure. Keep an eye on the hose for any bulging or signs of excessive pressure. Once you have adjusted the water flow, carefully inspect the entire length of the hose for any leaks, cracks, or damage. Gently run your hand along the hose to feel for any abnormalities. If you find any issues, turn off the water supply and address them before proceeding. Make sure the water is flowing smoothly through the hose without any obstructions. If you notice any blockages, remove them to ensure a steady flow. Remember, always prioritize safety when connecting a garden hose to an indoor faucet. By checking for water pressure and adjusting the water flow, you can ensure a successful and leak-free connection.Use the Hose for Watering or Cleaning Tasks
To utilize the hose effectively for various watering or cleaning tasks, make sure you have made a secure connection and the water supply is functioning properly. Once you’ve connected the garden hose to the indoor faucet and turned on the water supply, you can start using the hose for gardening and landscaping tasks, as well as car washing and outdoor cleaning. Here are a few tips to help you get the most out of your hose:- When using the hose for gardening and landscaping tasks, such as watering plants or cleaning outdoor surfaces, make sure to adjust the nozzle to the desired spray pattern. This’ll help you control the water flow and prevent any unnecessary wastage.
- For car washing, it’s recommended to use a nozzle with a gentle spray setting to avoid damaging the vehicle’s paint. Start by rinsing off any loose dirt and then apply a mild soap solution using a sponge or brush. Finally, rinse thoroughly to remove all soap residue.
- When using the hose for outdoor cleaning, like washing windows or hosing down patio furniture, always be cautious of slippery surfaces. Make sure to wear appropriate footwear and take necessary safety precautions to prevent any accidents.