How to Build a Trellis for Tomatoes
Depending on the kind of tomatoes that you want to grow in your garden, your trellis will have to be more or less sturdy. For tomatoes that grow quite large, you’ll have to think of a trellis that provides them with more support, as opposed to one that simply dictates the direction they’re going to grow in. The tomato trellis we’re about to show you how to build works perfectly both for larger tomatoes and for smaller ones. Without further ado, let’s see what you’re going to need in order to build it. The first things you should buy are some 7-foot t-posts, some 10-foot rebars, and some PVC 90-degree tees with a 1 ¼ inches diameter. The number of t-posts, rebars, and tees that you’re going to use depends on the length of the trellis that you want to build. Thus, it’s completely up to you to think about how many tomatoes you want to grow on your trellis or how much space you have in your garden for this project. Now, what you should know is that the soil should be ready for planting before you start building the trellis. That’s because if you do it the other way around, you’re going to have a hard time preparing the soil in between the t-posts. So once the soil is ready for you to plant your tomatoes, it’s time to build and install the trellis. First, drive the t-posts into the soil, making sure that they’re 1 foot deep and 4.5 feet apart. Then, take the PVC tees and place them on top of each post. The next step is to run the rebars through the tee, and your structure is almost ready. In order to create the support system for the tomatoes, you could use crop net, but we advise you to use twine instead. It’s resistant and extremely easy to add to the structure. All you have to do is tie pieces of twine to the rebars, depending on the number of tomatoes that you want to plant. If you’re wondering where the other end of the twine should go, the answer is the bottom of the tomato plants. You can tie it there safely without worrying that it might damage the tomatoes. When your tomatoes start to grow, you should wrap their vines around the twine strings. Just make sure that each vine has a twine of its own. You have to pay constant attention to their growth and continue to wrap them around the twine gently. We hope this short tutorial has successfully taught you how to build a trellis for tomatoes. The best thing about this set-up is the fact that you can store it away when you don’t need it. Then, you have the option of putting it back up in no time. Plus, the posts and rebars don’t take up a lot of space. So they’re perfect for people who have a smaller garden.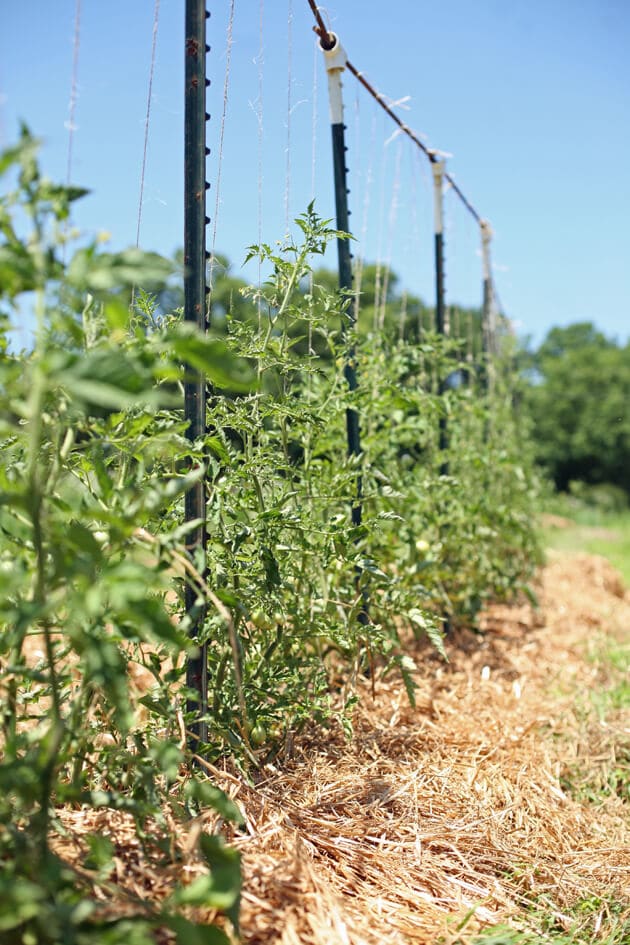
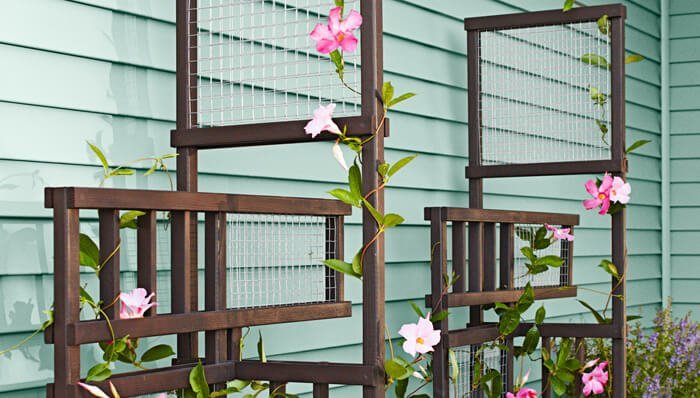
What Type of Gardener Would Benefit Most from Using a Trellis?
What Type of Gardener Would Benefit Most from Using a Trellis? Find out with our kind of gardener quiz. A trellis is ideal for vertical gardening, which is a great solution for small spaces. If you have limited garden space or want to add height and dimension to your garden, a trellis is perfect for you. It supports climbing plants like cucumbers, tomatoes, and vines, allowing them to grow vertically and save valuable space. Take our quiz to discover the kind of gardener you are and learn if a trellis is the right fit for you.
How to Build a Trellis for Vines
The next type of trellis we want to teach you how to build is a grapevine trellis. This is not a difficult trellis to build. After all, grapes don’t need a complex support system in order to develop properly. There are many trellis ideas for vines that you can choose from, but we decided to go with one that also involves t-posts, just like in the tomato trellis above. What you’re going to need in order to build this trellis are some wooden stakes, some 8-foot t-posts, a t-post driver, a rubber mallet, some line-marking spray paint, some string, 2 earth anchors, a pair of pliers, some t-post wire clips, a wire tensioning device, and some 12 1/2-gauge high-tensile wire. All these required items might make it look like building this trellis is a complicated job. Bear with us while we explain how easy it actually is. The first thing you have to do is stick the two wooden stakes into the ground where you want the ends of your trellis to be. Then, tie a string in between them and mark the ground each 18 to 21 feet along it by using the spray paint. This will show you the location of the t-posts. Using the t-post driver, you’ll have to drive the t-posts into the ground. Do that until the anchor plate is 2 feet underground. Now it’s time to install the earth anchors at a 45-degree angle on the outside of the end posts. The anchors should be at least 40 inches long and 5/8-inches in diameter. You only need earth anchors if you’re going to plant a lot of grapes and you want plenty of support. For only a few grape vines, it’s fine if you skip this step. After you’ve done that, you have to take a high-tensile wire and pull it across the row. The wire has to be 3 inches above the posts. You can tie it to the hooks of the earth anchors (or the end posts) when you’re done. Using the wire tensioning device, you have to adjust the wire tension to 250 pounds. Then, take the t-post clips to attach the wire to the t-posts. After you’re done with the first row, you can install a second one in the middle of the posts. All you have to do is go through the same steps as before.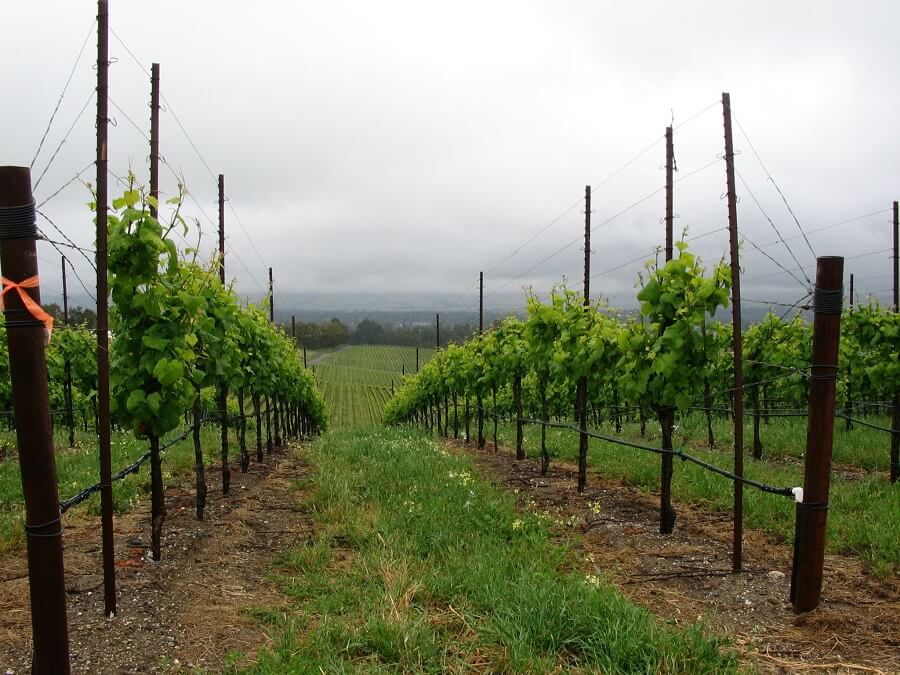
Can I Use the Tomato Trellis Method to Grow Grapevines and Cucumbers Indoors?
The tomato trellis method is commonly used to support growing tomatoes indoors this winter. However, adapting it for grapevines and cucumbers may not yield optimal results. Grapevines require sturdy structures, while cucumbers benefit from vertical support. Considering their different growth habits, it’s advisable to explore specific trellising techniques for indoor grapevine and cucumber cultivation.
The next type of trellis we want to teach you how to build is a grapevine trellis. This is not a difficult trellis to build. After all, grapes don’t need a complex support system in order to develop properly. There are many trellis ideas for vines that you can choose from, but we decided to go with one that also involves t-posts, just like in the tomato trellis above. What you’re going to need in order to build this trellis are some wooden stakes, some 8-foot t-posts, a t-post driver, a rubber mallet, some line-marking spray paint, some string, 2 earth anchors, a pair of pliers, some t-post wire clips, a wire tensioning device, and some 12 1/2-gauge high-tensile wire. All these required items might make it look like building this trellis is a complicated job. Bear with us while we explain how easy it actually is. The first thing you have to do is stick the two wooden stakes into the ground where you want the ends of your trellis to be. Then, tie a string in between them and mark the ground each 18 to 21 feet along it by using the spray paint. This will show you the location of the t-posts. Using the t-post driver, you’ll have to drive the t-posts into the ground. Do that until the anchor plate is 2 feet underground. Now it’s time to install the earth anchors at a 45-degree angle on the outside of the end posts. The anchors should be at least 40 inches long and 5/8-inches in diameter. You only need earth anchors if you’re going to plant a lot of grapes and you want plenty of support. For only a few grape vines, it’s fine if you skip this step. After you’ve done that, you have to take a high-tensile wire and pull it across the row. The wire has to be 3 inches above the posts. You can tie it to the hooks of the earth anchors (or the end posts) when you’re done. Using the wire tensioning device, you have to adjust the wire tension to 250 pounds. Then, take the t-post clips to attach the wire to the t-posts. After you’re done with the first row, you can install a second one in the middle of the posts. All you have to do is go through the same steps as before.How to Build a Trellis for Cucumbers
Now that we’ve told you all about how to build a trellis for grape vines, it’s time to learn how to build a trellis for cucumbers next. There are many types of cucumber trellises that you can attempt to build. Today, we thought we would provide you with one of the easiest ones. You only need a couple of supplies and about a half an hour to complete this task. If you’re looking for cheap trellis ideas, this is the one for you. This cucumber trellis that we’re about to teach you how to build looks like a tent and isn’t extremely tall. Still, you can make it taller depending on the supplies you buy. It’s extremely reliable and capable of supporting the weight of any type of cucumbers you might want to plant. What you have to purchase for this DIY project is a steel utility panel. You can usually find such panels in farm supply stores, and they don’t cost much. They’re also sometimes called cattle panels, which is the name that you’ll find them under if you want to order them from Amazon. Their length and width can differ, so select the one you think is more appropriate for your garden. Before starting the installation process, put a pair of gloves on. Then, use a heavy-duty bolt cutter to cut the cattle panel either in half or in three pieces. This depends on how many trellises you want. The next step involves bending the pieces right in the middle until they form a tent shape. Keep in mind that the panels are made of steel, so they’re not easy to bend. You might need to ask for another person’s help for this step. After you’ve created the tent shape, go back to the bolt cutter. Use it to snip off one of the ends of the trellis to create a staked end. The last step is to, of course, fixate the trellis into the ground. You should do that by using the staked end and then plant your cucumbers. They will grow up the trellis and over it due to its unique shape.