How to Plant and Care for the Aster Flower: 8 Tips
1. Prepare the Seeds and the Container
You can plant the aster flower from seeds, as long as you start them indoors. What you have to do is sow the seeds about two months before the time you anticipate that you’ll be transplanting the growths outside. We must mention that the aster flower is known for sometimes not germinating properly. This means that you shouldn’t expect all of the seeds to actually develop. We advise you to use a seedling tray where you can sow the seeds and then fill them with a seed starting blend. There are other things that you can use as well, in case you don’t have a seedling tray. Two other options would be small pots and plastic cups. The only thing you have to pay attention to is for the containers to be up to 4 inches deep.2. Sow the Seeds
After you’ve prepared the containers and bought the seeds, it’s time to sow them. The reason why a seedling tray is the best option is because you’re going to have to sow just one seed in every seedling compartment. Make sure to push the seed 1 inch into the starting blend. Then, cover the hole that you created when sowing the seed with some extra soil.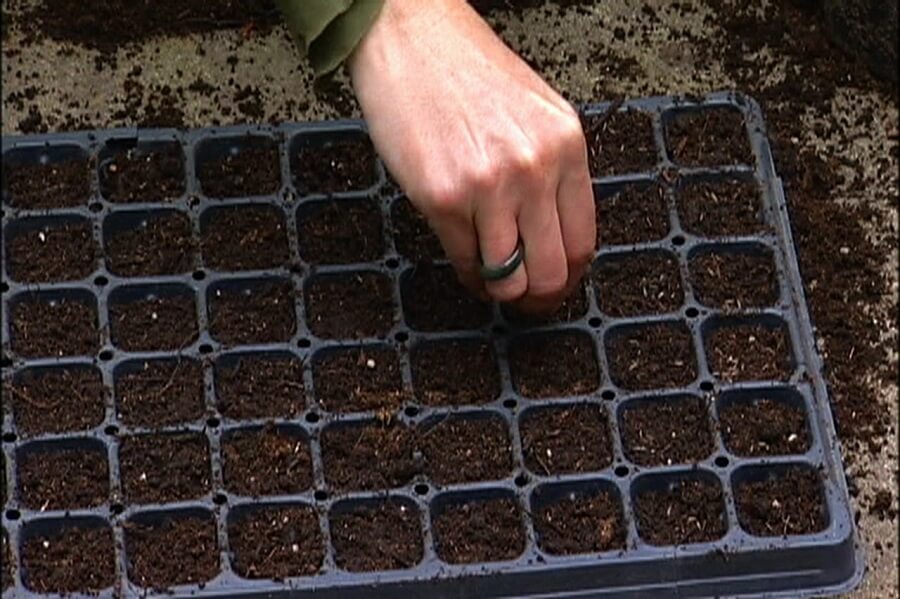
3. Store the Containers
The best way to store the aster flower seeds containers is to place them in the refrigerator for about 6 weeks. Before doing that, cover them with a plastic wrap for some additional protection. If you’re wondering why you have to keep your seeds in the refrigerator, we’re here to clear that up for you. The reason behind this step is that your seeds need something that mimics what would happen to them in nature, namely the chilling process. If you were to actually sow your seeds outside, the cold winter weather would cause them to die. This way, you know the refrigerator keeps them chilly but doesn’t completely freeze them, which ensures that they’ll be in top notch condition for you to transplant later on.4. Transfer the Containers
After approximately 6 weeks, you have to take the containers out of the refrigerator. Place them somewhere indoors where they can get a lot of sun exposure. You should do this about 4 weeks before the winter sends its last frost. You can’t move the aster flower seeds outside until they have formed seedlings. However, this happens quite quickly as long as they get about 6 hours of sun exposure every single day.5. Transplant the Seedlings
The best possible time for transplanting the seedlings into your garden is in early spring, but you can prolong this step until mid-spring as well. The reason why you have to wait that long is because you have to make sure you won’t be getting any more frosts that could damage your newly formed seedlings. Even if you bought already-formed seedlings, or you had previous aster flowers and used some of their new growths, the best time to plant them is still early to mid-spring.6. Choose the Right Location
Before planting the aster flower seedlings, it’s important to consider the growing conditions that they require. For instance, the best place for them is a well-drained soil that gets plenty of sunlight, but also partial shade. Preferably, you should make sure the soil is rich in nutrients, but aster flowers can also develop in a medium-quality soil. Keep in mind that if your garden has clay soil, you might not be able to grow these types of flowers, since clay soil doesn’t drain well. If you feel like you should improve soil drainage, you can try planting the seedlings at the top of a small hill or incline. Then, since your plants need all the nutrients they can get, mix the soil with some compost after loosening the top 15 inches with a tiller. 4 inches of compost should be enough to satisfy the needs of your plants. The next step involves digging holes into the ground, where you will later place the seedlings. The holes have to be twice as wide as the containers where you kept the seedlings, and have about the same depth as them. Make sure not to dig the holes too close to one another. A distance of 3 feet is advised.7. Remove the Seedlings and Plant Them
You have to pay a lot of attention when removing the seedlings out of their containers, in order to make sure they don’t get damaged. The best way to do it is to press on the sides of the container, starting from the bottom up. This will cause both the seedling and the soil to easily slide out of the container. If you’ve tried this and it didn’t work, try pouring some water over the soil. Damp soil might be easier to get out than if the soil is completely dry. Depending on the container, you might not even have the option of pressing on its sides. In this case, what you should do is place the container on its side. Then, use a trowel to glide out the seedling and attached soil. Once you’ve managed to get all the seedlings out of their respective containers, it’s time to actually plant them outside. Place each of the seedlings in a hole, making sure that the top of their roots is at the same level as the surface of the soil. Then, use the soil you’ve dug out and cover the rest of the hole. All there’s left for you to do now is water the soil. This will help it settle and give the plants a good head start.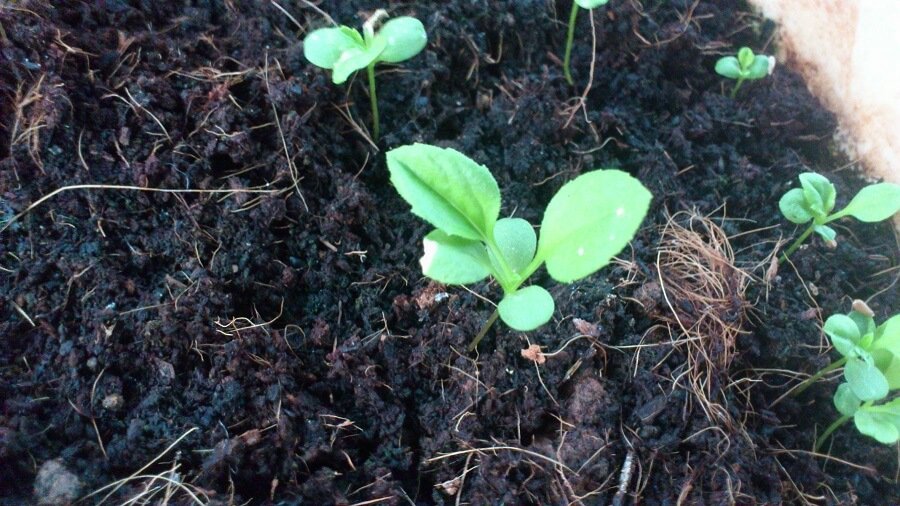
8. Take Care of the Aster Flower
Our guide to aster flowers wouldn’t be complete without a couple of tips and tricks on how to take care of the established plants. The first thing you should know is that the aster flower needs mulching every spring. Thus, you should surround it with about 2 inches of mulch after carefully removing any signs of old mulch. Adding mulch will ensure that the soil is warm in the cold season and cool in summer. Moreover, weeds are much less likely to grow on soil that has been properly fertilized with mulch. When it comes to watering, you should carefully monitor the aster flower during its growing season. Take note of how much it rains each week. If the answer is less than 1 inch, then you know you have to soak the soil yourself. Just make sure you don’t overwater the plants since this will weaken them. If you notice that your aster flower starts to wither and yellow, this is a sign that it’s getting too much water. If on the contrary, you don’t provide it with enough, it will start to lose some of its leaves and flowers. Each spring, you should also mix some compost with the soil around your plants. Moreover, a general purpose fertilizer is safe to use every month. The aster flower also needs pruning twice a year, once lightly in spring and once heavily in fall. In spring, you should pinch the shoots so that they grow outward. In winter, when the foliage dies, you should cut back the entire plant. This will make sure it grows healthier in the long run. If you’re worried about pests, you should know that the aster flower isn’t in grave danger. Still, you should look out for white smut, powdery mildew, aphids, slugs, leaf spots, rusts, and nematodes. If you notice signs of any of these pests, make sure to purchase something that is suitable for treating them. Furthermore, it’s always better to prevent rather than to wait for the disease to appear and then treat it. So, we recommend choosing aster varieties that are disease-resistant.Aster Flower Tips
The aster flower makes an ideal addition to rock, butterfly and perennial gardens. Regardless of size or color, all asters thrive under the same conditions. They do best when planted in a sunny location with well-drained soil that stays moist but not wet. If your garden soil is naturally sandy or has clay consistency, add some compost to amend the texture. At the end of the flowering season, don’t rip them out. If you can, let them die back naturally. While it depends on the type of aster flower and your USDA growing zone, you might get to enjoy a repeat performance the following year. Asters are hardy from zones 4 to 9. For the best results, purchase asters as soon as they hit the gardening stores. That way, they’ll have enough time to establish themselves in your garden. Just remember that their bloom cycles depend on shorter daylight hours, so don’t give up on them too early in the year to come. Additionally, keep in mind that different varieties bloom at different time spans from late summer into late autumn. If you want to keep blooms going for as long as possible, obtain several types of asters that bloom at different times. If you prefer one spectacular garden finale, get different colors of one variety that will flower at the same time. In regards to color schemes, the possibilities are endless. Aster flowers come in red, white, pink, lavender, yellow, orange and bronze tones. If you have trouble choosing, decide whether you prefer tone on tone or contrasting color schemes. For the former, combine pink with lavender, red with orange, or bronze with yellow.Aster Flower Ideas
For a contrasting landscape, combine a yellow aster flower with red, or plant yellow with pink. Of course, a carpet of white aster flowers can also make a striking effect, especially when you have colorful fall foliage in your garden. Regardless of how you combine your aster colors, they work well with harvest plantings and displays. They also provide vital late-season nourishment for butterflies, bees and migrating pollinators. They’re especially important as a food source for the dwindling monarch butterfly population. Since asters encompass over 200 varieties, don’t forget to consider the height of each aster flower. While some mature at 12 inches, others grow taller than 4 feet. You can even get dwarf ground varieties that only reach about 4 inches in height. Shorter ones work well for borders and in the front of the garden. Plant taller asters in the back. You can also add visual interest by mixing taller and shorter flowers for contrast in height within a confined area. If your region is prone to high winds or late season storms, try to stay with shorter varieties throughout the garden. Asters make good companion flowers. Pair shorter ones with zinnias and taller varieties with brown-eyed Susans. If you don’t have much garden space but desire some late-season color before winter arrives, you can certainly plant asters in containers. This works especially well for short varieties.What Are the Similarities and Differences in Caring for Succulents and Aster Flowers?
When it comes to caring for succulents and aster flowers, there are both similarities and differences to consider. While both plants require adequate sunlight and well-draining soil, they differ in terms of watering needs and growth habits. To ensure successful care for both, it’s essential to consult the ultimate succulent care guide for specific instructions tailored to each plant’s requirements.