Are you looking for a creative and eco-friendly gardening project that’s not only fun but also contributes to a sustainable environment? Look no further, as making your own biodegradable seed pods offers a fantastic way to embrace the concept of recycling and reduce waste. In this guide, you’ll discover how to transform everyday items such as toilet paper rolls into DIY seed pods that are perfect for any gardener, from beginners to experts. Join us in celebrating Earth Day’s ethos by crafting your very own seed pods and bringing new life to your garden.
Key Takeaways
- Biodegradable seed pods are excellent for eco-friendly gardening practices.
- Learn how to make seed pods using upcycled toilet paper rolls and other recyclable materials.
- Discover the importance of using high-quality seed starting mix for optimal plant growth.
- Step-by-step guide to crafting your seed pods, ensuring correct seed depth.
- Essential tips for germination success, including moisture control and ideal environmental conditions.
- Transplanting seedlings: learn when and how to move your seed pods to the garden.
- Explore creative alternatives to traditional seed pods for a unique touch to your garden.
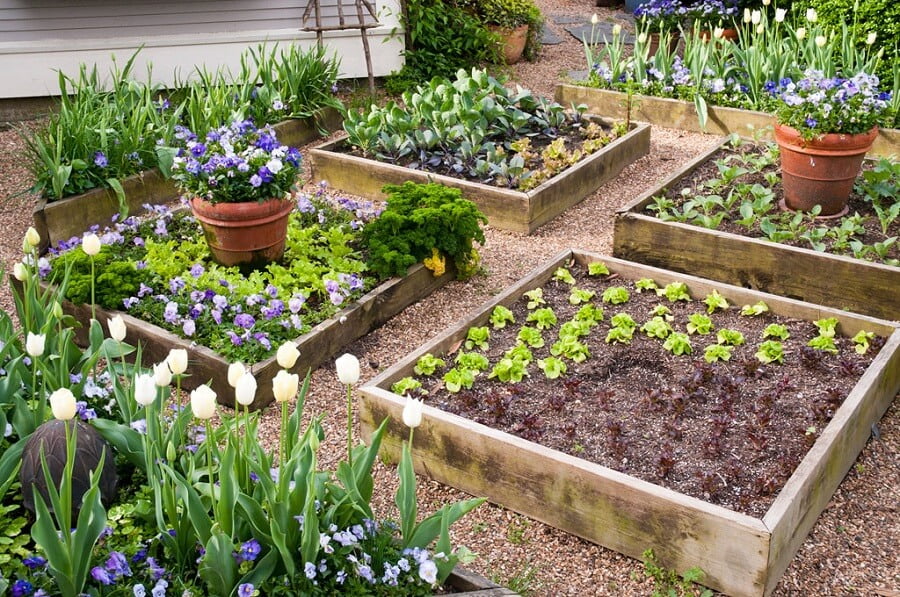
Embracing Eco-Friendly Gardening with Homemade Seed Pods
Homemade seed pods have become an integral part of eco-friendly gardening, offering gardeners a chance to reduce waste and embrace recycling. By using easily accessible, recyclable materials, it is possible to create effective seed starters that contribute to sustainable seed starting and a greener planet. Some popular seed pod options include:
- Empty toilet paper rolls
- Egg cartons
- Ice cream cones
- Various upcycled containers, such as yogurt cups and tin cans
These homemade seed pods can often be planted directly into the soil, as they are biodegradable and break down naturally over time. Non-biodegradable seed pods can also be useful, with the advantage of being reusable for future gardening seasons. This eco-friendly approach aligns with the principles of Earth Day, supporting the idea of turning trash into gardening treasures and fostering a more sustainable environment.
| Seed Pod Material | Pros | Cons |
|---|---|---|
| Toilet Paper Rolls | Biodegradable, easy to find, suitable for various seed types | Requires cutting and shaping, may become soggy when wet |
| Egg Cartons | Biodegradable, suitable for small seeds, easy to separate cells | Not suitable for larger seeds, may have limited space for root development |
| Ice Cream Cones | Biodegradable, easy to plant directly in soil, attracts moisture | May break easily, not suitable for all seed types |
| Upcycled Containers | Reusable, customizable size, promotes recycling | Non-biodegradable options need to be removed before transplanting |
By turning everyday household items into seed pods, it is possible to contribute to a healthier and more sustainable environment while enjoying the benefits of eco-friendly gardening. These seed pods not only provide a unique and creative solution to seed starting but also help in reducing waste and promoting an environmentally responsible lifestyle.
The Essentials: Gathering Supplies for Your Seed Pods
Creating your own toilet paper roll seed pods is an eco-friendly way to support sustainable planting. All you need are a few simple DIY seed pod materials and the right gardening soil mix to promote optimal plant growth. In this section, we will explore the benefits of using toilet paper rolls as biodegradable seed pod bases and discuss how to choose the best seed starting mix for your seedlings.

Why Toilet Paper Rolls Make Perfect Biodegradable Seed Pod Bases
As a readily available and compostable material, toilet paper rolls are a fantastic choice for crafting biodegradable seed pod bases. By incorporating recycling in gardening, you can help reduce waste and contribute to a greener environment. To transform the rolls into seed pods, simply cut them into suitable sizes for seed starting, avoiding tears while labeling the pods to ensure easy identification of the seed types contained within.
Choosing the Right Seed Starting Mix for Optimal Growth
Selecting a high-quality seed starting mix is crucial for the successful growth of your seedlings. A suitable mixture should provide the following benefits:
- Promote healthy root development
- Supply essential nutrients during early stages of plant growth
- Retain moisture to create an optimal germination environment
Using an appropriate seed starting mix in your DIY seed pods will help achieve the best conditions for germination. With the right seed pod soil, you can set your seedlings up for success and enjoy a thriving, sustainable garden.
As you prepare to create your own seed pods, keep in mind these essential supplies:
- Empty toilet paper rolls
- Seed starting mix
- Felt-tip markers for labeling
- Scissors for cutting
With these materials on hand, you’re ready to craft your own toilet paper roll seed pods and contribute to sustainable planting efforts. By reusing common household items, you can create biodegradable seed pods that blend seamlessly into your gardening routine while supporting a more environmentally friendly approach to growing plants.
Step-By-Step Guide to Crafting Your Seed Pods
Creating your own DIY garden pods is an enjoyable project that promotes sustainable gardening while encouraging eco-friendly practices. This seed pod tutorial offers a detailed step-by-step guide, transforming simple materials into functional seed pods.
-
Gather materials: To begin crafting your seed pods, collect the following items – empty toilet paper rolls, seed starting soil, scissors, felt-tip markers, seeds, tissue paper, and white tacky glue.
-
Cut the toilet paper rolls: Using the scissors, cut each toilet paper roll into three equal parts. Each section will serve as a base for your seed pod.
-
Prepare the tissue paper: Cut small squares of tissue paper to create bottoms and tops for your seed pods. The pieces should be large enough to cover the ends of each toilet paper roll section.
-
Attach the tissue paper: Apply white tacky glue to the edges of one end of each toilet paper roll section. Place a tissue paper square over the glued end, pressing gently to seal. This will create the bottom of your seed pod.
-
Fill the seed pods: Add seed starting soil to each seed pod, filling it approximately two-thirds full. Gently press the soil down with your fingertips to ensure it settles properly in the pod.
-
Plant the seeds: Place the seeds into the soil, following the recommended planting depth for each seed type. The number of seeds per pod will vary depending on the plant species. Consult the seed packet instructions for guidance.
-
Seal the seed pods: Apply another layer of white tacky glue to the open end of each toilet paper roll section, then place another tissue paper square on top. Press gently to seal the seed pod, ensuring the tissue paper remains in contact with the soil.
-
Label the seed pods: Using a felt-tip marker, label each seed pod with the seed type and an arrow indicating which end is the top. This will help maintain proper planting depth when transplanting your seedlings to the garden.
With this step-by-step seed pod guide, you’ll be well-equipped to craft your own eco-friendly garden pods, providing a sustainable and inventive solution for seed starting. Once completed, ensure optimal germination conditions by monitoring moisture, temperature, and light levels.
Planting Seeds: Tips for Ensuring Germination Success

To increase the chances of germination success, it’s essential to maintain a consistent moisture level within the seed pods and provide adequate warmth, light, and air circulation. In this section, we’ll explore key planting seeds tips for success, including the importance of moisture levels, temperature control, and proper labeling of your pods.
- Maintain Consistent Moisture Levels
Monitor the moisture by touching the soil daily, ensuring it remains moist but not waterlogged. Adequate moisture is crucial for the germination process and encourages healthy root development. A useful trick to help maintain appropriate moisture levels is placing a plastic wrap over the seed pods, creating a mini greenhouse effect.
- Provide Adequate Warmth and Light
Temperature plays a significant role in the germination process, and most seeds require a consistent temperature range to sprout successfully. Seeds need sufficient warmth and light for optimal growth, so it’s important to place your seed pods in a location that provides both. Consider using heat mats and grow lights to maintain ideal conditions for seed germination.
- Proper Labeling
Proper labeling is essential to keep track of the seed varieties and their specific needs. Use a waterproof marker to label each seed pod with the plant’s name and planting date. This information will be invaluable when it’s time to transplant the seedlings to your garden and monitor their progress.
Following a seed pod planting guide and implementing the garden seed success tips outlined above can significantly enhance your germination results. Utilize these germination techniques to optimize seed growth in your homemade seed pods and create a flourishing garden.
| Germination Factor | Why It’s Important | Tips for Success |
|---|---|---|
| Moisture | Ensures the seed remains hydrated for proper germination. | Keep soil consistently moist, and consider using a plastic wrap to maintain moisture levels. |
| Warmth and Light | Provides energy for seed growth and development. | Place pods in a sunny location and utilize heat mats and grow lights when needed. |
| Labeling | Allows for easy identification of seed varieties and monitoring of progress. | Use waterproof markers to label each pod with the plant’s name and planting date. |
Maximizing Growth: The Perfect Environment for Seed Pod Development
The Importance of Moisture Control in Seed Germination
Moisture control is a key factor in the germination of seeds. Keeping the soil in your seed pods appropriately moist encourages the seeds to sprout without becoming waterlogged, which can hamper growth or lead to rot. Regularly check the soil’s moisture levels, adjusting your watering practices as needed to maintain optimal conditions.
Some useful germination moisture techniques to maintain optimal moisture for seeds include:
- Using a spray bottle for gentle watering
- Covering the seed pods with a plastic wrap to retain moisture
- Using a self-watering seed tray to avoid over or under-watering
How Sunlight and Temperature Can Impact Your Seedlings
Seedlings thrive in an environment with the right balance of sunlight and temperature. A warm area inside your home, preferably next to a window sill, provides the necessary warmth and light for the development of seeds within the pods. Make sure to keep the pods in a location that receives ample, but not excessive, sunlight and avoid extreme temperature fluctuations for the best growth outcomes.
To ensure growing healthy seedlings, consider these important factors:
- Seed pod light exposure: Position your seed pods in a spot that receives indirect sunlight or filtered light from a window.
- Temperature control germination: Aim for a consistent daytime temperature between 65-75°F (18-24°C) and a nighttime temperature of 60-70°F (16-21°C).
- Garden temperature effects: Gradually acclimate your seedlings to outdoor temperatures by placing them outside for a few hours every day prior to transplanting them in the garden.
Creating the perfect environment for seed pod development will set the stage for a successful, eco-friendly gardening experience. By diligently monitoring moisture, sunlight, and temperature, your seedlings will have the best possible chance of thriving and contributing to a greener planet.
Transplanting Seedlings: When and How to Move Pods to Your Garden
Knowing when and how to transplant seedlings from the seed pods to your garden is crucial for a successful gardening experience. In this section, we will discuss the optimal time for transplanting seedlings, as well as practical tips for garden pod transplantation.
- When to Transplant Seedlings
- Moving Seed Pods to Your Garden
- Seedling Transplant Guide
When to Transplant Seedlings
The ideal time to transplant your seedlings is when their roots begin extending from the soil, signaling that they have developed a robust root system and are ready for a larger space. At this stage, your seedlings will have a better chance of adapting to the garden environment and flourishing.

If you have used biodegradable seed pods, carefully transplant them to your garden by planting them at the same depth as they were in the seedling stage. Water the transplanted seedlings thoroughly after the transplantation process to help them adapt to their new environment.
For non-biodegradable seed pods, gently remove the seedlings to avoid damaging their root systems. Next, place them in pre-dug holes in your garden bed and water them thoroughly.
Seedling Transplant Guide:
| Step | Description |
|---|---|
| 1 | Identify the right time for transplanting, typically when roots begin to extend from the soil. |
| 2 | Prepare the garden bed by ensuring adequate spacing and pre-digging holes for the seedlings. |
| 3 | For biodegradable seed pods, transplant them directly into the garden, while for non-biodegradable pods, carefully remove seedlings before transplanting. |
| 4 | Ensure seedlings are planted at the same depth as they were in their seed pods. |
| 5 | Water the transplanted seedlings thoroughly to encourage root establishment and growth. |
| 6 | Monitor the progress and health of the seedlings, applying necessary care as needed. |
By following these guidelines, you’ll be able to transplant your seedlings successfully and watch them develop into beautiful, thriving plants in your garden.
DIY Innovations: Creative Alternatives to Traditional Seed Pods
Exploring creative seed pods and innovative gardening ideas can add an interesting touch to your garden while promoting sustainable and eco-friendly practices. There are numerous alternative seed starting methods that can be easily crafted using various upcycled items found around your home. DIY gardening innovations such as these not only offer unique benefits but also contribute to a more sustainable gardening experience. In this section, we will explore some ingenious seed pod alternatives to help inspire your gardening pursuits.
The following list introduces some of the more innovative seed pod alternatives which can be used effectively as seed starters:
- Chinese takeout containers
- Egg cartons
- Ice cream cones
- Juice cartons
- K-Cups
- Plastic bottles
Utilizing these unconventional seed pod alternatives can provide various advantages, such as size suitability, ease of use, and potential for reuse next season. However, it is essential to consider the specific characteristics and properties of each item to ensure a successful gardening experience.
| Seed Pod Alternative | Notable Features | Benefits |
|---|---|---|
| Chinese takeout containers | Lightweight, compact, and easy to clean | Perfect for small spaces, easy to transport and reuse |
| Egg cartons | Biodegradable, segmented compartments | Individual pods for seedlings, eco-friendly and compostable |
| Ice cream cones | Biodegradable, cone shape | Fun and creative, can be planted directly into the soil |
| Juice cartons | Sturdy, waterproof material, tall and narrow | Reusable, ideal for deep-rooted plants |
| K-Cups | Small, uniform size, plastic | Excellent for seed germination, easy to handle and store |
| Plastic bottles | Versatile, various sizes, transparent | Can be adapted to different plant needs, allows monitoring of root growth |
By experimenting with these creative seed pod alternatives, you can not only add a personal and imaginative touch to your garden but also make a positive impact on the environment and contribute to a more sustainable gardening practice. So, why not give these innovative ideas a try and redefine the concept of seed starting in your garden?
Will Using Seed Pods in My Garden Attract or Repel Ants?
Using seed pods in your garden can be effective for keeping ants off strawberry plants. Certain plants, like marigolds and mint, have natural properties that repel ants, and using their seed pods can help create a barrier. However, be cautious with other types of seed pods, as they may attract ants instead.
Conclusion
Incorporating sustainable gardening practices, such as creating homemade seed pods, offers a myriad of benefits not only to the environment but also to your wallet and aesthetics of your garden. Embracing eco-gardening means taking responsibility for reducing waste, upcycling everyday materials, and creating a greener Earth for future generations.
As you’ve learned throughout this article, making DIY seed pods is a simple yet effective way to contribute to eco-friendly gardening. From choosing the perfect biodegradable base to transplanting your seedlings into the garden, each step of the process is designed to be cost-effective and mindful of the environment.
So go ahead and give it a try! Whether you’re an experienced gardener looking to expand your sustainable practices or a beginner just starting out on your eco-gardening journey, making your own seed pods is a fantastic and rewarding project. Not only will you enjoy the fruits of your labor, but you’ll also be contributing to a greener, healthier, and more sustainable world.