Are you tired of throwing away your kitchen scraps and yard waste, only to watch it end up in a landfill? Well, there’s a safe and easy way to recycle those organic materials right at home. Composting is the answer!
It not only helps reduce waste but also produces nutrient-rich soil for your garden. Don’t worry if you’re new to this eco-friendly practice; we’ve got you covered with our beginner’s guide to getting started.
Composting may seem intimidating at first, but trust us – it’s as simple as layering ingredients and letting nature do its magic. Plus, it’s an incredibly safe process when done correctly.
So let’s dive into the world of decomposing goodies and learn how composting can be both fun and beneficial for you and the environment!
The Basics Of Composting
Imagine a world where your kitchen scraps and yard waste are transformed into something valuable, nourishing the earth and helping plants thrive. This magical process is called composting, and it’s easier than you think to get started! By learning the basics of composting, not only will you be doing your part to reduce waste but also creating a safer environment for future generations.
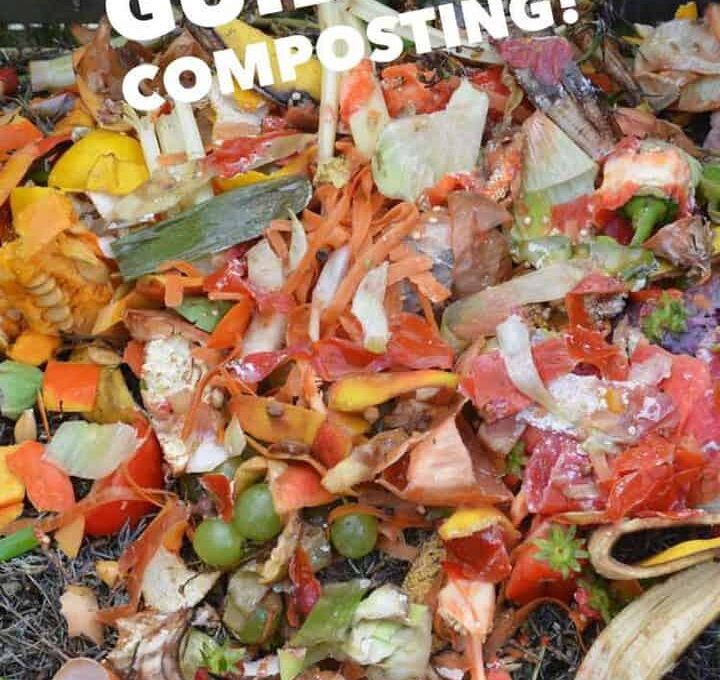
To kick off your journey in composting, let’s dive into the essential components needed for successful decomposition. A good compost pile needs three things: greens (nitrogen-rich materials), browns (carbon-rich materials), and moisture.
Greens can include fruit and vegetable scraps, coffee grounds, or grass clippings. Browns consist of dead leaves, small branches, or even shredded cardboard. Maintaining an ideal balance between these two types of materials ensures that your compost breaks down efficiently while keeping unpleasant odors at bay. Lastly, moisture plays a crucial role in this process as well; make sure to keep your pile damp by adding water when necessary.
One easy way to start composting is with a simple bin system – either purchased or homemade – which keeps everything contained and helps maintain the right conditions for decomposition. In addition to proper layering of greens and browns within the bin, turning the contents regularly allows air circulation throughout the pile, further promoting quicker breakdown of organic matter.
Over time, you’ll witness firsthand how nature works its magic in transforming waste into rich nutrient-dense soil that can be used for gardening or landscaping purposes – all without harmful chemicals! So go on, give composting a try today and play an active role in safeguarding our planet for years to come!
Choosing The Right Composting System
Composting is a great way to reduce waste and help the environment. There are many different types of systems, from backyard compost piles to large-scale composting operations.
It’s important to choose the right system for your needs. Location is another important factor to consider when choosing a composting system. Depending on where you live, you may have access to different options.
Cost is another factor to think about when choosing a composting system. While it can be expensive to get started, composting can save you money in the long run.
Composting can be an easy and rewarding way to reduce waste and help the environment.
Types Of Systems
So you’ve decided to start composting, but with so many options out there, how do you choose the right system? Don’t worry; we’re here to help!
There are several types of composting systems that can fit your needs and keep you feeling safe while turning waste into a valuable resource.
One popular option is a simple outdoor pile or bin. This method is great for those who have space in their yard and want an easy-to-maintain system. Just toss in your kitchen scraps, lawn clippings, and other organic materials, give it a good stir every now and then, and watch as nature does its thing. You’ll feel secure knowing that this natural process is helping reduce landfill waste and creating nutrient-rich compost for your garden.
Another option worth considering is vermicomposting – using worms to break down organic matter. With this method, all you need is a container filled with bedding material (like shredded newspaper) and some red wiggler worms. These little critters will happily munch away on your food scraps, producing nutrient-dense worm castings that can be used in your garden. Vermicomposting can even be done indoors if you don’t have much outdoor space! It’s fascinating to watch these tiny creatures work their magic while providing a sense of security knowing they’re safely contained within their home.
Tumbler-style composters offer yet another way to turn waste into gold – well, not literally gold but rich nutrients for plants. These rotating bins make it easy to mix up the contents by simply giving them a spin now and then. The enclosed design keeps pests at bay while also speeding up decomposition due to increased airflow inside the tumbler. Plus, they come in various sizes making it perfect for any living situation whether it’s urban or suburban life.
With so many different methods available today, choosing the right composting system might seem overwhelming at first glance but remember: each one has its benefits and drawbacks, so pick the one that makes you feel secure and suits your needs best.
Location
Now that you’ve got a better idea of the different composting systems out there, it’s time to think about where you’ll be setting up your new eco-friendly project. Location plays an important role in making sure your compost thrives and stays safe from any unwanted critters or issues. Whether you’re working with a sprawling backyard or a cozy apartment, finding the perfect spot for your chosen system is crucial.
For outdoor piles or bins, make sure to choose a level area with good drainage so excess water doesn’t cause problems like overly soggy compost. You’ll want to keep it close enough to your garden for convenience but far enough away from windows and doors to avoid any unpleasant odors wafting into your home.
When deciding on the location for vermicomposting or tumbler-style systems, consider factors such as temperature control (especially if indoors), accessibility for turning and harvesting, and protection from extreme weather conditions.
No matter which system you end up choosing, taking the time to carefully consider its placement will not only help ensure successful decomposition but also provide peace of mind knowing that everything is running smoothly and safely within your chosen space.
So go ahead – pick the perfect spot and start transforming those scraps into valuable nutrients for your plants!
Cost
Now that you’ve got the location figured out, it’s time to think about another important factor in choosing the right composting system: cost. Different systems come with various price tags, so you’ll want to find one that fits your budget while still meeting all of your composting needs.
After all, going green shouldn’t break the bank!
There are affordable options like simple outdoor piles and homemade bins or pricier choices such as fancy tumblers and advanced vermicomposting setups. It’s crucial to weigh the upfront costs against long-term benefits like reduced waste disposal expenses and free fertilizer for your garden.
Remember, investing in a composting system is not only good for Mother Earth but also for keeping some extra cash in your pocket.
So take a moment to assess what you’re willing to spend on this eco-friendly endeavor and then choose the best composting system for your hard-earned dollars.
Happy composting!
Preparing Your Compost Bin Or Pile
Preparing your compost bin or pile is an essential step in starting the composting process. Select a location that’s easy to access and has enough space for your bin or pile. A shady spot is ideal, as it helps keep the compost from drying out too quickly. The area should also have good drainage, so water doesn’t pool around your compost.
When setting up your compost bin or pile, there are some materials you’ll need to gather:
-
Brown materials:
-
Dried leaves
-
Small branches
-
Cardboard
-
Newspaper
-
Green materials:
-
Fruit and vegetable scraps
-
Coffee grounds
-
Tea bags
-
Fresh grass clippings
Start by placing a layer of brown materials at the bottom of your bin or pile; this will help create air pockets and improve airflow within the heap.
Next, add a layer of green materials on top of the brown ones – try to maintain a ratio of three parts brown material to one part green material. This balance ensures proper decomposition while reducing unpleasant odors.
Make sure to turn and mix your compost regularly with a pitchfork or shovel. Turning allows oxygen into the mix which speeds up the breakdown process, kills any harmful bacteria, and prevents foul smells from developing.
Always remember safety first when dealing with decomposition: wear gloves when handling compost directly and wash hands thoroughly afterward!
By following these simple steps in preparing your compost bin or pile, you’re well on your way towards creating nutrient-rich soil for use in gardens while contributing positively to our environment.
Selecting The Best Ingredients For Your Compost
Now that you’ve got your compost bin or pile all set up and ready to go, it’s time to dive into the nitty-gritty of composting. Like a chef in the kitchen, selecting the best ingredients for your compost is crucial for creating rich, nutritious soil. By adding just the right mix of materials, you’ll be on your way to making ‘black gold’ – a gardener’s dream!
To get started, let’s break down what goes into a successful compost recipe. There are two main types of ingredients: greens and browns.
Greens are nitrogen-rich materials like fruit and vegetable scraps from your kitchen, coffee grounds, grass clippings, and plant trimmings. Browns are carbon-rich materials such as dried leaves, branches, wood chips, straw, paper products (like newspapers), and even eggshells!
The ideal ratio for combining these elements is about 2 parts brown material to 1 part green material. When layering your compost bin with these ingredients, aim for alternating layers of greens and browns – this will provide a balance between moisture retention and air circulation within the pile.
Remember that too much moisture can lead to an unpleasant smell while not enough may slow down decomposition rates significantly. Keep track of what you’re putting into your bin so you can make adjustments if necessary; no one wants their backyard oasis turning into something out of a horror movie!
As long as you maintain balance by following our suggested ratio above—alongside regular tending—you’ll have healthy compost teeming with beneficial microorganisms before you know it!
The Importance Of Layering
You might be wondering why layering is such a big deal when it comes to composting. Well, there’s actually a really good reason behind it!
Layers in your compost pile are like the layers of clothing we wear: each one plays an essential role in keeping us safe and comfortable. Just as you wouldn’t want to go out on a cold day without bundling up, your compost pile needs proper layering to stay healthy and efficient.
One key aspect of layering is having the right mix of materials. Your compost pile should have both ‘greens’ (wet, nitrogen-rich materials) and ‘browns’ (dry, carbon-rich materials). Greens can include things like fruit scraps, vegetable peels, and grass clippings; browns could be fallen leaves or straw.
By alternating between greens and browns, you’re creating a balanced environment that allows for optimal decomposition while also making sure everything stays neat and tidy! So how do you make sure you’ve got the perfect balance? It’s simple: just remember the rule of three!
Aim for about three parts brown material for every one part green material—that way, you’ll ensure that your compost has enough carbon to provide energy for all those helpful decomposers working away inside. Plus, this ratio helps control odors by absorbing any excess moisture from wetter ingredients. And who doesn’t love a nice-smelling backyard?
Remember these tips next time you tend to your compost pile so it can work its magic safely and effectively.
Proper Moisture And Aeration Techniques
Now that you understand the importance of layering in your compost pile, let’s dive into another crucial aspect of successful composting: maintaining proper moisture and aeration.
Ensuring your compost has adequate water content and air circulation will help provide an optimal environment for decomposition to occur. This section will give you some useful tips on how to achieve this balance.
A well-maintained compost pile should feel like a damp sponge – not too wet, but moist enough to support microbial activity. Here are some simple ways to maintain the perfect moisture level:
-
Water your compost pile occasionally during dry spells
-
Using a hose or watering can, gently sprinkle water over the surface evenly
-
Be careful not to add too much water at once; it’s better to add smaller amounts more frequently
-
Cover your pile with a tarp or other material during heavy rainstorms
-
This prevents excess water from saturating your compost and creating anaerobic conditions
Alongside moisture control, proper aeration is key for efficient decomposition. Oxygen supports the aerobic microorganisms responsible for breaking down organic materials in your pile. When there isn’t enough oxygen present, these beneficial microbes struggle to survive while undesirable anaerobic bacteria take over, producing foul odors and slowing down the process. To ensure good airflow throughout your pile:
-
Turn your compost regularly using a pitchfork or shovel
-
Aim for every couple of weeks or when you notice any unpleasant smells coming from the bin
-
Turning also helps mix in fresh materials and redistribute moisture evenly
-
Consider adding larger items such as sticks or small branches intermittently between layers
-
These create pockets of air within the heap and improve overall structure
So remember, effective composting relies heavily on providing appropriate levels of both moisture and oxygen for decomposers to thrive. By following these suggestions, you’ll be well on your way towards fostering a healthy ecosystem within your compost pile.
This will not only speed up the decomposition process but also create a safe and nourishing environment for your plants to grow, making your garden flourish in no time!
Maintaining Ideal Temperature Conditions
Monitoring temperature is essential for successful composting. You should use a thermometer to measure the temperature of your compost at least every other day.
Adding moisture helps to keep the temperature of your compost in the ideal range. You should check the moisture level of your compost regularly and add water if necessary.
Aerating compost is also important for keeping the temperature in the ideal range. You can aerate your compost by turning it with a shovel or pitchfork. Doing this helps to ensure that the compost stays at the right temperature for the best results.
Monitoring Temperature
Let’s face it, we all like to be comfortable in our own space – and the tiny microbes that help break down your compost pile are no different! The key to keeping them happy and working hard is maintaining ideal temperature conditions. Monitoring the temperature of your compost pile is essential for a successful and efficient composting process.
Keeping track of temperature may sound complicated, but it’s actually quite simple once you get the hang of it. To measure the internal heat of your compost pile, use a long-stemmed thermometer or a specialized compost thermometer. It’s best to take readings from various spots within your pile to ensure even heating throughout.
A healthy compost pile will reach temperatures between 110°F (43°C) and 160°F (71°C), which helps kill off harmful bacteria and weed seeds while promoting decomposition by those friendly microorganisms.
Remember, safety always comes first when dealing with hot materials. Be sure to wear gloves when turning or handling your compost, especially if the temperature has reached its optimal range.
If you find that your compost isn’t reaching these high temperatures, don’t worry – there are numerous ways to adjust and improve conditions within your pile. By monitoring the moisture levels, adding more nitrogen-rich materials (‘greens’), or simply giving it a good mix can help raise its core temperature.
With patience and practice, you’ll master the art of creating perfect conditions for nature’s little helpers to work their magic on your waste!
Adding Moisture
Now that we’ve got the temperature aspect covered, let’s dive into another crucial factor in maintaining ideal conditions for your compost pile: moisture.
Just like us humans, those hardworking little microbes need water to survive and thrive! A well-hydrated compost pile will not only keep them happy but also boost their efficiency in breaking down organic materials.
Adding moisture to your compost is a piece of cake – simply use a hose or watering can to dampen the contents whenever you notice it becoming too dry. Aim for a consistency similar to a wrung-out sponge; this ensures there’s enough water without making things soggy (which could lead to unpleasant smells).
Don’t forget to give your pile a good mix after adding water so that every part gets an equal share!
By keeping an eye on both temperature and moisture levels, you’re creating the perfect environment for your composting buddies to do their job safely and effectively. With these simple steps, you’ll be well on your way towards turning waste into nutrient-rich gold for your garden!
Aerating Compost
Now that we’ve covered temperature and moisture, let’s talk about another important aspect of maintaining ideal conditions for your compost pile: aerating.
You see, those hardworking microbes don’t just need water and warmth; they also need oxygen to break down organic materials effectively. Without enough air circulation, your compost pile could become smelly and slow to decompose.
Aerating your compost is pretty simple – all you have to do is give it a good mix every once in a while! Using a garden fork or similar tool, turn the contents of your pile so that fresh air can reach even the deepest parts.
This not only provides oxygen for those microscopic helpers but also helps redistribute heat and moisture throughout the pile. And hey, it’s an excellent way to get some exercise too!
So go ahead and fluff up that compost like you would with a cozy pillow! By regularly turning and mixing its contents, you’ll ensure optimal airflow which will keep both bad smells at bay and support our tiny friends in their decomposition duties.
Just follow these easy tips on temperature, moisture, and aeration, and you’ll create a safe haven where your garden waste transforms into valuable nutrients!
Troubleshooting Common Composting Issues
Imagine you’ve been diligently adding kitchen scraps, yard waste, and other organic materials to your compost pile for several weeks. You’re excited about the prospect of creating nutrient-rich fertilizer for your garden, but something doesn’t seem quite right with your compost. It’s not breaking down as quickly as it should, or maybe there’s an unpleasant smell coming from the pile.
Don’t worry – these are common issues that can be easily resolved once you know what to look out for.
One possible issue is that your compost pile isn’t heating up enough to break down the materials efficiently. This could be due to a lack of oxygen in the pile, which slows down decomposition. To fix this problem, make sure you’re turning your compost regularly (about once every week) to aerate it properly.
If you find that your pile is too wet and smelly, try adding more carbon-rich ‘brown’ materials like dried leaves or straw to balance out the nitrogen-rich ‘green’ materials such as fruit and vegetable scraps. On the other hand, if your compost seems too dry and slow-to-decompose, add some water (but not too much!) to moisten it up a bit.
Another common issue is attracting pests like rodents or insects to your compost pile. The best way to prevent this is by avoiding placing any animal products like meat or dairy into the mix as they often attract unwanted visitors. Keep a tight lid on any containers used for collecting kitchen scraps before they go into the heap, so critters aren’t tempted by easy access food sources lying around outside the bin area itself!
When building new piles or turning existing ones over time ensure proper layering methods involving alternating layers between green materials high in nitrogen content along side brown items rich with carbon – this will provide optimal conditions necessary towards achieving successful results while minimizing odors potentially drawing attention from various types wildlife nearby ultimately keeping everyone safe throughout entire process involved within our journey towards sustainable living practices overall.
Harvesting Your Finished Compost
Now that you’ve been diligently adding to your compost pile and giving it the proper care, there comes a time when you’re ready to harvest the fruits of your labor. Harvesting your finished compost is an exciting step in the process as it signifies that all your hard work has paid off!
In this section, we’ll walk you through how to know when your compost is ready and provide tips on collecting and using it.
You might be wondering how to tell if your compost is done. Well, it’s quite simple: just look for rich, dark soil-like material called humus at the bottom of your bin or pile. This usually takes about three months or more depending on factors like temperature, moisture levels, and materials used. Your finished compost should also have a pleasant earthy smell – nothing foul or rotten. If you find some chunks of uncomposted materials mixed in with the humus, don’t worry; simply separate them out and return them to your ongoing compost pile.
Once you determine that your compost is ready, go ahead and collect it from the bottom of your bin or pile using a shovel or pitchfork. Be sure not to mix fresh materials into the finished product!
You can now use this nutrient-rich blend in various ways around your garden such as by spreading it over flower beds, mixing with potting soil for container plants, or even sprinkling over lawn areas for added nutrients. Not only will this give new life to tired soils but also help keep everyone safe knowing they are growing their plants with natural resources rather than chemical alternatives.
So go ahead, enjoy reaping the rewards of nature’s very own recycling system!
Can I Use Pine Needles in my Compost Pile?
Pine needles are a valuable addition to your compost pile. As a natural and readily available resource, the pine needles composting ingredient brings numerous benefits. They add acidity, which is ideal for plants like blueberries and azaleas. Moreover, their fibrous texture enhances aeration and water movement in the pile, promoting decomposition and nutrient-rich compost production.
Utilizing Compost In Your Garden
Now that you’ve got your compost ready, it’s time to put it to good use in your garden! Utilizing compost can significantly improve the health and growth of your plants. Plus, it’s an eco-friendly way to nourish your garden without relying on chemical fertilizers. So let’s dive into how you can make the most out of your homemade compost.
Here are some effective ways to incorporate compost into your gardening routine:
-
Top-dressing: Gently spread a thin layer (about 1-2 inches) of compost over the soil surface around established plants. This will help retain moisture, suppress weeds, and provide essential nutrients as it slowly breaks down.
-
Side-dressing: During the growing season, add small amounts of compost around the base of each plant. This is especially beneficial for heavy feeders like tomatoes and peppers that require extra nutrition.
-
Soil amendment: Before planting or sowing seeds, mix generous amounts of compost directly into the topsoil. This improves soil structure by increasing its ability to hold water and air while providing a slow-release source of nutrients for young roots.
-
Compost tea: Brew a nutrient-rich liquid fertilizer by steeping finished compost in water for about two days. Use this ‘tea’ to water seedlings or transplants regularly throughout their growth cycle.
Now that we’ve explored various ways to utilize compost in our gardens let me assure you that using this natural resource not only benefits your plants but also contributes positively towards environmental conservation efforts like reducing waste sent to landfills or decreasing reliance on harmful chemical fertilizers which can pose risks for humans and wildlife alike.
By engaging with sustainable practices such as making and using homegrown organic matter like backyard-made-compost, you’re taking active steps toward creating a safer environment for all living beings – including yourself! So go ahead, give your garden what it needs while keeping Mother Nature happy too!
Composting Myths And Misconceptions
Picture a gardener standing in the middle of their flourishing garden, surrounded by lush plants and colorful flowers, all thanks to compost. Unfortunately, there are many myths and misconceptions surrounding composting that may keep some people from achieving this beautiful scene. In this section, we’ll debunk these fallacies so you can feel confident diving into the world of composting.
| Myth | Reality |
|---|---|
| Composting is difficult and time-consuming | With proper planning and maintenance, it’s quite simple and doesn’t require much time |
| You need a large space or yard for composting | There are methods suitable for small spaces (e.g., worm bins) |
| Compost piles attract pests like rats and insects | If managed correctly (covering food scraps with brown materials), they shouldn’t cause any pest problems |
Now that we’ve busted some common composting myths, let’s address safety concerns as well. When dealing with decomposing organic matter, there’s always a risk of harmful bacteria or mold growth. However, if you maintain your pile properly – such as turning it regularly to ensure adequate airflow – these risks can be minimized. Additionally, wearing gloves while handling compost will provide an extra layer of protection.
Remember that knowledge is power when it comes to overcoming obstacles in composting. By understanding the truth behind these misconceptions and taking necessary precautions for safety, you’re one step closer to creating nutrient-rich soil amendments for your thriving garden oasis. Happy composting!
Taking Your Composting Skills To The Next Level
Now that you’ve got the basics of composting down, it’s time to take your skills to the next level. You can experiment with different methods and techniques to improve your compost quality and help speed up the process. Remember, experimenting is fun, but always keep safety in mind when trying out new things.
Here are some advanced techniques for you to try:
-
Hot Composting:
-
This method involves carefully managing the temperature of your compost pile.
-
Hot composting breaks down materials faster than cold composting due to increased microbial activity at higher temperatures.
-
To achieve this, make sure your pile has a proper mix of green (high-nitrogen) and brown (high-carbon) materials and turn it regularly.
-
Vermicomposting:
-
Vermicomposting uses worms—usually red wigglers—to break down organic matter into nutrient-rich castings.
-
Set up a worm bin with bedding material like shredded newspaper or cardboard, add food scraps, and then introduce the worms.
-
Harvest their nutrient-dense castings after a few months as an excellent soil amendment.
-
Bokashi:
-
Bokashi is a Japanese method that relies on anaerobic fermentation using inoculated bran to break down waste quickly without needing turning or oxygen input.
-
Layer kitchen scraps with bokashi bran inside an air-tight container until full; once filled, let it ferment undisturbed for about two weeks before burying contents in the garden or adding them to another type of composter.
As you become more experienced in composting, don’t forget to share your newfound knowledge with friends and family! Encourage them to start their own compost piles so they too can enjoy the numerous benefits while contributing positively toward our environment.
By working together, we can create safer and healthier communities through responsible waste management practices. So go ahead and elevate your composting skills and make a difference in the world!
Frequently Asked Questions
Can I Compost Items Like Pet Waste Or Dairy Products, And If So, How Do I Safely Do It Without Causing Harm To My Garden Or Attracting Pests?
Can you compost items like pet waste or dairy products?
The answer is yes, but it’s important to do so safely and correctly.
When adding pet waste or dairy products to your compost, make sure they’re thoroughly mixed with other materials like leaves, straw, or sawdust, which will help prevent any potential harm to your garden as well as keep pests at bay.
Keep in mind that maintaining a healthy balance of ‘green’ and ‘brown’ materials in your compost pile is crucial for avoiding unpleasant smells and ensuring a successful decomposition process.
By taking these precautions, you’ll be able to recycle more types of organic waste while keeping your garden safe and thriving!
How Can I Speed Up The Composting Process If I Need Compost Sooner For My Gardening Needs?
If you’re eager to speed up the composting process for your gardening needs, there are a few simple tricks you can try!
First, make sure to chop or shred larger materials into smaller pieces so they break down more quickly.
Turning your compost pile regularly will also help oxygenate it and encourage faster decomposition.
Additionally, maintaining a proper balance of green (nitrogen-rich) and brown (carbon-rich) materials is essential for efficient composting.
Finally, consider adding some ‘activators’ like coffee grounds or aged manure to kickstart the process even further.
By following these tips, you’ll be well on your way to creating nutrient-rich compost in no time – keeping your garden happy, healthy, and safe!
Are There Any Specific Composting Methods Or Techniques For Urban Dwellers With Limited Outdoor Space, Such As Apartment Balconies Or Small Patios?
Absolutely! For urban dwellers with limited outdoor space, there are a few clever composting methods that can fit your needs.
One popular option is ‘vermicomposting,’ which involves using worms to break down your kitchen scraps in a small, enclosed bin. This method doesn’t require much space and can even be done indoors without any unpleasant odors.
Another space-saving technique is the ‘bokashi’ system, where you ferment food waste in an airtight container using special microorganisms.
Both of these methods help keep your home clean and safe while producing nutrient-rich compost for your plants – perfect for apartment balconies or small patios!
How Can I Minimize Or Eliminate Strong Odors That May Arise During The Composting Process, Especially In Close Proximity To My Living Space Or My Neighbors?
Did you know that about 60% of household waste is organic and can be composted?
If you’re worried about strong odors from your compost bin or tumbler, especially in urban areas, there are several steps you can take to minimize or eliminate them.
Firstly, maintain a proper balance between ‘green’ materials (like fruit and vegetable scraps) and ‘brown’ materials (such as dry leaves or shredded newspaper). This helps keep the moisture level just right – not too wet nor too dry – which discourages smelly anaerobic bacteria.
Secondly, turning your compost regularly ensures good airflow and speeds up decomposition.
Lastly, consider adding a layer of brown material on top of your compost pile to act as an odor barrier.
By following these tips, you’ll be able to create nutrient-rich fertilizer without bothering yourself or your neighbors with unpleasant smells!
Can I Incorporate Composting Into A Larger Sustainable Living Or Permaculture System, And If So, How Do I Effectively Integrate It With Other Eco-Friendly Practices?
Absolutely, you can integrate composting into a larger sustainable living or permaculture system!
By combining eco-friendly practices like rainwater harvesting, solar energy, and organic gardening with your composting efforts, you’ll create a harmonious environment that benefits both you and Mother Earth.
To effectively blend these practices, start by using your nutrient-rich compost to nourish your garden’s soil. This will help reduce waste while promoting healthy plant growth.
Meanwhile, collect rainwater for irrigation purposes and consider installing solar panels to power your home. These sustainable approaches work hand-in-hand with composting to make your lifestyle greener and safer for the planet we all call home.
Conclusion
Composting can be a captivating and conscientious choice for cultivating your own eco-friendly garden oasis.
By being mindful of materials, mastering methods, and mitigating messes, you’ll soon become a composting connoisseur in no time!
Don’t forget to delightfully dabble in diverse sustainable living practices while incorporating your newfound composting knowledge.
This way, you’re not only nurturing nature but also paving the path towards a greener future for yourself and our planet.
Happy composting!