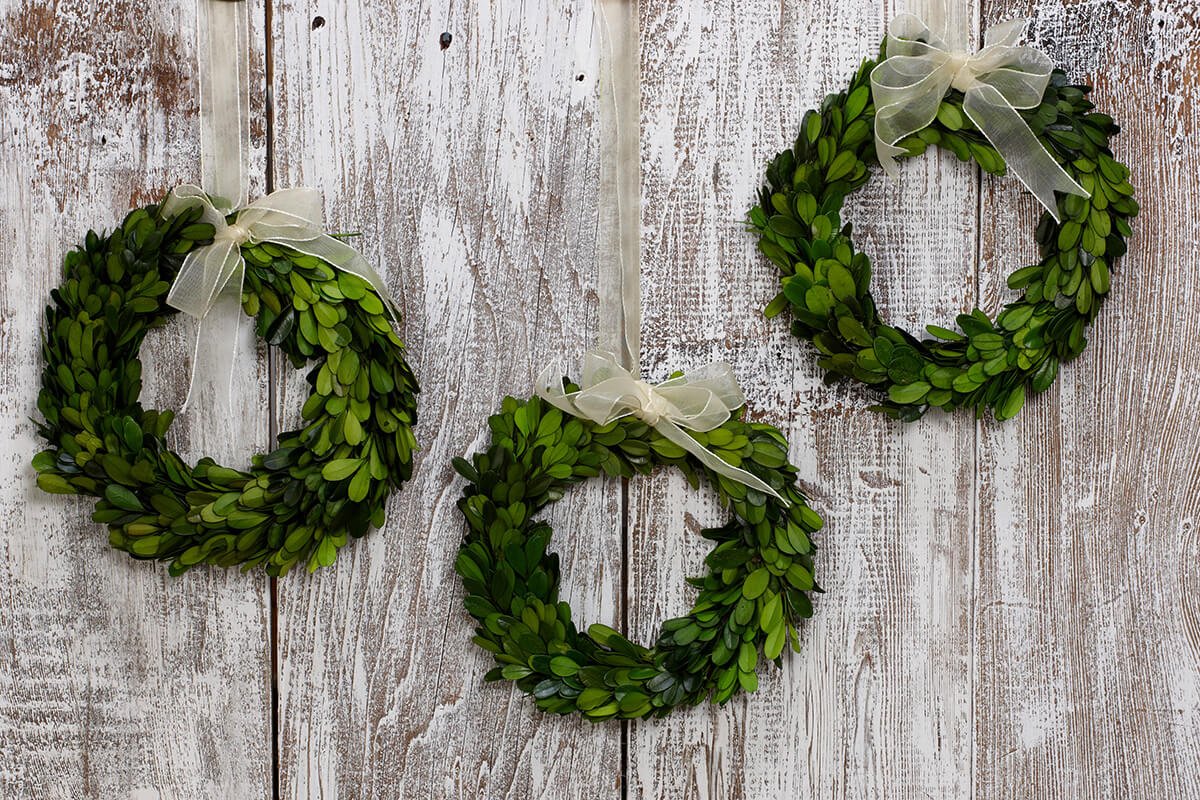
A wreath can give your home a warm and festive feel in the summer. Often times we think of wreaths only at Thanksgiving and Christmas, but during the hot summer months, the green of a wreath can brighten your home both inside or outside. I will show you how to make a wreath out of boxwood. A boxwood wreath is very easy to make and will add warmth to your home.
Supplies You’ll Need:
- Grapevine wreath
- Plastic greenery
- Hot glue gun
How to Make a Boxwood Wreath
Making a boxwood wreath can be a fun project and requires only three materials: a grapevine wreath, plastic greenery, and a hot glue gun. The greenery should be similar looking to boxwood, which is an outdoor shrub. Here is how to make a boxwood wreath:
- Begin by removing the greenery pieces from the stem. To do this, simply tug on the plant until it comes off the stem.
- Next, begin gluing the pieces onto the grapevine wreath. Make sure you glue them on their side so that they do not stick out from the wreath. Make sure all the pieces are facing the same direction.
- Once you have made your way around the wreath, use any extra plastic greenery to make the wreath fuller.
- Allow the glue to dry.
- Once the glue has dried, you can either leave the wreath as it is or add a bow to it. Hang your wreath and enjoy!

Photo Credit: Pinterest
Estimated Cost and Time to Make It
The estimated price of an already-made boxwood wreath is between $30 to $60. DIY boxwood wreaths are much cheaper. Another nice feature about a homemade boxwood wreath is that it only requires three materials to make and is an inexpensive wreath to make yourself. Here are the estimated costs of each material:
- Grapevine wreath: The price will depend on where you purchase it from, but online the prices range from $2 to $20. Obviously, a smaller boxwood wreath would be less expensive to make. Watch for sales at your local craft stores.
- Plastic greenery: The faux boxwood greenery will cost approximately $5 to $7, depending on where you buy it. Again, watch for sales at your local craft stores.
- Glue gun: The hot glue gun price will range from $1 to $20. Some glue guns may be more expensive. The cost of a boxwood wreath will be even more economical to make if you already have a glue gun.
How much time will it take to make your boxwood wreath? Overall, it should take less than an hour to make. Some people have been able to make it in 15 minutes. Remember that the bigger the wreath, the more time it will require. How full you make the wreath will also be a time factor. But overall, it is a fairly simple project that will not require much time.
Different Styles to Make
There are many unique boxwood wreath styles that you can make. Let’s take a look at different variations of wreaths:
Christmas Wreath
A boxwood wreath can make a perfect Christmas wreath. By adding some red bows, pine cones, red berries, and maybe a string of Christmas lights, a boxwood wreath can be made into a beautiful holiday wreath.

Photo Credit: Sweet Something Designs
Square Wreath
Instead of making the traditional circle wreath, try making your boxwood wreath in a square. This will add a creative look to your home.

Photo Credit: The Membrureoral Design
Boxwood Wreath with Flowers
Add some flowers to your boxwood wreath by gluing the flowers to the grapevine. You can use either faux flowers or fresh flowers. For a temporary decoration, use live cut flowers. You will have to add new ones often because the flowers will wilt quickly.

Photo Credit: Pinterest
Fourth of July Wreath
A boxwood wreath can make a nice Fourth of July decoration. Add a red, white, and blue bow and a star to your wreath.

Photo Credit: Pinterest
Fun Places to Hang Your Wreath
There are many fun places to hang a boxwood wreath. Some of these ideas that I’ve included below could be used with other types of wreaths. Remember to use your imagination when hanging your boxwood wreath. As long as it looks nice, it doesn’t really matter where you hang your wreath.
Front Door
Hanging a wreath on the front door is probably the most traditional place to hang a wreath. It’s the perfect place to display your new wreath. Not only does it add warmth to your home, it may also inspire someone else to make their own artificial boxwood wreath.

Cabinets
If you want to skip the traditional “hang the wreath on the door” (or if you have extra wreaths), why not hang it on a cabinet door? This is a nice idea especially if you made a mini boxwood wreath.
Your Shed
Your shed is a great place to hang a wreath. You can hang it on the outside of the door, on or under the windows, or even inside for indoor decorating.
Table Centerpiece
Instead of hanging your boxwood wreath, try laying it down on directly onto your table and it becomes a pretty centerpiece. You could even place some candles in the center of the wreath, or put a jar of candy or cookies in the center.
Deck
The deck is a great place to hang your boxwood wreaths. Simply line the wreaths along the deck railing.
Mirrors
Dress up your home by hanging a boxwood wreath on a mirror used for decoration. This can add a unique look to your home. Using a vintage mirror can add a unique look.

Photo Credit: Blog Lovin
Cake Pedestal Wreaths
Make some boxwood wreaths to put around a cake pedestal. This will make a unique centerpiece for your table.

Photo Credit: Better Homes & Gardens
How to Preserve Your Boxwood Wreath
If you decide to use live boxwood shrub cuttings for a wreath decoration, the leaves will turn brown and begin to wilt. Below are a few tips to preserve your boxwood wreath. Here is how to keep your boxwood wreath green for seasons to come:
Step #1:
Lay a piece of cardboard box outside on the ground. This will help protect the surface from spray paint. Lay the boxwood wreath face down on the cardboard.
Step #2:
Hold a can of foliage sealer about eight inches away from the wreath. Begin spraying the wreath. Once the entire wreath has been sprayed, leave it to dry.
Step #3:
Turn the boxwood wreath over and spray it with the foliage sealer. Repeat step #2, making sure the entire wreath gets sprayed. Let the wreath completely dry.
Step #4:
Either hang the wreath in your desired place or lay it in a flat-lidded box until you want to use your boxwood wreath again.
How to Preserve Boxwood Shrub Cuttings
Did you cut some boxwood shrubs that you would like to save for future wreaths? If so, you will need to preserve them until you make your next wreath or so they can be used for another craft. Here are is how you can preserve your boxwood cuttings:
Step #1:
Pull the leaves off the end of the cut stem. Pull enough leaves off so that you have two inches of stem. Lightly tap the end of the stem with a hammer.
Step #2:
Weigh how many boxwood cuttings you have. This is an important step because it will help you know how much of the preservation liquid you should use.
Step #3:
Measure one ounce of glycerin for every ounce of shrubs, and place it into a separate glass bowl. Mix one teaspoon of green dye into 1/2 cup of hot water into another bowl and set it aside. Add one cup of glycerin to another glass bowl and pour the dye and water mixture into that bowl of glycerin. Stir the mixture until the glycerin fully dissolves. Add the remaining glycerin from the first glass bowl to the dye mixture.
Step #4:
Let the mixture thoroughly cool before you add the shrub cuttings to it. Allow the stems to sit in the mixture for two weeks, or until they soak up all the mixture. When the mixture has been absorbed, remove the shrub cuttings and store them in a place where they will not be disturbed until future use.
Conclusion
I have shared with you all that you need to know to make your own boxwood wreath, including estimated cost and time, styles to make, places to hang your wreath, and how to preserve your wreath. Now is the fun part. Go get yourself some boxwood and try to make a boxwood wreath of your own. Once you master how to make one for your own home, you may want to make and give some wreaths as beautiful gifts for friends and family.
Photo Credit: The Membrureoral Design