Growing plants from seeds is fascinating for many people, especially for kids. If you want your children to learn about gardening and the miracle of growing plants at an early age, you should start thinking about some fun and easy activities you can involve them in. One of these activities is seed starting. There are a lot of plants that grow from seeds, and some of them develop quite fast. This is precisely what you need when it comes to gardening with kids without them getting bored. Today, we’re going to show you how to grow plants from seeds step by step, with the help of your child. Then, we’re going to provide you with 3 seed starting project ideas to begin with.
Seed Starting with Kids: 5 Main Steps
Step 1: Decide on What to Plant
The first step when starting seeds with children is to decide what kind of plants you want to grow. Normally, you should try to stick to vegetables or fruits that you know your child likes, and he or she will be able to enjoy afterward. Still, it can happen that your child’s favorite vegetables are impossible for you to grow in your garden. In this case, you’ll have to explain to him or her why that’s not possible. Generally, you will be able to come up with something that sounds appealing to your child in the end.
The second thing you have to consider when it comes to deciding on the type of plant you want to grow is the fact that children are typically impatient. This means that you should avoid choosing plants that take a long time developing. Otherwise, your child might get bored and lose interest in the project. There are plenty of vegetables that are fast-growing, and we’re going to talk more about some of them when we present you with the 3 seed starting project ideas we’ve selected for you today.
Step 2: Gather the Required Materials
Once you’ve decided what you want to plant with your child, it’s time to shop for seeds, depending on the options you have, but seeds are not the only thing you’re going to need. You should also buy potting mix for the containers. Of course, you can also sow the seeds outside in the garden, but as a first project that aims to teach children all about seed starting, sowing the seeds in a container that you can keep an eye on all the time is better. Take this time to also teach your children about the importance of good soil for plant development.
Finally, the right container is also important. Here, you have several options. You can simply buy a traditional pot from the store, you can use older pots that you have around the house, or you can even repurpose other types of containers and turn them into seed starting pots, which would also be an extra fun DIY for you and your child.
Step 3: Plant the Seeds
On to actually planting the seeds, it’s important to allow your children to be as involved as possible in this step. Simply having them watch you do it won’t arouse their interest in growing plants. Even more, it won’t make them feel as if they’re actually contributing. The great thing about this step is that you’ll find everything you need to know on the package of the seeds you’ve bought. All you have to do is follow the instructions (another useful thing to teach children), and you’ll be done in no time.
Step 4: Care for the Seeds
Depending on the type of seeds you’ve started, you’re going to have to follow a different care ritual. There are some general guidelines that you should keep in mind when it comes to seed starting care.
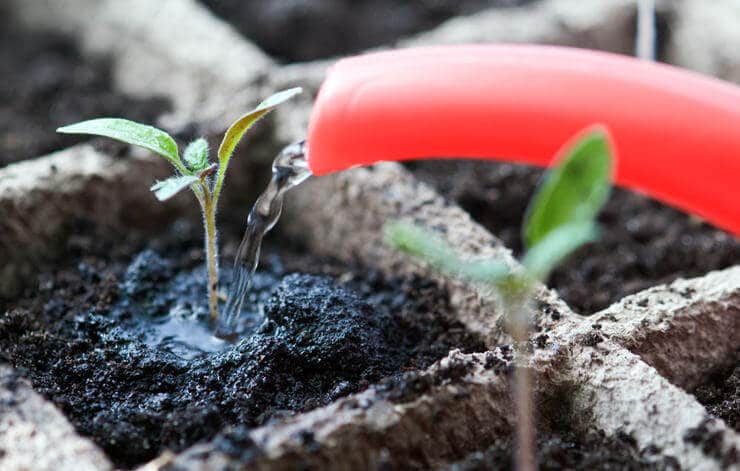
First of all, the container where you’ve just planted your seeds should be placed in a sunny location. This means that the windowsill is probably one of the best places in your house where you can store it. Second of all, watering the seeds is something you should never forget to do. Make sure to explain to your child that plants need water as much as humans do. Moreover, demonstrate how to water the seeds gently, so as not to dislodge them from the soil.
Step 5: Keep a Growth Journal (Optional)
Even though this is an optional step, in our opinion, it’s one of the most exciting, interesting, and educational ones. Invite your child to keep a growth journal together. There, you can write down the evolution of the vegetable or fruit you’ve just planted, from seed to a fully-grown plant. This won’t only help you get a better sense of how the plant develops, but it will also be of assistance whenever you’re trying to remember how much time it took for a certain plant to grow. Something extra that you could do is take regular photos of the plant as it starts to develop and attach them to the journal.
3 Seed Starting Project Ideas for Kids
1. Radishes
While they might not be the children’s favorite snack, radishes are extremely healthy and nutritious. Moreover, they’re a great addition to salads. They’re also easy to grow and don’t require a lot of space, which is everything you could want in a seed starting project for kids.
When it comes to growing radishes, the first thing we have to advise you is to make sure the soil is clear of any sticks or rocks, and that it looks and feels fine and loose. Avoid sowing radishes seeds in summer, since they’re a crop better suited for the cold season. Fall and spring are the two best options for seed starting radishes.

You should plant the seeds a half of an inch deep and an inch apart from each other. It only takes a couple of days until you can see the fruits of your labor. This is quite amazing and will definitely charm your children. If you want to make sure nothing will disturb your crops, constantly look out for weeds. Ask your child to help you pull them out if necessary. This is also a great opportunity to teach him or her about weeds and how damaging they can be to the plants. When the leaves of the radishes grow to be four inches long, get your child and start harvesting them together.
2. Pumpkins
Even though growing pumpkins sounds like a difficult and time-consuming task, in fact, it’s easier than you’d think. Not to mention the fact that seed starting pumpkins just in time for Halloween is going to get your children even more excited about growing pumpkins themselves and then carving them for decorations.
The right time for sowing pumpkin seeds depends on the area you live in. For instance, if you live in warm climates in the South, you should sow them in June. If you live in the North, the best time to do that is in late May. Timing is really important if you want to grow pumpkins for Halloween. That’s because once they reach maturity, they tend to rot really fast. Which is why they have to be ripe exactly at Halloween, not earlier.

Also, be aware of the fact that you’re going to need quite a lot of space to grow pumpkins. Obviously, a pot is not an option for them. Plant them outside, in full sun, and water them regularly. That’s especially true if you don’t usually get that much rain in your area. When they’re ready to be carved, exercise your creativity with your child and decorate your garden and/or backyard with spooky jack-o’-lanterns.
3. Hens and Chicks
The reason why we selected this plant as our last seed starting project is that its funny name and gorgeous appearance will definitely fascinate children. Hens and chicks are a type of succulent, which makes them quite easy to take care of. They’re also known as houseleeks, and you can grow them both indoors and outdoors, both in cold and hot weather.
Since your child is probably going to ask why these plants are called hens and chicks, make sure to tell him or her that the explanation behind the name is that they have a rosette shape, and they tend to produce a lot of “babies”. These babies are constantly attached to the “mother” by an underground runner.
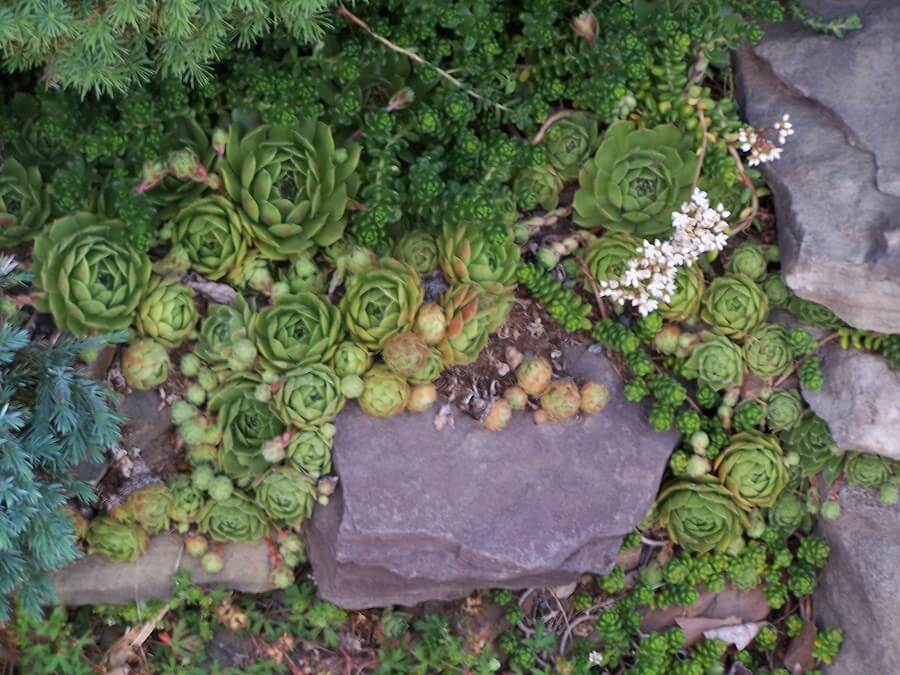
Hens and chicks are low-maintenance. All they require is a well-draining soil and full sun. You shouldn’t water them that often, and fertilization is rarely necessary either. If you’re going to be planting seeds outdoors, you should know that they can grow in rock crevasses as well. If you want to plant them in containers inside, you should use a succulent mix as the growing medium.
Summing It All Up
Seed starting shouldn’t be an activity that you have to do alone. You can always engage your children by keeping things interesting, telling them about different plant varieties and the best way to take care of them, and trying to mix things up by using the fruits of your labor in some fun activities (as in the case of the Halloween pumpkins).