Pressing flowers is one of the best ways to make sure you preserve their beauty for a longer period of time, and also get to use them for all sorts of cool projects and DIYs. Not to mention the fact that children can be really interested in working with pressed flowers and engaging in all sorts of fun and crafty activities, where they can put their creativity to good use. Today, we’re going to provide you with 4 kids garden projects that involve pressed flowers and that you can do together with your children.
What to Do with Pressed Flowers: 4 Children Garden Projects
1. Pressed Flowers Bookmarks
Especially if your children love to read, they’re definitely going to enjoy making their own bookmarks using pressed flowers and leaves. While you might think this DIY is difficult to accomplish, the truth is that it doesn’t require a lot of materials or effort, just some creativity and inspiration. What you’re going to need for this DIY is different types of pressed flowers and/or leaves, some cardstock, a pair of scissors, some clear contact paper, glue, a single hole punch, and a ball of yarn or string.
Now that you’ve collected all the materials, it’s time to cut the cardstock according to how large you want your bookmark to be. If you want, you can model it after some other bookmark that you have at home. The cardstock can be a traditional light brown one, or it can be of different colors, depending on your children’s preference. Still, we advise you to go with the light brown one. That way, the pressed flowers will truly be the center of attention.
Then, on to the fun part of this DIY, which is arranging the pressed flowers on the cardstock. After you’ve decided on a design, use the glue to carefully attach the flowers to the cardstock. Then, take the clear contact paper and cover them, so that using the bookmark won’t damage the design.
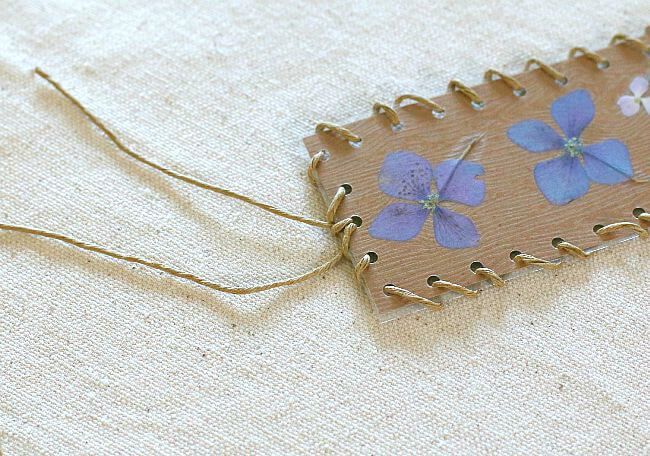
The last step of this DIY also involves creativity. That’s because it’s time to put the finishing touches on your pressed flowers bookmarks. An idea would be to design the bookmarks as in the image below. Here, you have to use the hole punch to create holes all around the edges of the bookmark. Then, you can simply put a string of yarn through them. If you want your bookmark to be more visible when you use it, tie the string at the top, leaving a couple of inches of string hanging loose.
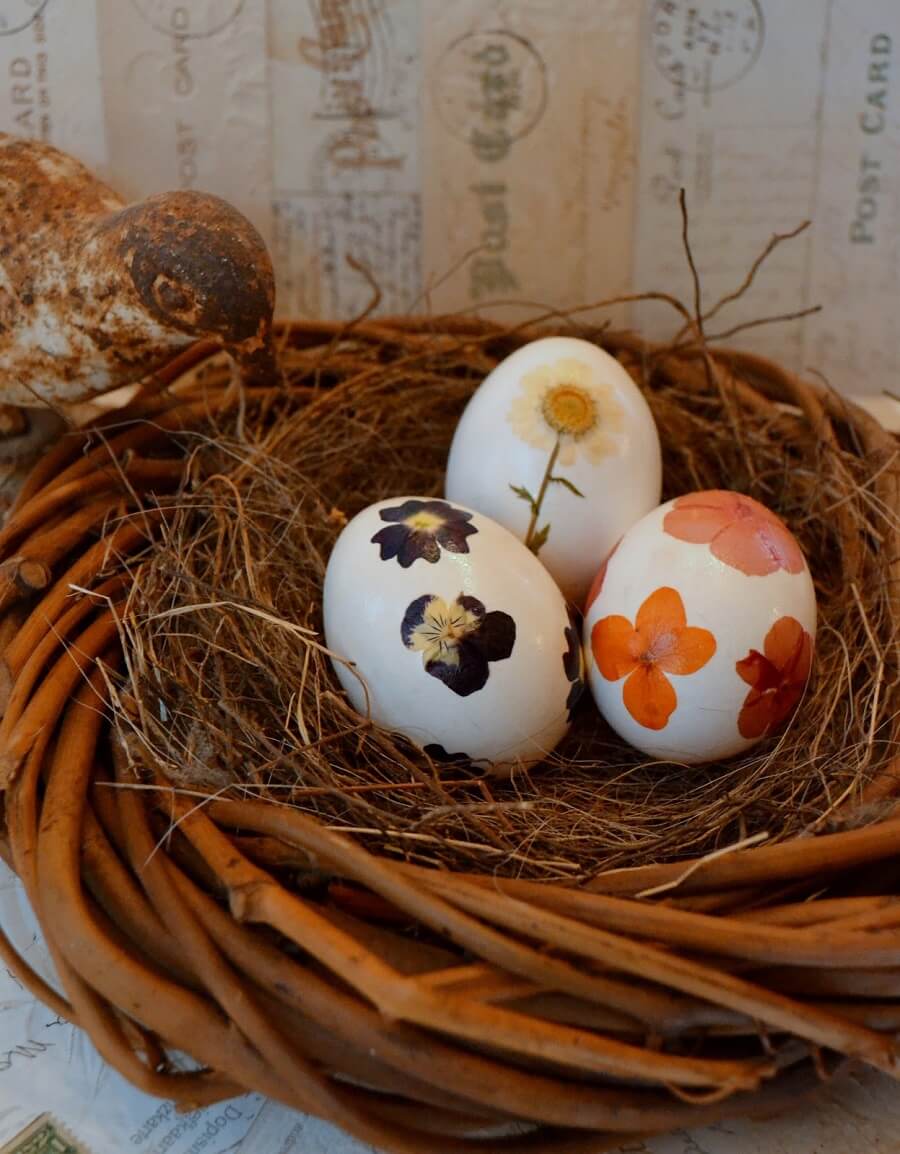
2. Pressed Flowers Easter Eggs
Since Easter is fast approaching, we thought we would also include a pressed flowers DIY that you can do before this holiday. That is not to say that you can’t do it any other time of the year as well. Only that you can’t deny it’s perfect for Easter. The great thing about it is that you don’t need a lot of materials. Just get some hard boiled eggs, different pressed flowers, some Mod Podge, and a paintbrush.
This DIY works best if the flowers are thin. So we recommend paying attention to their thickness when you press them. The thinner they are, the easier they are to stick to the eggs. Pansies are perfect for this DIY, as well as violas, forget me nots, or hydrangeas. At the same time, daisies might not work out, since they have a thick center.
The first thing you have to do is boil the eggs. You can also blow them if you want to keep them for a longer period of time, not just use them at Easter. For egg blowing, you can purchase a tool that will help you drill a hole in the egg in no time. Then, use the brush to collect some Mod Podge and place it on the egg, exactly where you want your flower to be. With the help of the same brush, pick up the flower and gently place it on top of the Mod Podge. Then, cover it with more Mod Podge and make sure that there aren’t any air pockets underneath it.
That’s it, this is everything you have to do. Repeat the same steps with the rest of the flowers, and you’ve got yourself some gorgeous looking decorative eggs.
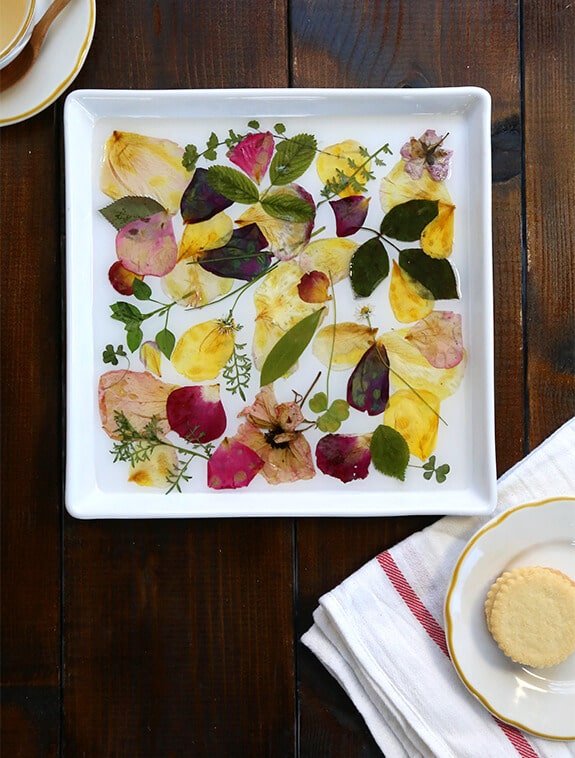
3. Pressed Flowers Tray
Yet another creative and interesting DIY involving pressed flowers, this one is also moderately easy to accomplish. Moreover, it can be a fun experience for the entire family. What you’re going to need is a white tray, different pressed flower petals, craft glue, some epoxy resin, and a paper cup with a stirring stick.
After you’ve decided on the flowers you want to use, you’ll have to arrange them on the tray and create a design that you really love. Then, take the craft glue and glue them individually. Make sure that you don’t use a lot of glue because the epoxy resin you’re going to cover them with might cause the glue to show. The epoxy comes with its own instructions of how to mix it. You can simply follow those and mix the two substances in the paper cup, using the stirring stick.
When the mix is homogeneous, pour it in the tray over the pressed flowers. Then, use the same stirring stick to smooth it around. Just make sure not to pour too much of it. You don’t want a thick layer of epoxy resin covering your flowers. The layer should be extremely thin, just enough to barely cover the flowers. If there are any bubbles on the surface of the resin, simply wait for 5 minutes and then blow on them. You’ll notice that they pop in no time.
You should give the tray a couple of days to dry, just to make sure everything is entirely sealed. If you can see any pieces of flowers sticking out, this means you’re going to have to apply another epoxy coat. If you’re worried that the epoxy might be toxic, you can put your worries aside. Once it’s dry, the epoxy is perfectly safe for you to place your tea or breakfast on it. Plus, it looks really amazing with all those pressed flowers underneath it.
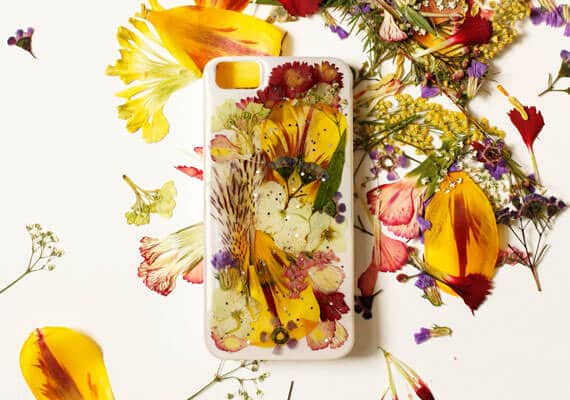
4. Pressed Flowers Phone Case
Especially if your child is older and owns a phone, making your own unique pressed flowers cases is a great idea of an activity that can be a lot of fun for both of you. For this DIY, you’re going to need the following materials: pressed flowers, solid white phone cases, clear craft glue, a clear plastic cup, a craft stick made of wood, epoxy resin, some nail polish remover that contains acetone, a couple of q-tips, and glitter (if you want to).
Once you’ve collected all these materials, it’s time to arrange the pressed flowers on the case. Experiment with different designs until you find the one you like best. You can use just a couple of flowers or a lot of them, as long as the layer doesn’t get too thick. Since you’ll be using resin to cover it, the layer should be rather thin. After taking a picture of the arrangement, remove the flowers from the case. Then, start sticking them on the case individually, all the while looking at the picture.
Next, it’s time to mix the resin according to the instructions on the packaging. If you’re planning on using glitter, also add the glitter into the mix now. Then, start by pouring just a little bit of resin onto the case. Use the craft stick to spread it around. Remember that you shouldn’t go over the edges, but just cover the back of the case. Again, blowing on the bubbles will help them go away.
In a couple of hours, your case should be completely dry. If you want to be entirely sure of the success of your DIY, you can allow it to dry until the next day. The nail polish remover and the q-tips are perfect in case you notice any resin going over the edges. If the first coat of resin hasn’t completely covered the pressed flowers, you’re going to have to repeat the activity and add a second coat. If no flowers are sticking out, the DIY is complete. You and your child just made two lovely pressed flowers phone cases.
Summing It All Up
No matter how old your child is, he or she is probably going to enjoy some fun and crafty activities involving pressed flowers. Pressing flowers in itself can be entertaining, not to mention useful in getting children more interested in plants, gardening, and spending time outside. If you couple that with a few simple DIYs that result in truly gorgeous and fully functional objects, the excitement will only increase. We hope you liked at least one of the DIYs we presented you with today. If you did, ask your child to join you in gathering different types of flowers, pressing them, and trying out some of the cool ideas in today’s guide.